If you have already connected a payment system, see this article: How to create a button for accepting payments.
To connect payment services:
Open your Bot.
Select the Settings section.
Open the Payment systems tab.
You can connect Telegram's internal currency, Telegram Stars:
This payment method does not require any additional setup in @botfather. To activate it, just check the boxes next to the sections you need in the payment systems settings:
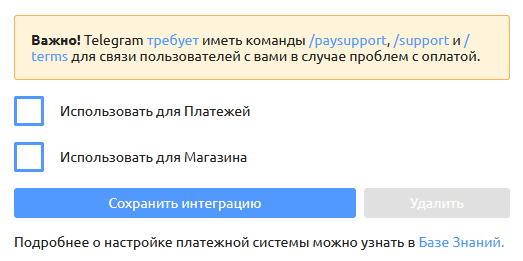
Important! The rules, restrictions and other details about Telegram Stars are available on the Telegram blog.
This article will be updated once Telegram provides more complete information about withdrawing and using Stars.
Important! Telegram requires your bot to have the
/paysupport,/supportand/termscommands so that users can contact you if they have payment problems.
Other available payment methods:
For individuals (payment through the built-in browser):
YooMoney (Yandex.Money) (RUB) — https://yoomoney.ru/
Qiwi (RUB) — https://qiwi.com/
Enot (RUB) — https://enot.io/
RuKassa (RUB, USD) — https://ruks.pro
Cryptocurrency:
Wallet Pay (TON, BTC, USDT) — https://pay.wallet.tg/
CryptoBot (TON, BTC, USDT, BNB, BUSD, USDC) — https://t.me/CryptoBot
Minter (BIP) — https://minter.network/
For legal entities:
Payment inside Telegram:
YooKassa (TG) (RUB) — https://yookassa.ru/
Sberbank (RUB, EUR, USD) — https://www.sberbank.ru/
Tranzzo (Interkassa) (RUB, EUR, USD, CHF, CZK, GBP, GEL, KZT, NOK, PLN, SEK, UAH) — https://tranzzo.com/
Stripe (RUB, EUR, USD, CHF, CZK, GBP, GEL, KZT, NOK, PLN, SEK, UAH) — https://stripe.com/
Paycom.Uz / Payme (UZS) — https://business.payme.uz/
CLICK Uzbekistan (UZS) — http://click.uz/
Rave by Flutterwave — https://ravepay.co/
LiqPay — https://www.liqpay.ua/uk/
Smart Glocal — https://smart-glocal.com/
Unlimint — https://www.unlimint.com/
Paykassma — https://paykassma.com/
PSB (RUB) — https://www.psbank.ru/
Bank 131 (RUB) — https://www.131.ru/
LeoGaming (RUB) — https://leogaming.net/
Cascad (RUB) — https://cascad.com/
Paymega — https://paymega.io/
Portmone
Global Pay UZ — https://global.uz/
iPay88 — https://www.ipay88.com/
ECOMMPAY (RUB) — https://ecommpay.com/
PayMaster (RUB) — https://info.paymaster.ru/
Payment through the built-in browser:
Robokassa (RUB, USD, EUR, KZT) — https://robokassa.com/
YooKassa (RUB) — https://yookassa.ru/
CloudPayments (RUB) — https://cloudpayments.ru/
Tinkoff Kassa (RUB) — https://www.tinkoff.ru/kassa/
Prodamus (RUB, USD, EUR, KZT) — https://prodamus.ru
PaymentNut (RUB, USD, EUR, KZT) — https://paymentnut.ru/
Payselection (RUB) — https://payselection.com/
Payment in a mini app. Users do not have to leave the chat with the bot to pay — all payment systems that used to redirect to the browser now open in a mini app.
You can enable this feature separately for each payment system.
Important! If you are not registered as a legal entity (sole proprietor, LLC and so on), these options are for you: YooMoney (Yandex.Money), Qiwi, Enot and RuKassa.
For legal entities
Payment inside Telegram:
Let's go through the setup of YooKassa (TG), Sberbank, Tranzzo (Interkassa), Stripe, Paycom.Uz / Payme, CLICK Uzbekistan, Rave by Flutterwave, LiqPay, Smart Glocal, Unlimint, Paykassma, PSB, Bank 131, LeoGaming, Cascad, Paymega, Portmone, Global Pay UZ, iPay88, ECOMMPAY and PayMaster.
Learn more about connecting the Tranzzo payment system: Connecting the Tranzzo (Interkassa) payment system.
Get a token from a payment system that supports the currency you need.
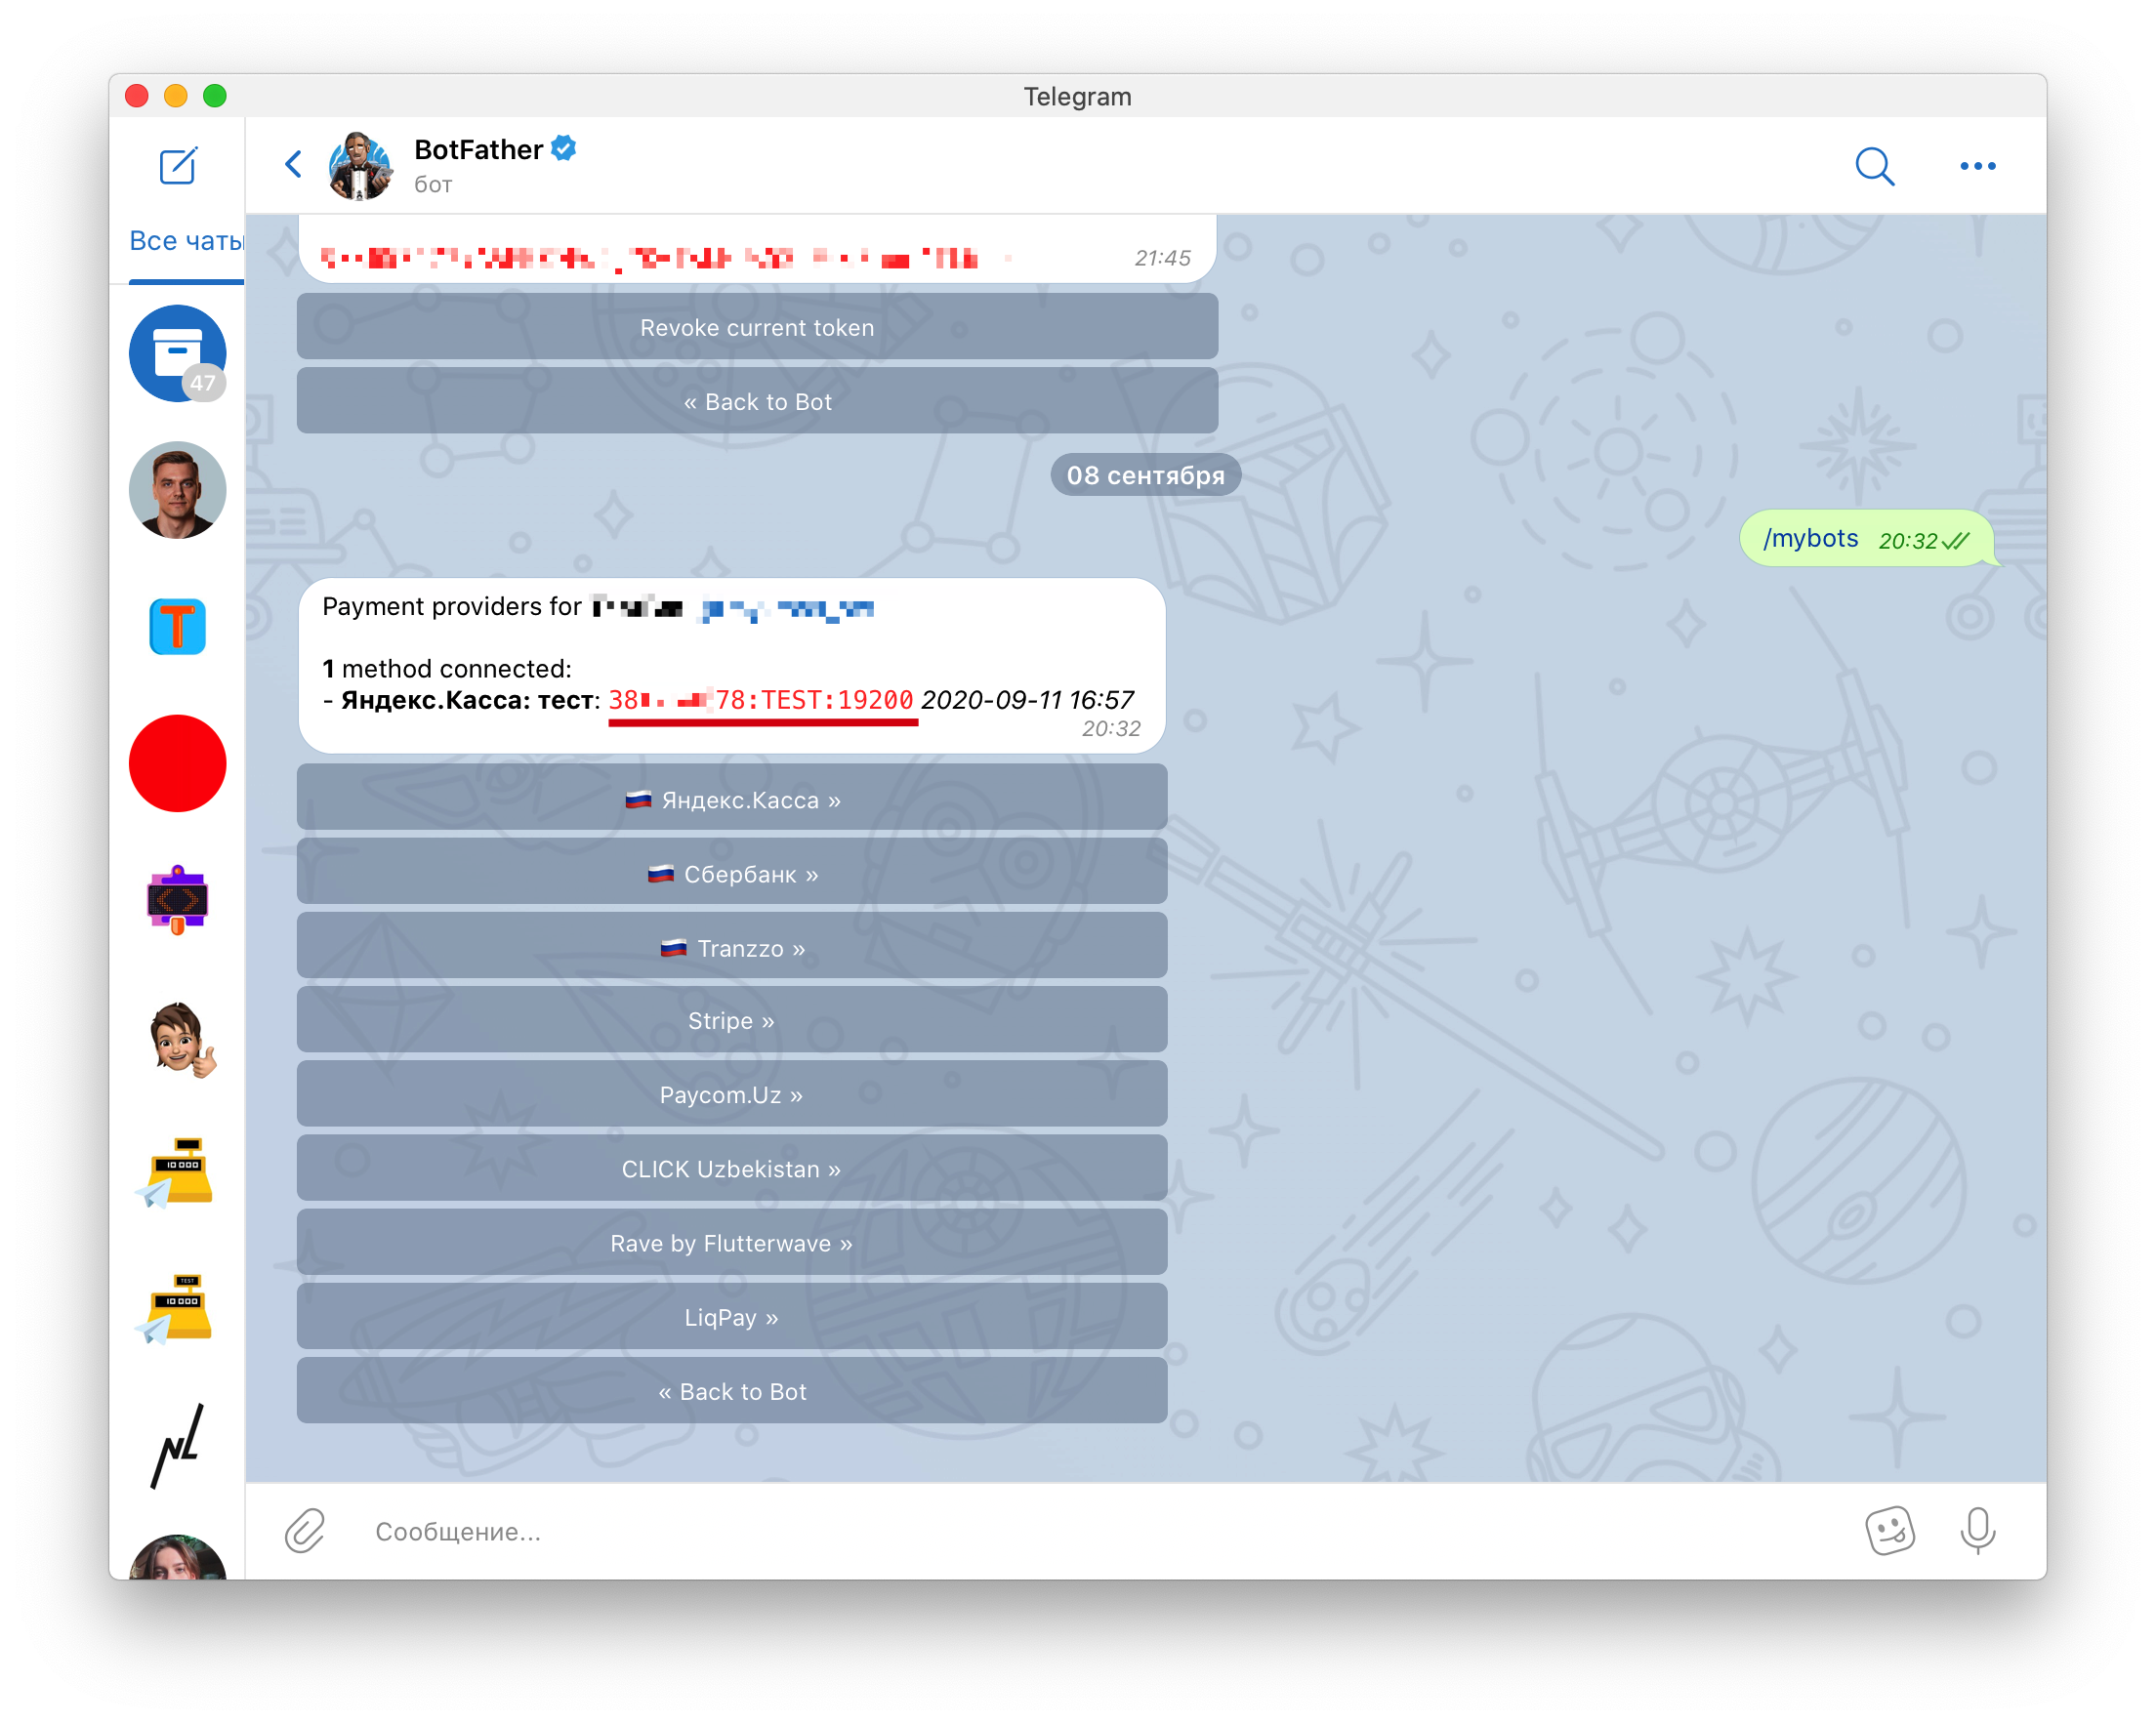
Once you have the token, connect it in Telegram through @BotFather: send the /mybots command, select the bot you need and tap the Payments button.
Select the payment system you need from the list and follow the bot's instructions.
Copy the token and paste it in your puzzlebot account: on the bot page, open the Settings tab, Payment systems section.
Payment through the built-in browser:
Let's go through the setup of YooKassa, Robokassa, CloudPayments, Tinkoff Kassa and Prodamus.
YooKassa
Go to https://yookassa.ru, sign up and complete the organization verification process.
Click "Add store" → select "No website" → "Telegram bot".
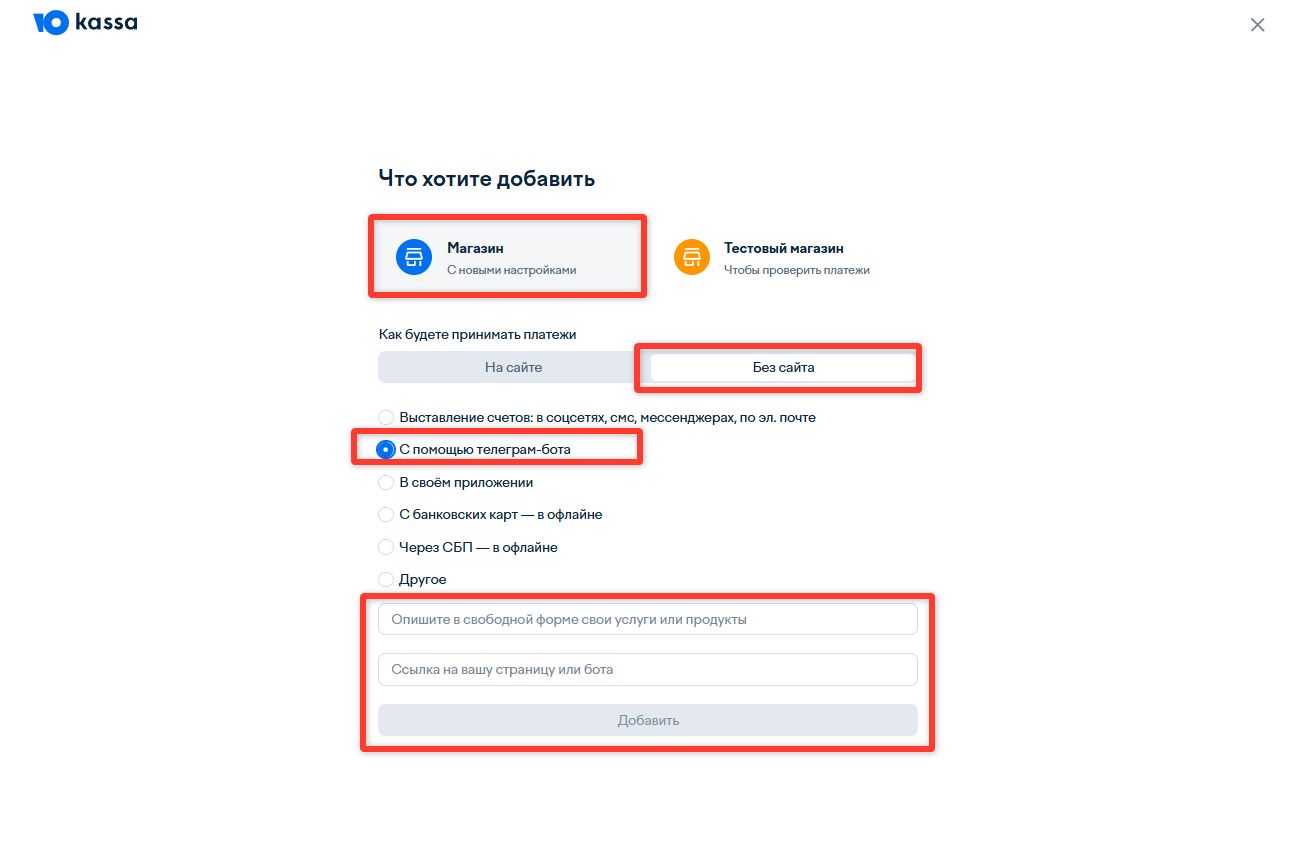
Paste the link to your Telegram bot and describe what you are going to sell.
Follow the next steps and send screenshots of the bot and of the product you sell.
Once your store is reviewed and approved, you will be able to create an API key.
In the Integration → API keys → section, in the "Secret key" block, click Issue key. Also copy the store's shopID.
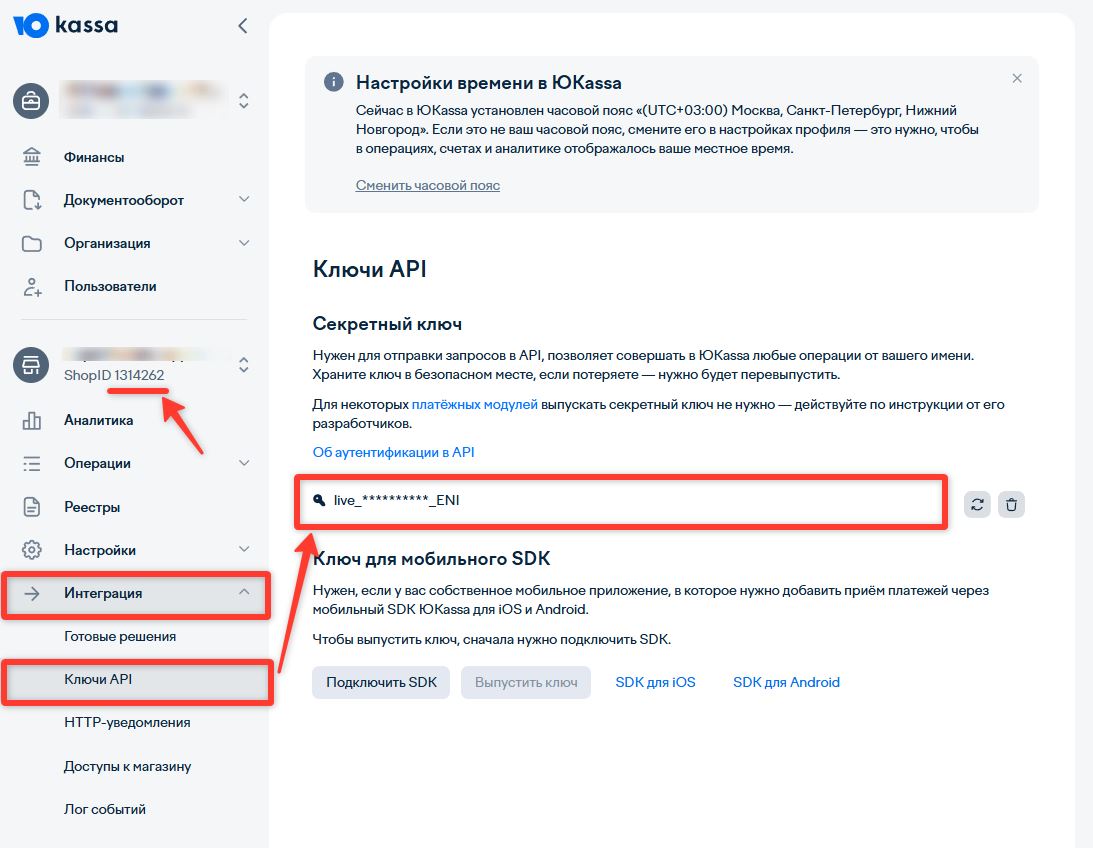
Go to the Settings of your bot in the puzzlebot constructor, select Payment systems → Add → select YooKassa (not to be confused with YooKassa TG, which is connected differently).
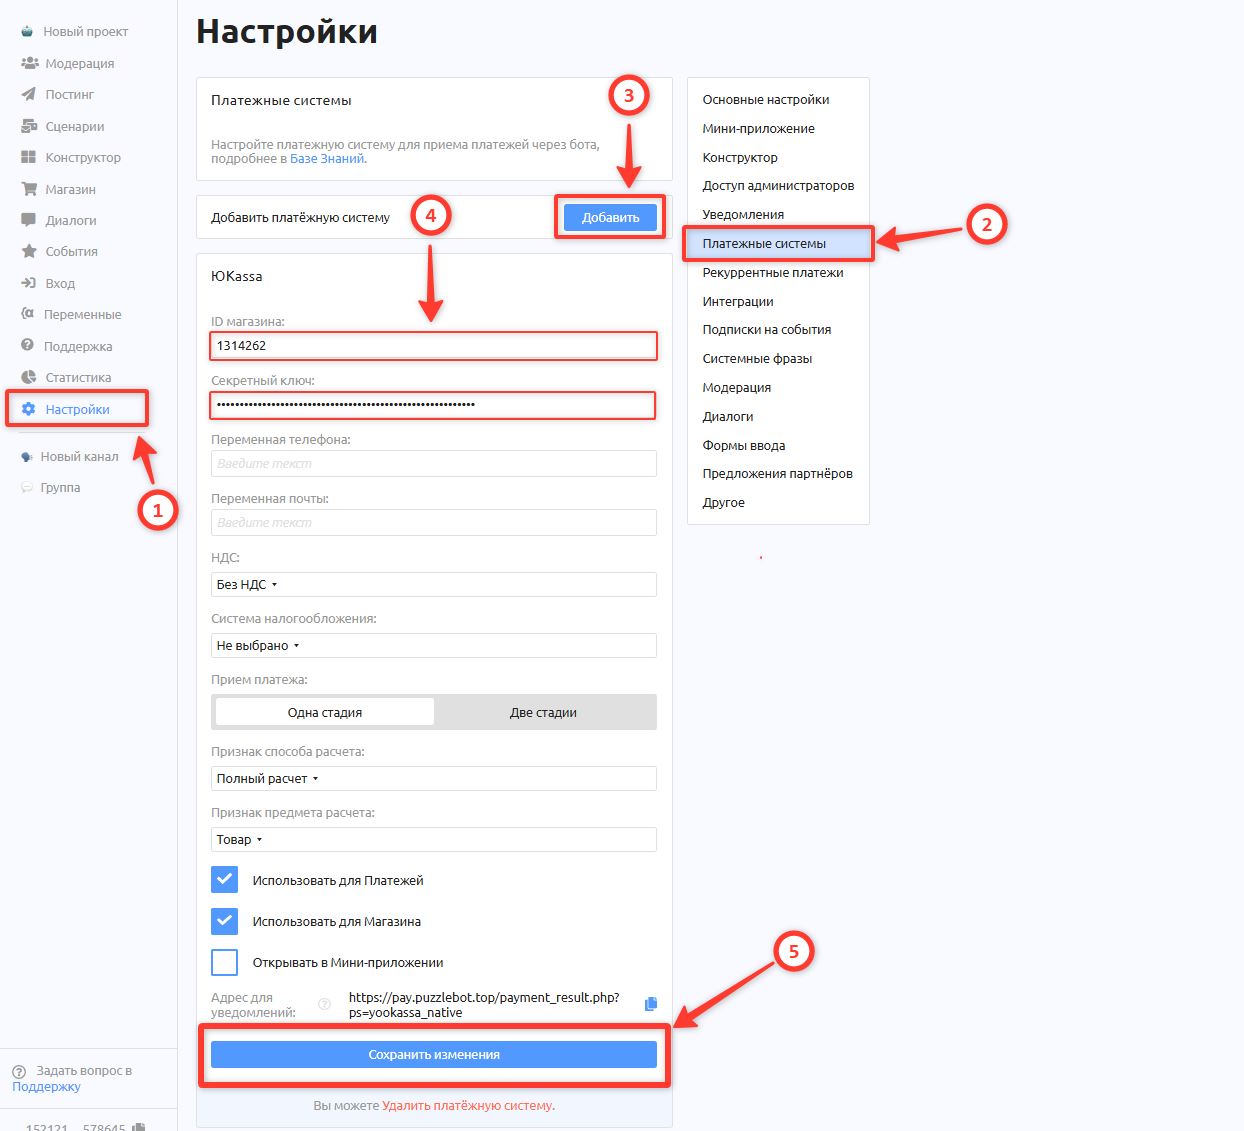
Paste the Store ID — this is the ShopID from YooKassa.
Paste the Secret key — this is the API key you created above.
Select the VAT rate, your tax system and the payment subject attribute.
Specify the email or phone variables if you want YooKassa to send receipts to users.
You create the variables yourself in the Variables section, and you collect the user's contact details with an Input form.Click Save changes.
In YooKassa, go to Integration → HTTP notifications, enter the following notification URL and check all the events:
https://pay.puzzlebot.top/payment_result.php?ps=yookassa_native
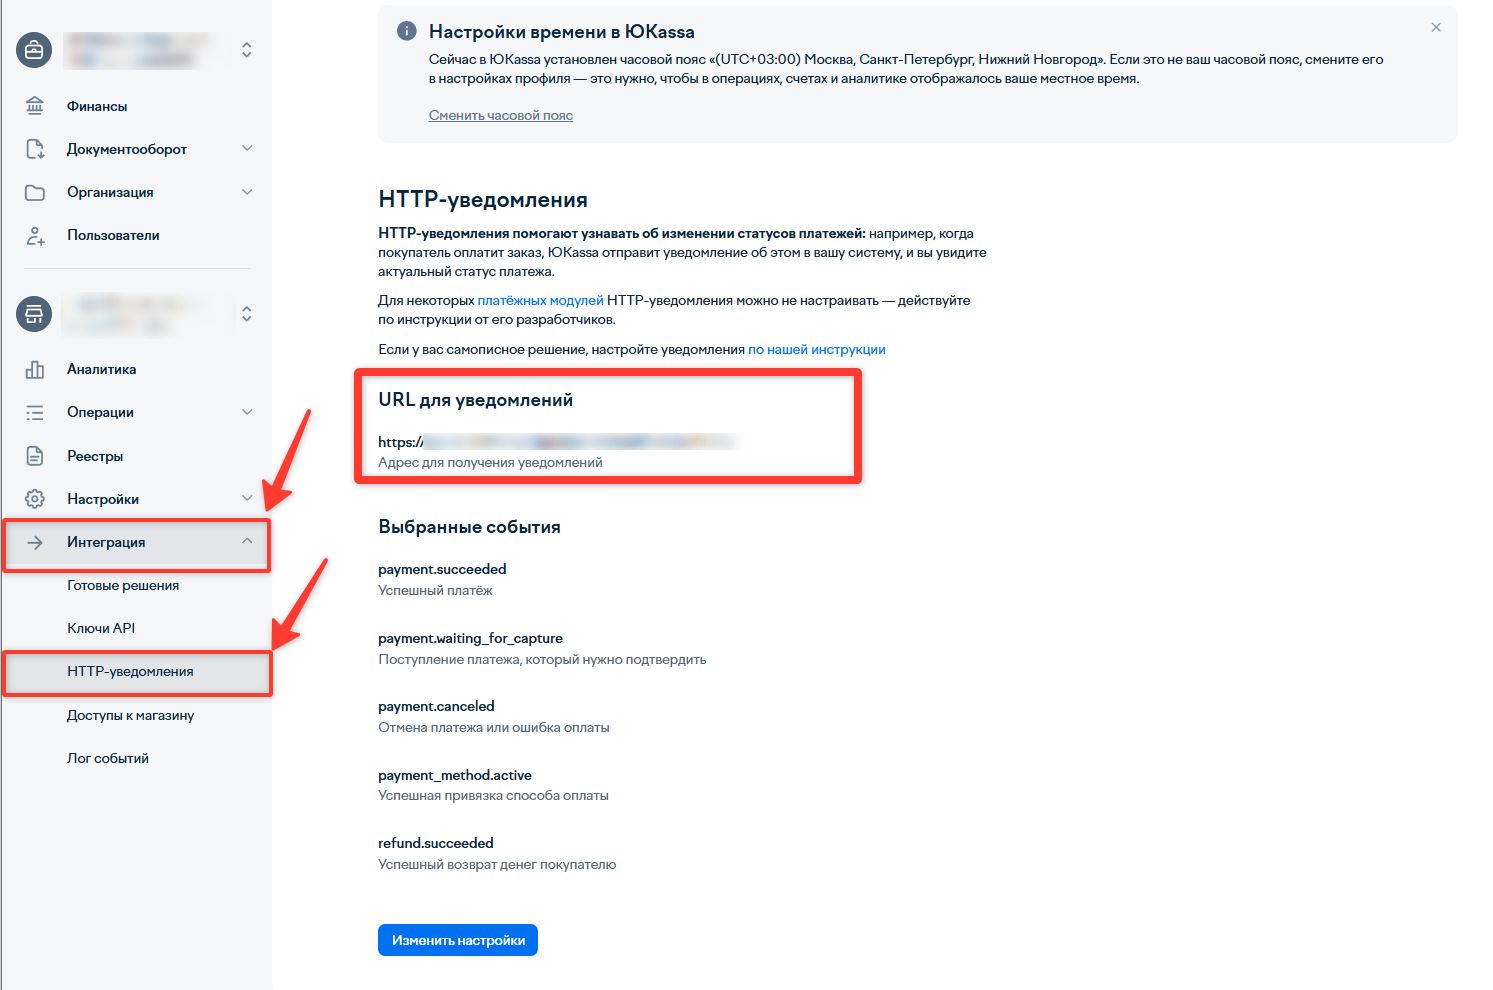
Save the settings. Now you can set up your first payment with a button for accepting payments.
Robokassa
Before connecting, register a store on the payment service website — https://partner.robokassa.ru/
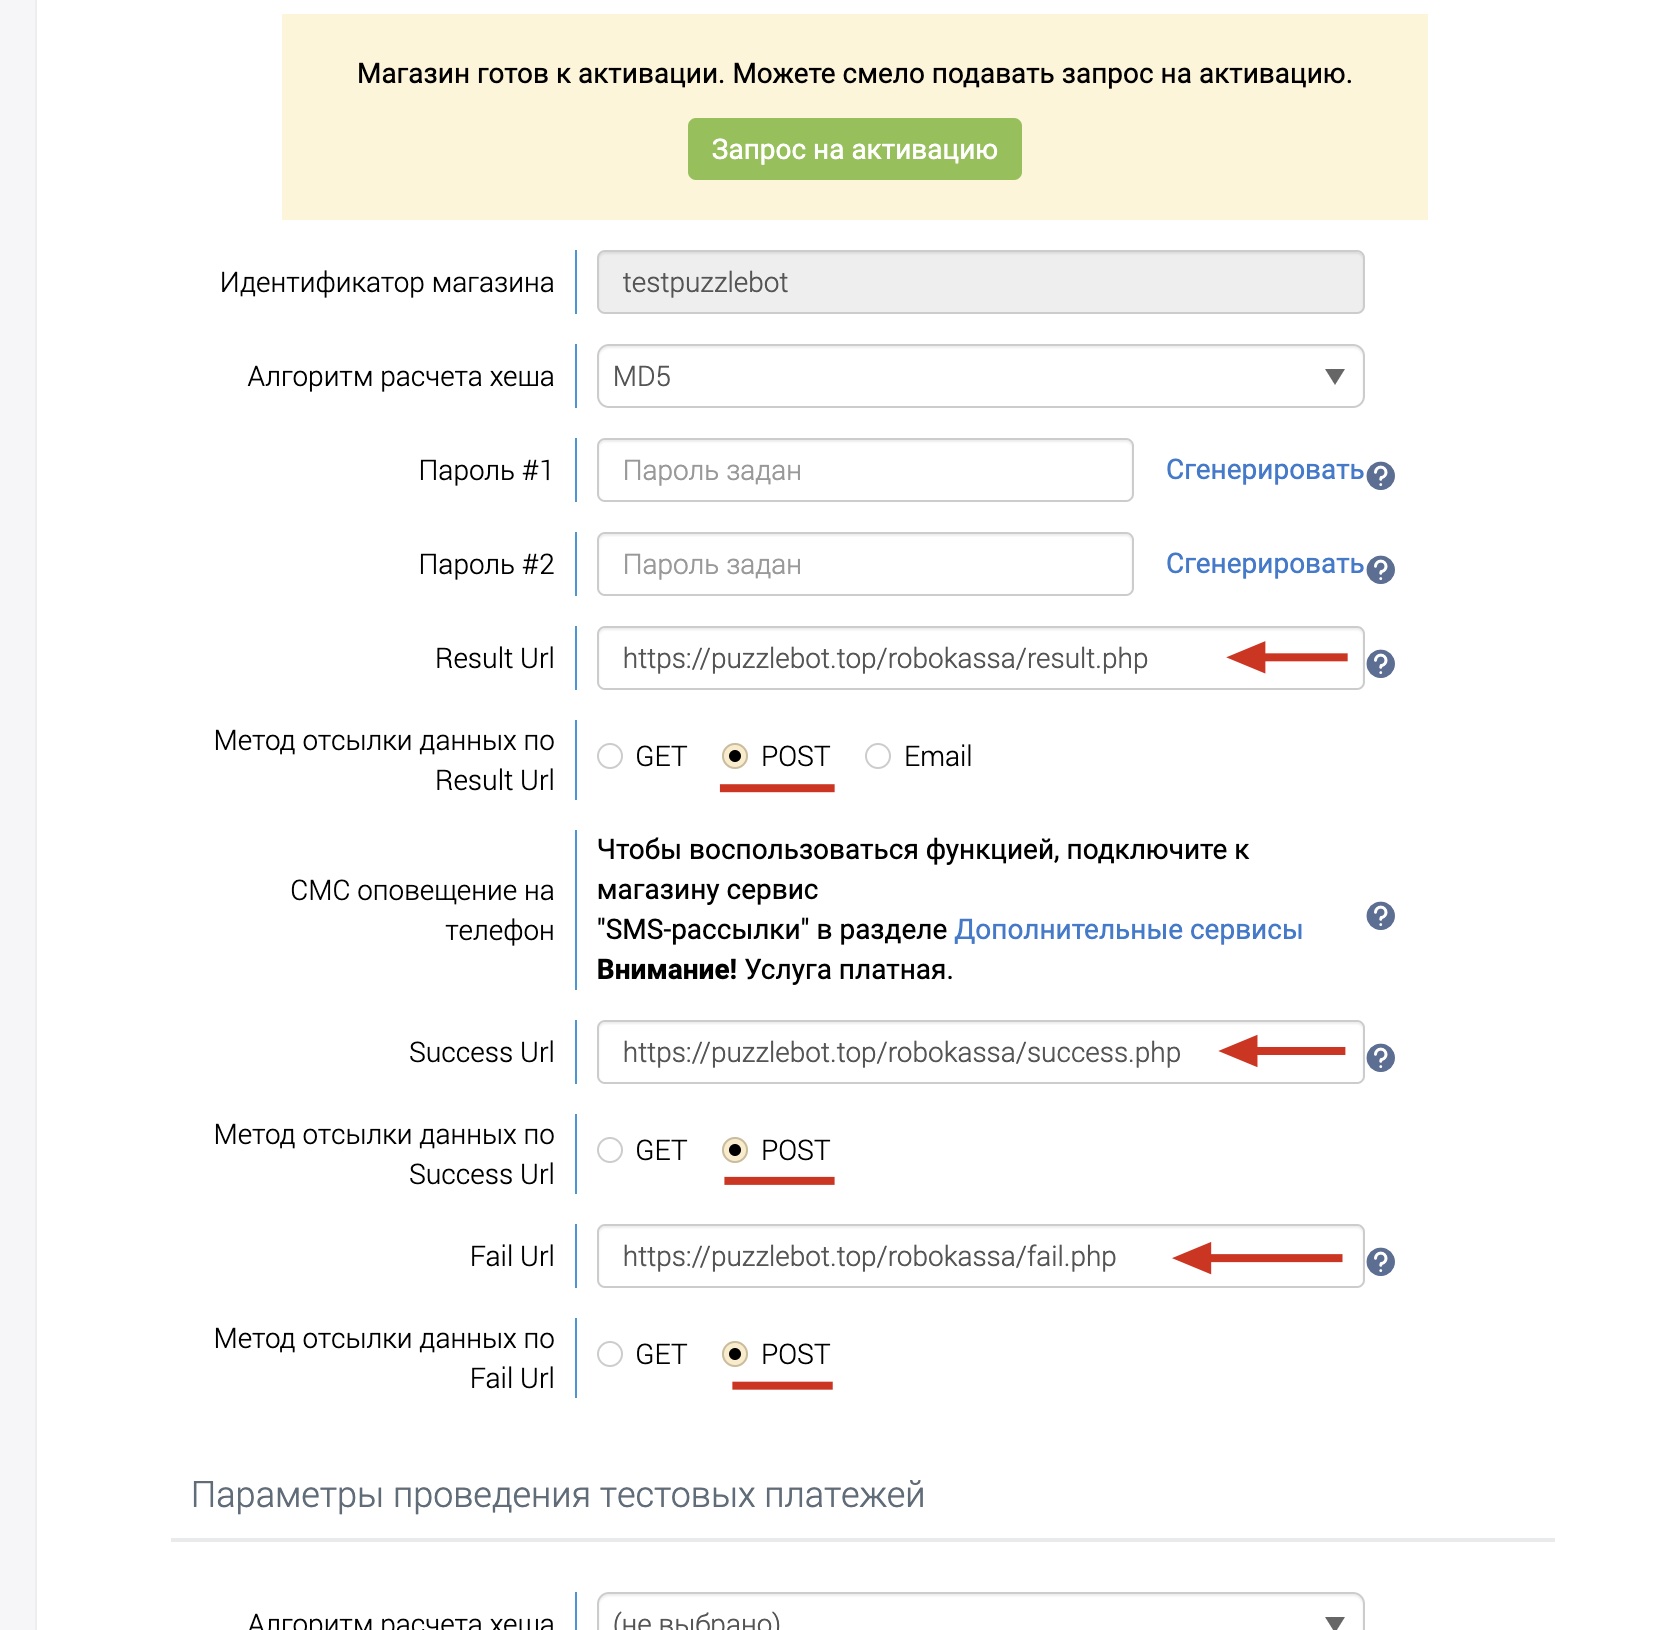
In the store settings, on the "Technical settings" tab:
Add the Result Url:
https://pay.puzzlebot.top/payment_result.php?ps=robokassaChange the method for sending data to the Result Url to POST.
Add the Success Url:
https://puzzlebot.top/robokassa/success.phpChange the method for sending data to the Success Url to POST.
Add the Fail Url:
https://puzzlebot.top/robokassa/fail.phpChange the method for sending data to the Fail Url to POST.
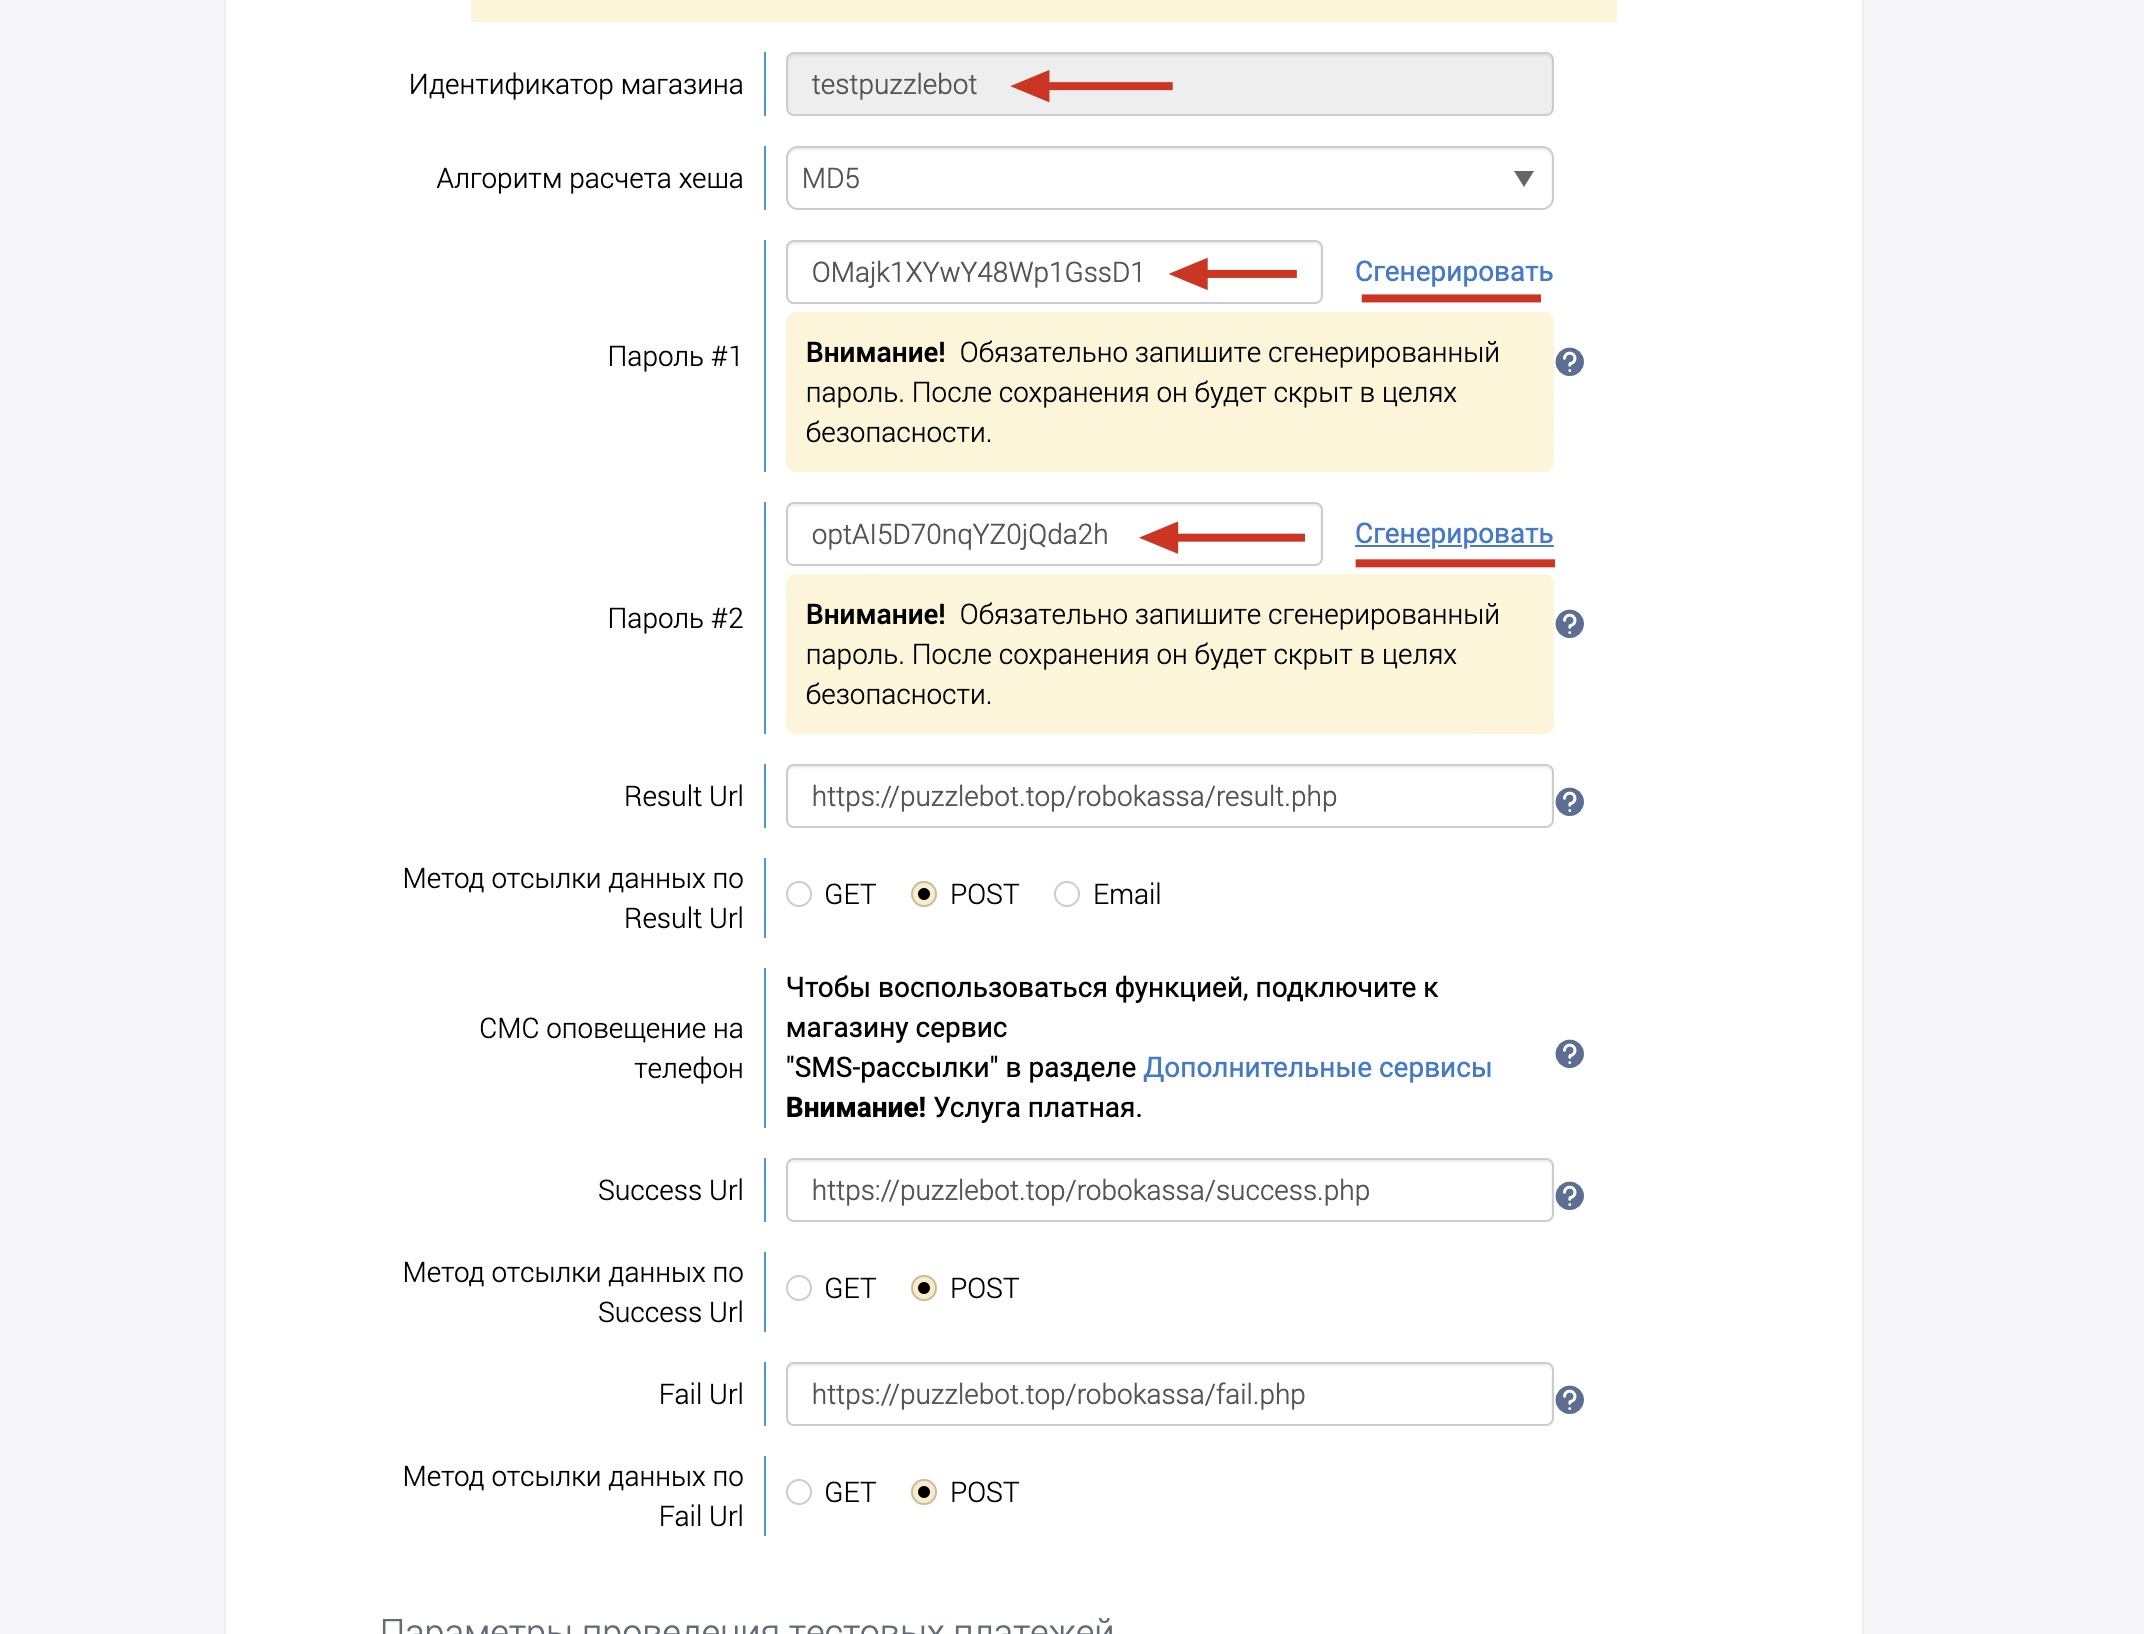
7. Generate Password #1 and Password #2.
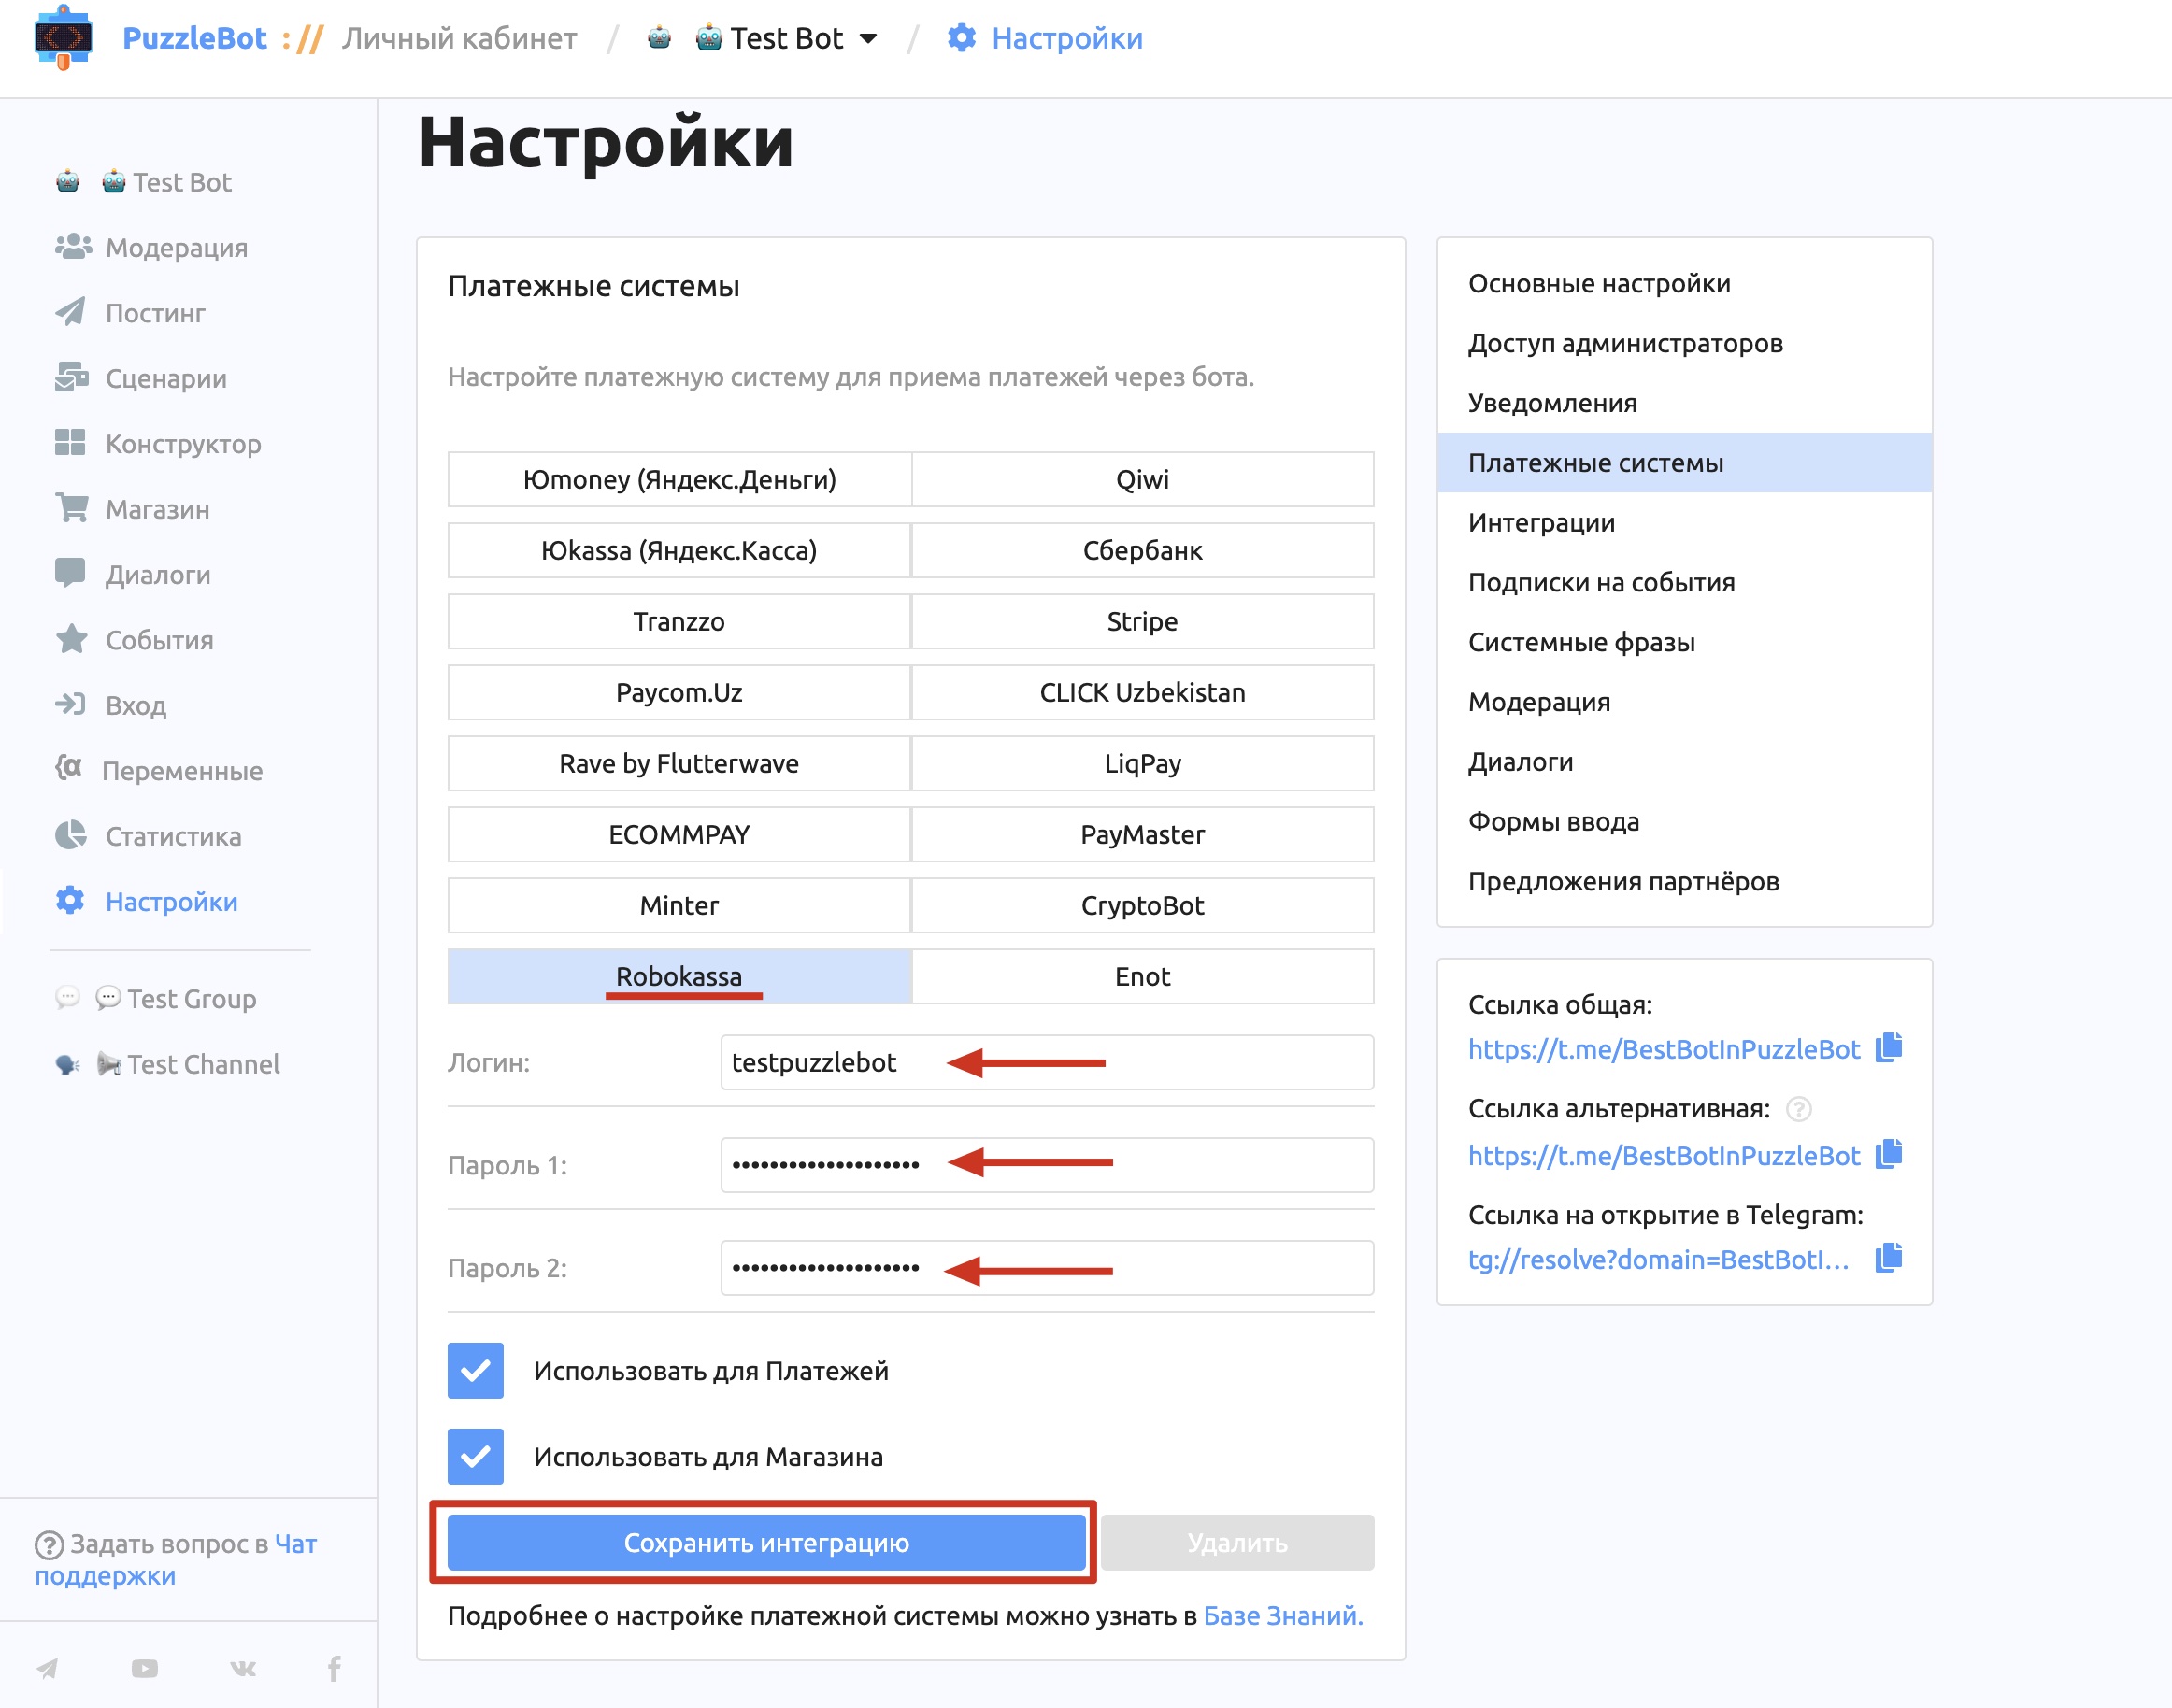
8. Paste the Store identifier into the "Login" field and the passwords into the corresponding fields.
9. Save the integration in puzzlebot and save the data you entered in Robokassa.
Once you have completed all these steps, the Robokassa connection is done.
Cloudpayments
Before connecting, register a store on the payment service website — https://cloudpayments.ru/
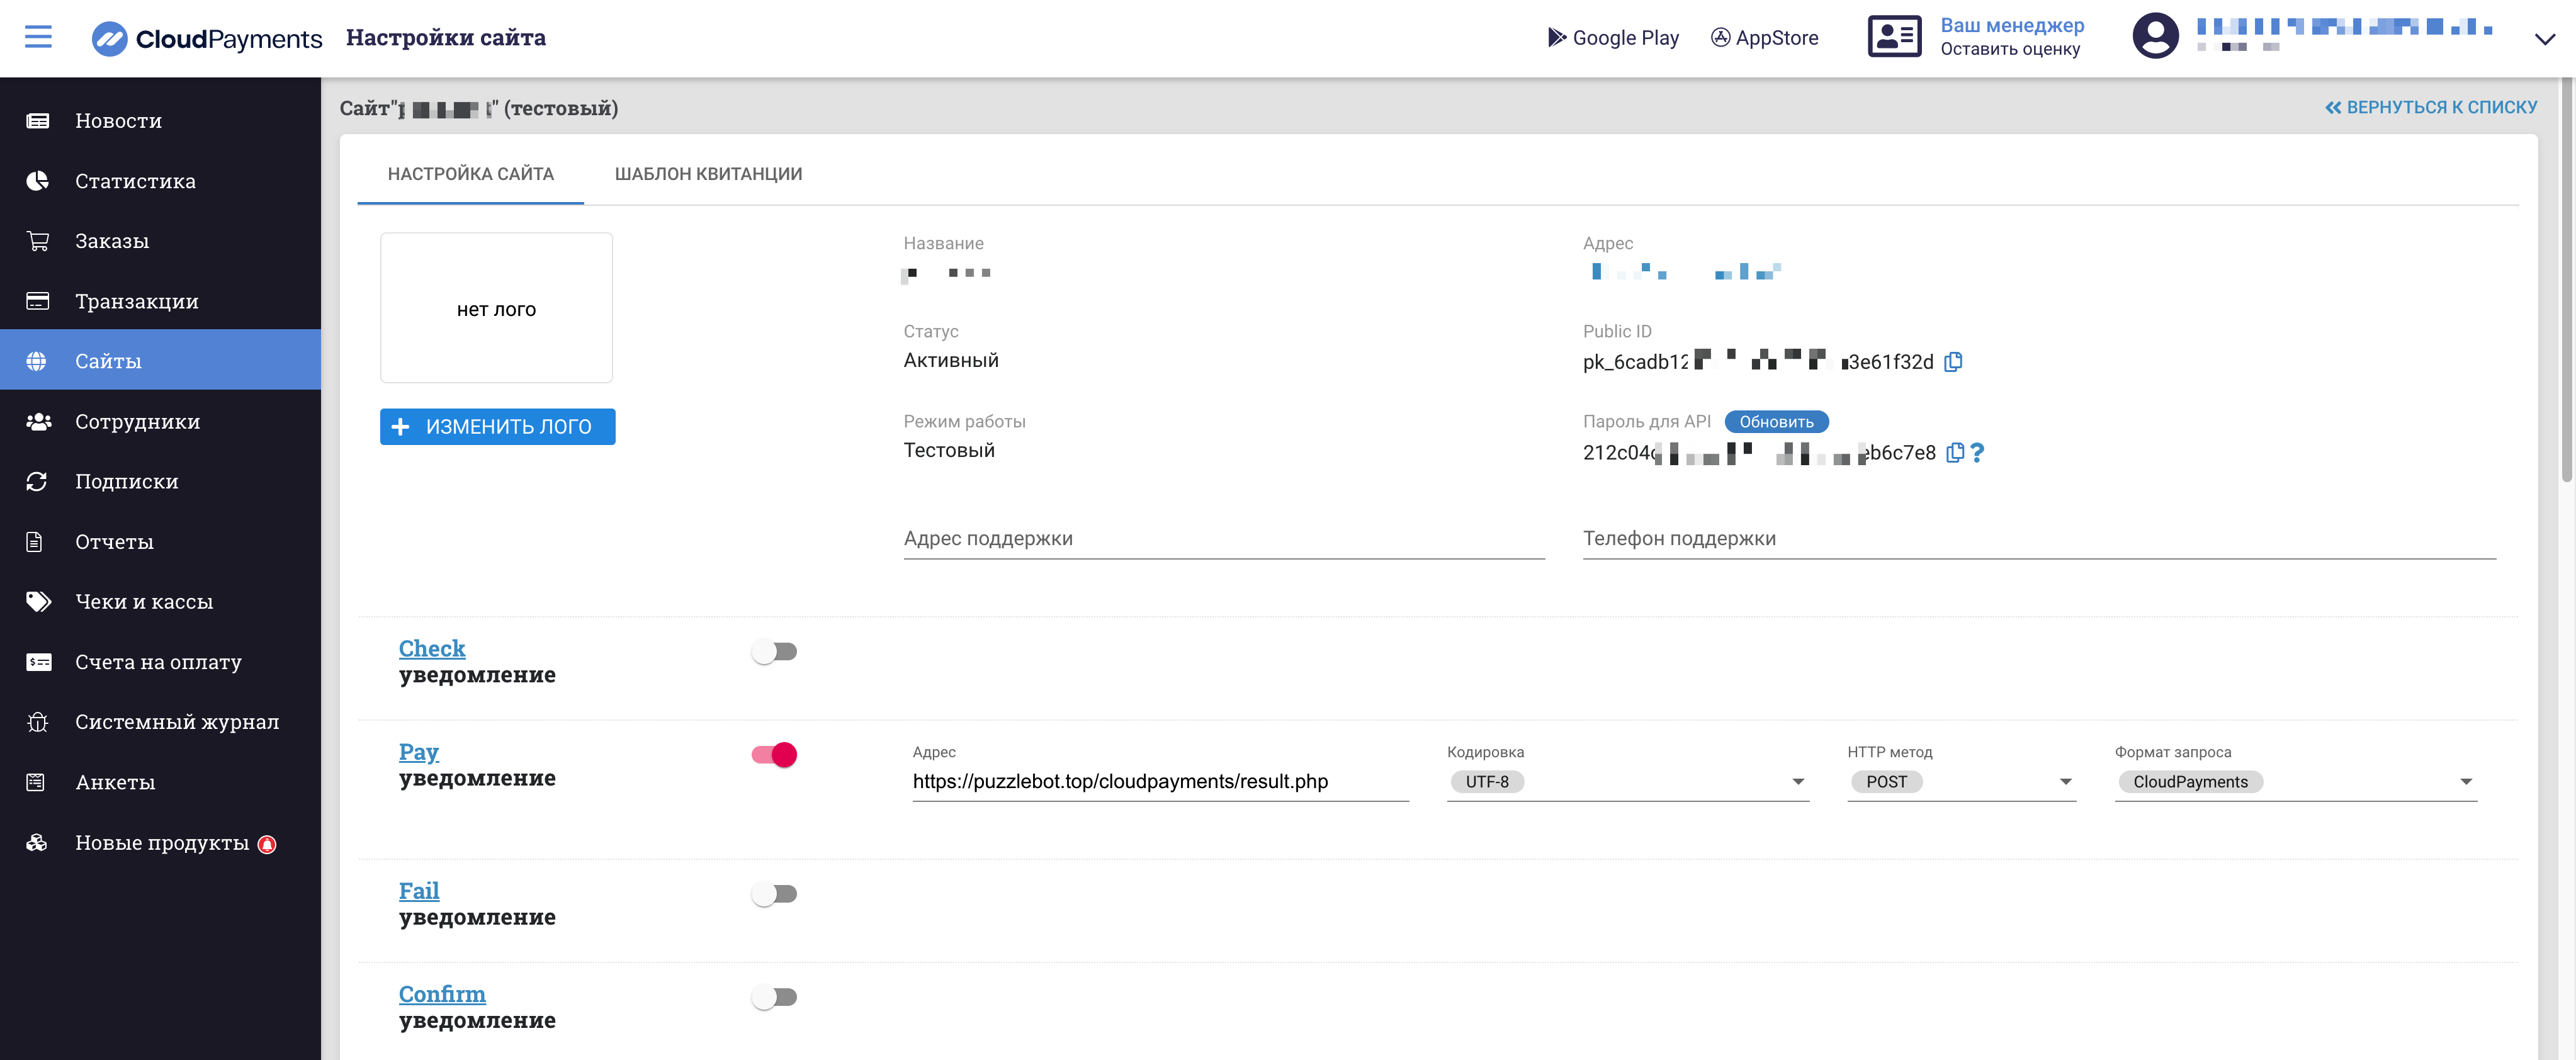
In the store settings, on the "Sites" tab:
Add a site.
Enable the Pay notification and specify:
Address:
https://pay.puzzlebot.top/payment_result.php?ps=cloudpaymentsEncoding: UTF-8
HTTP method: POST
Request format: CloudPayments
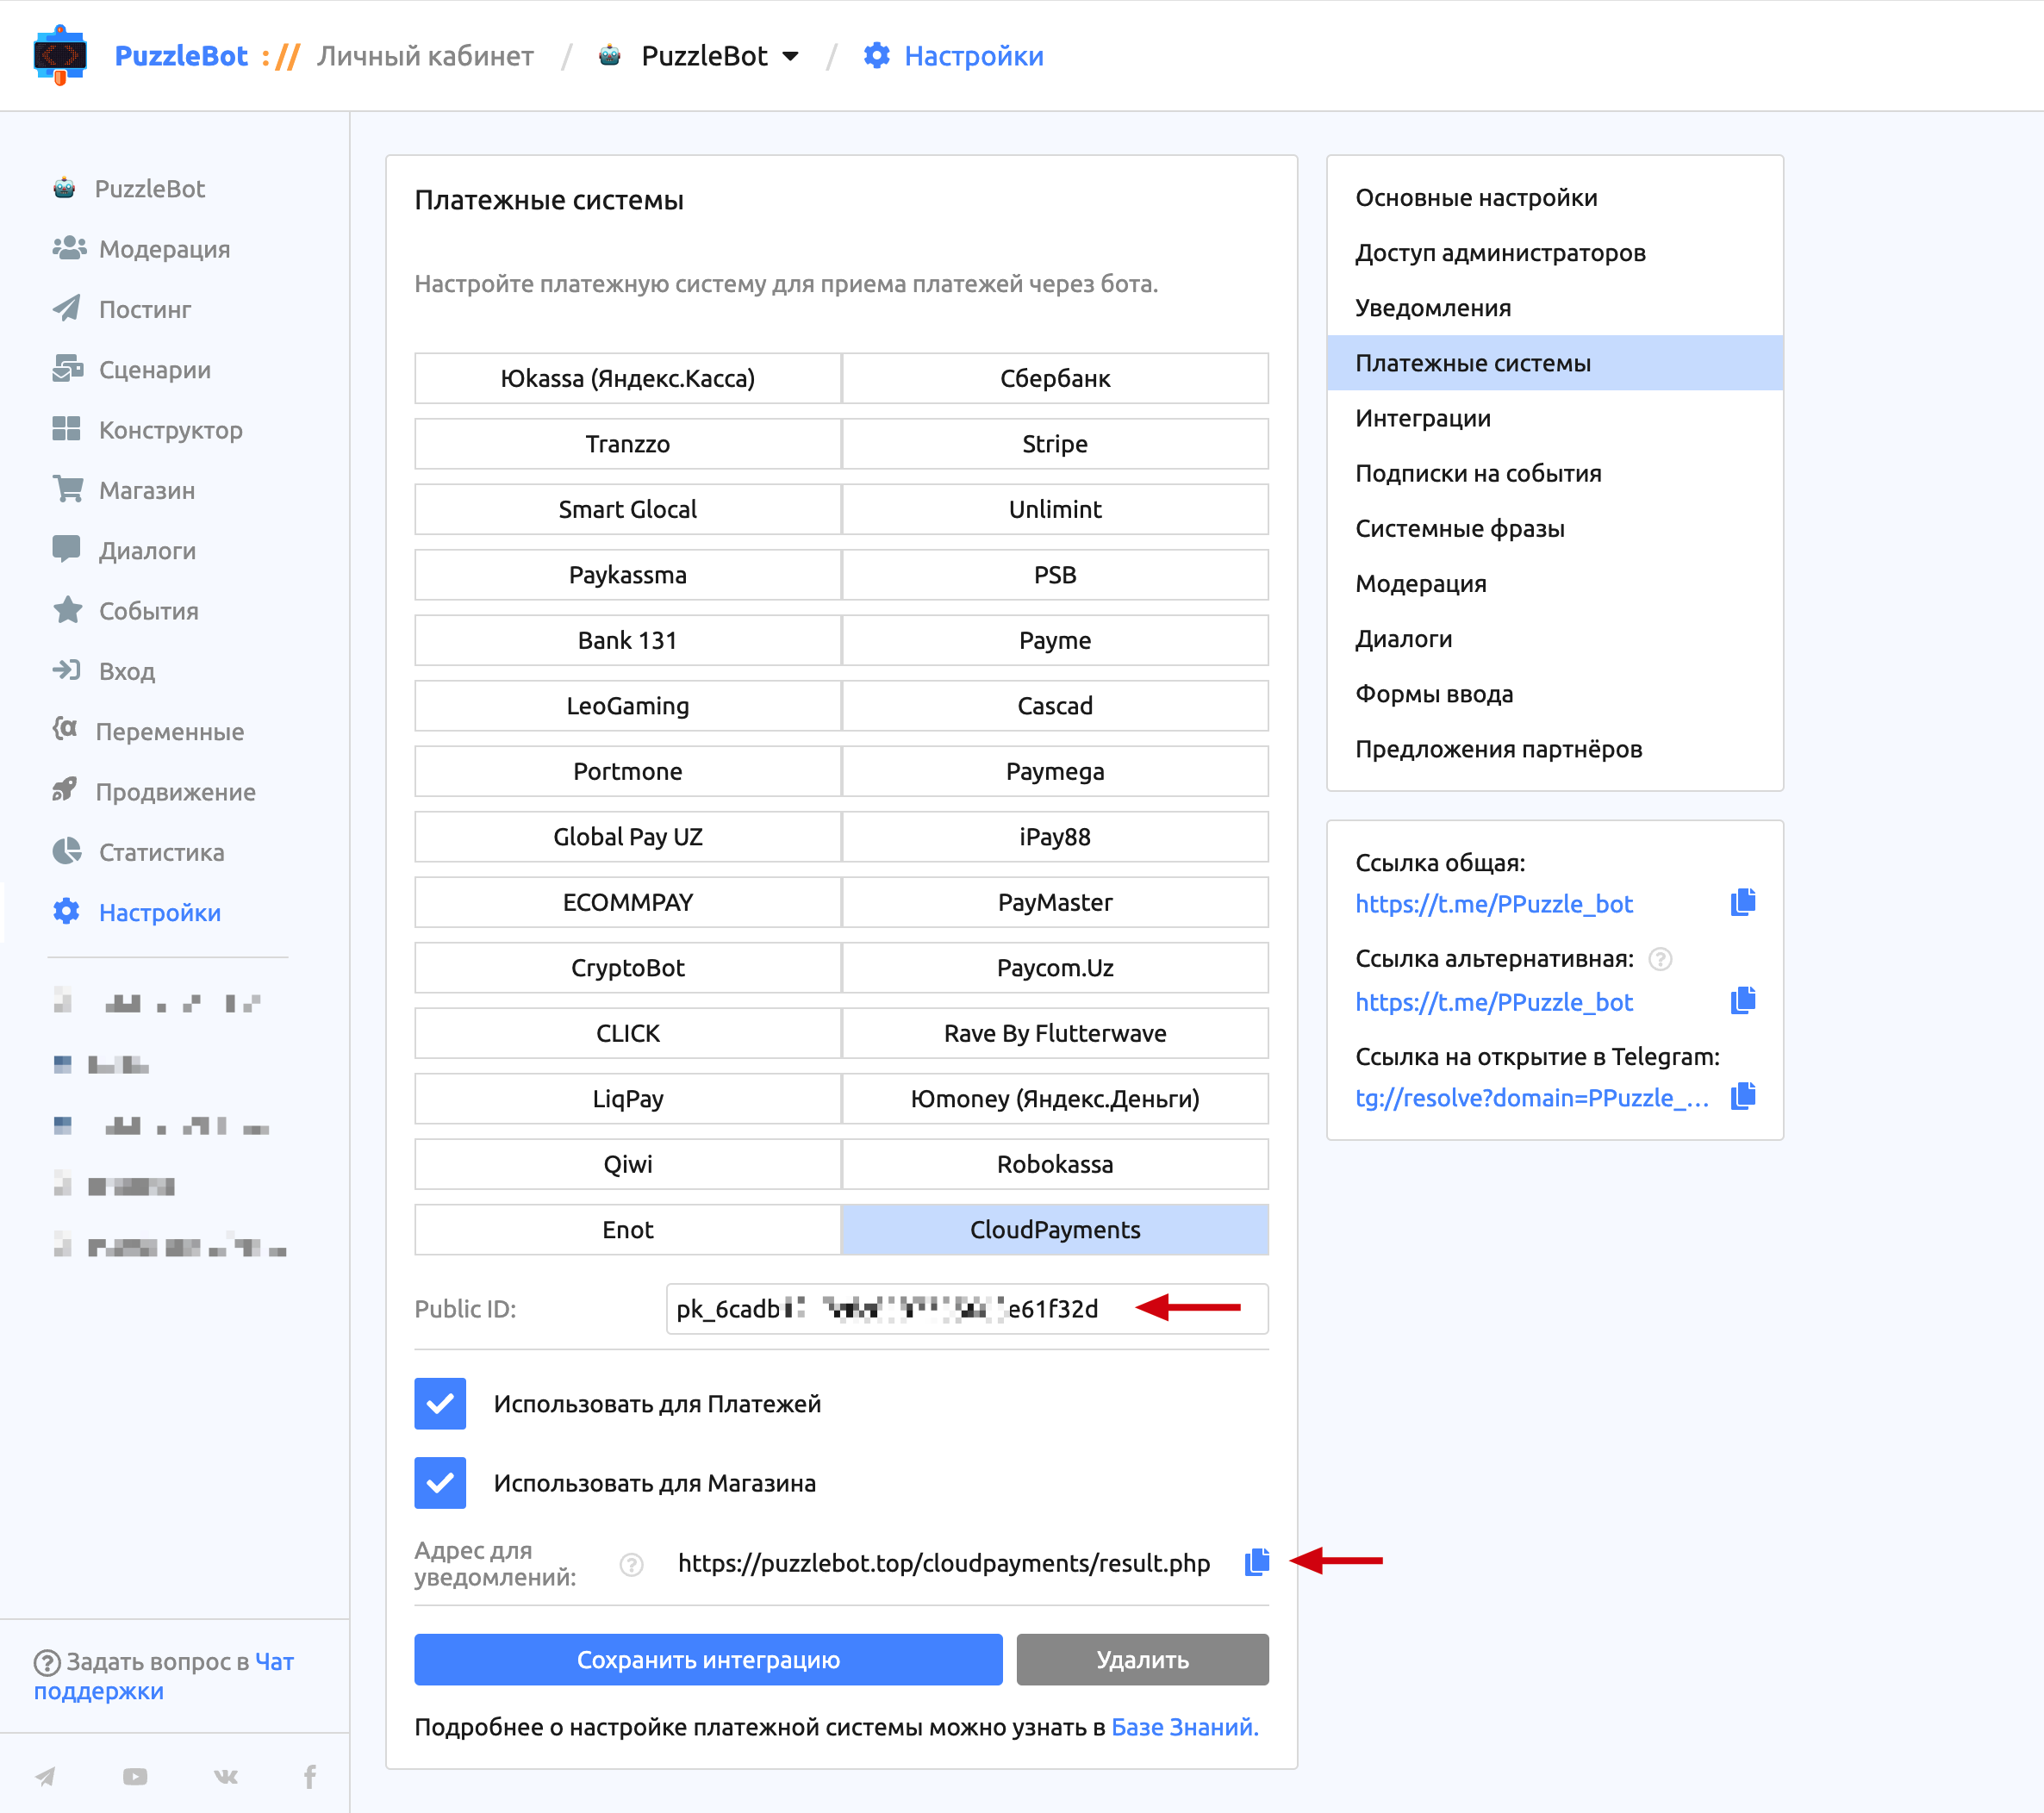
3. Paste the Public ID.
4. Save the integration in puzzlebot and save the data you entered in CloudPayments.
Once you have completed all these steps, the CloudPayments connection is done.
Tinkoff Kassa
To connect Tinkoff internet acquiring, first submit an application and get a terminal identifier and password — https://www.tinkoff.ru/kassa/solution/classic/
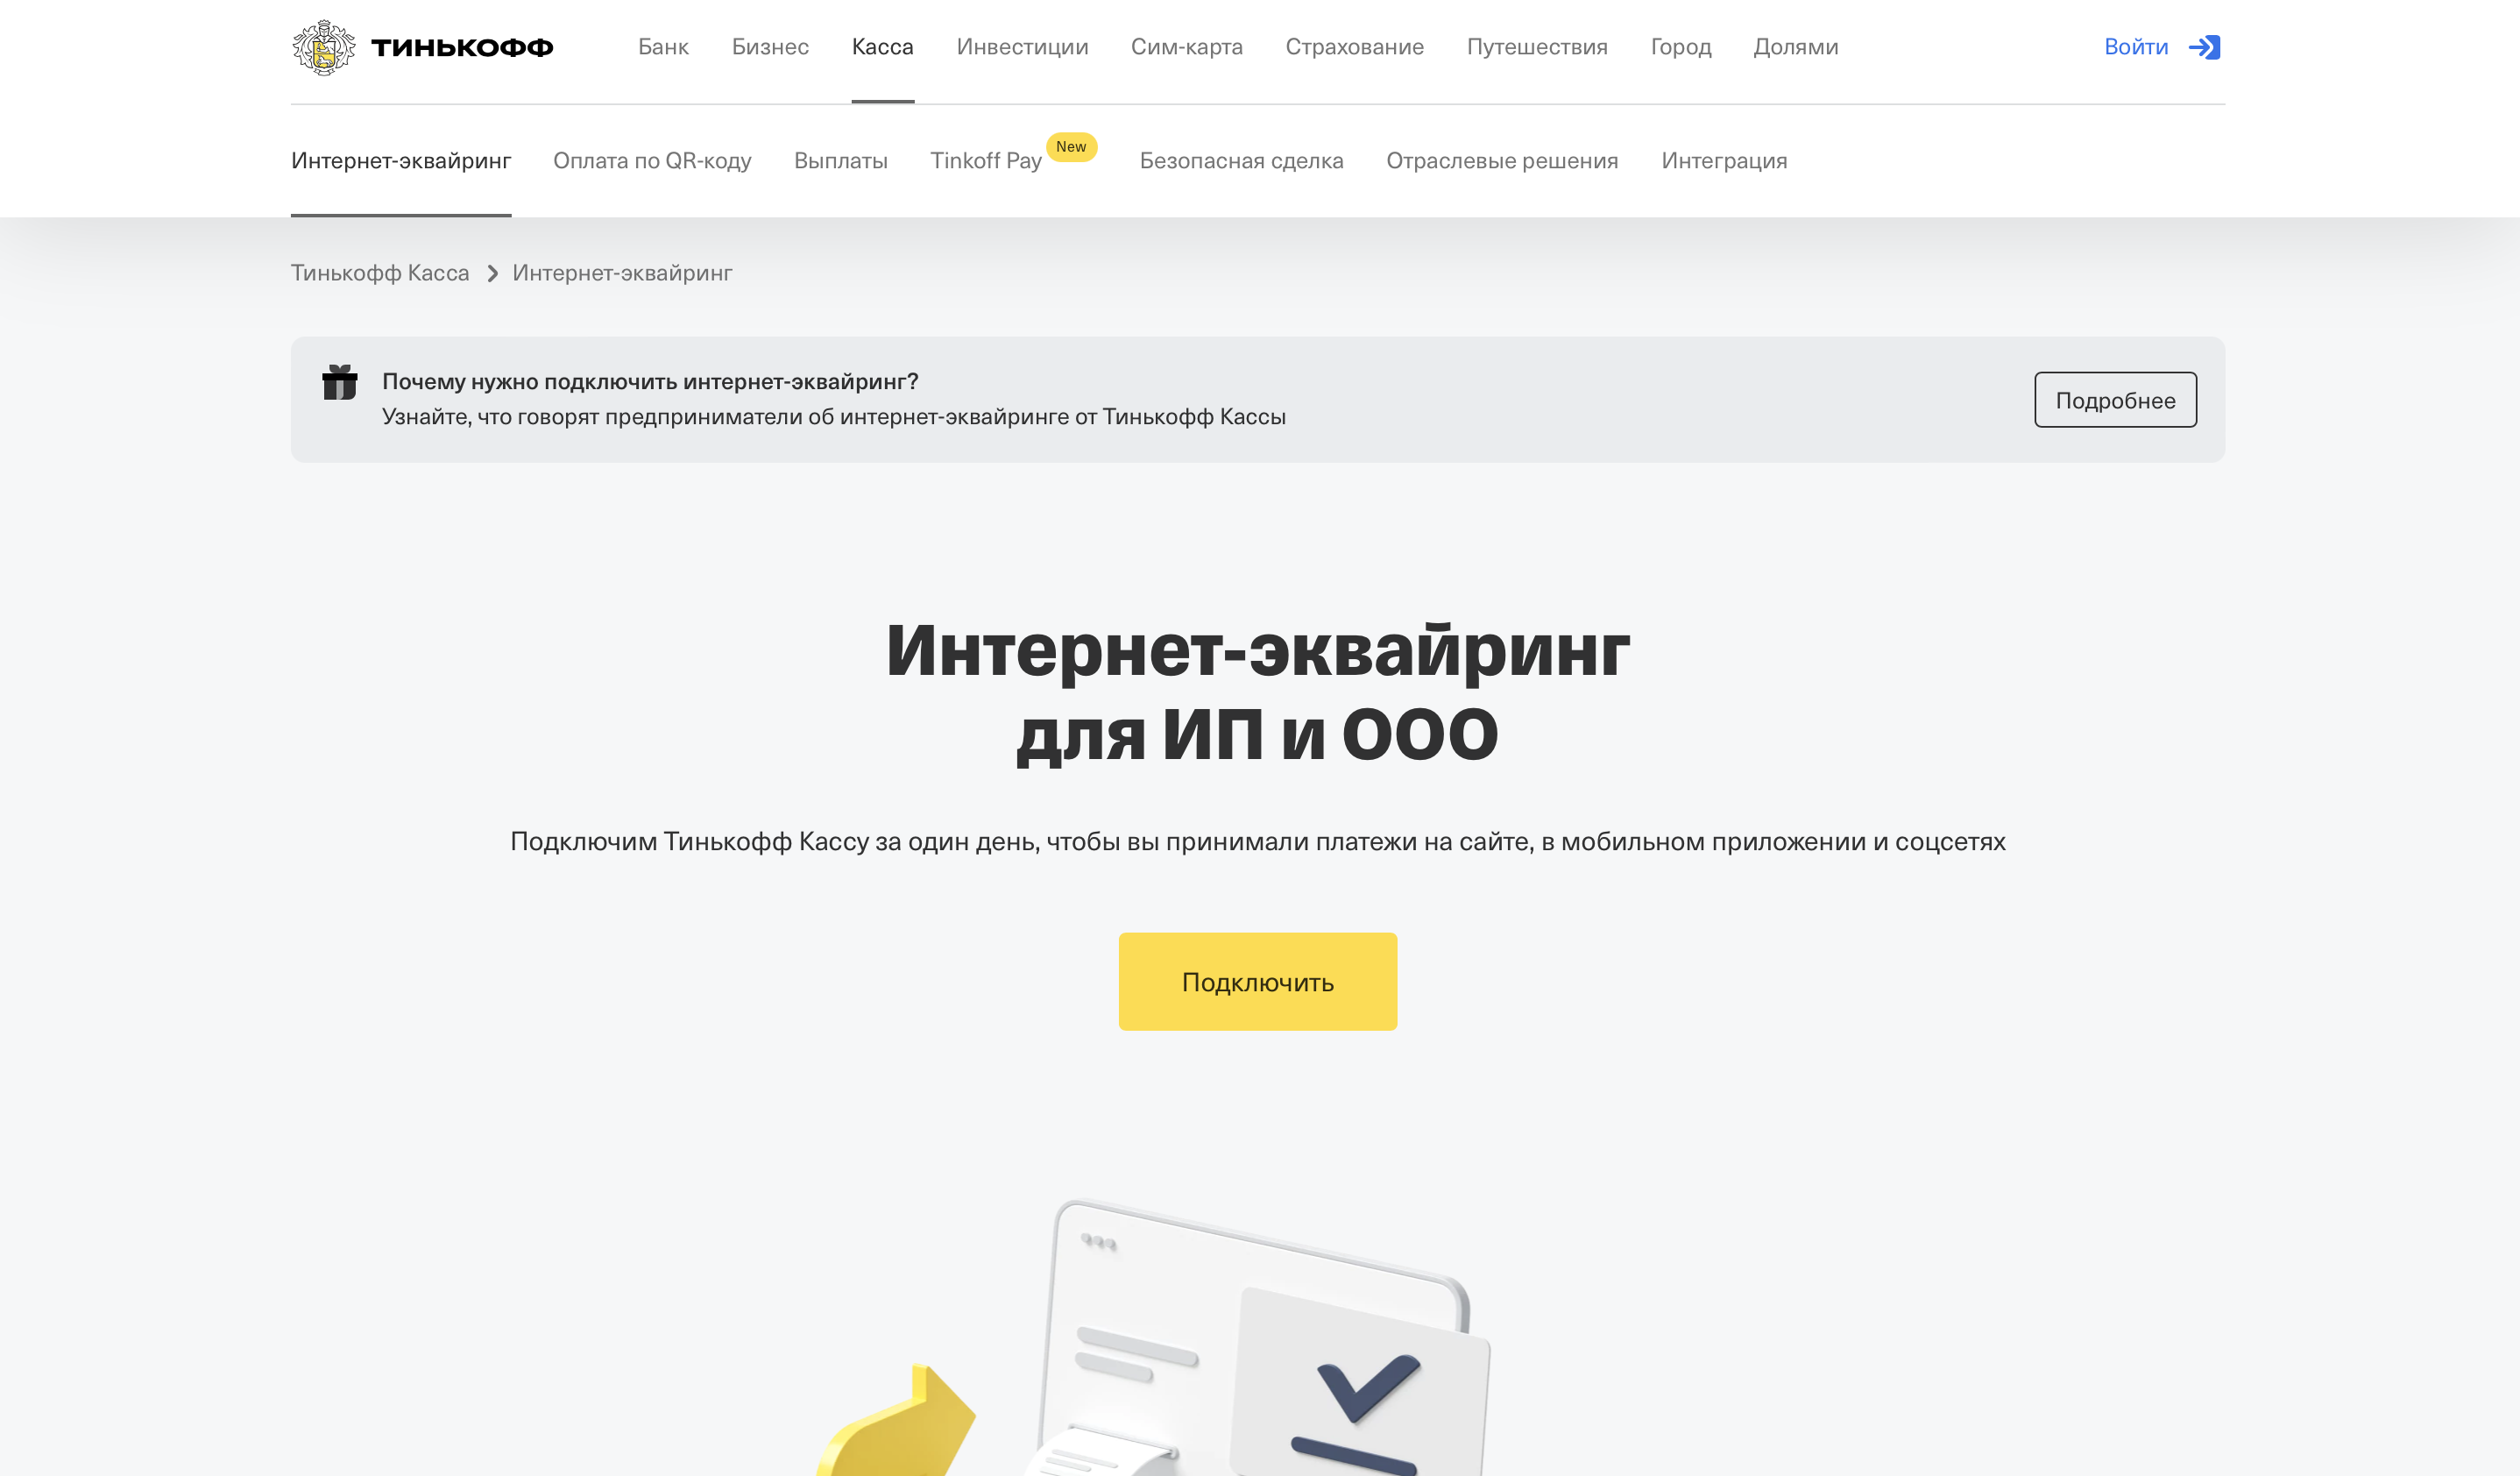
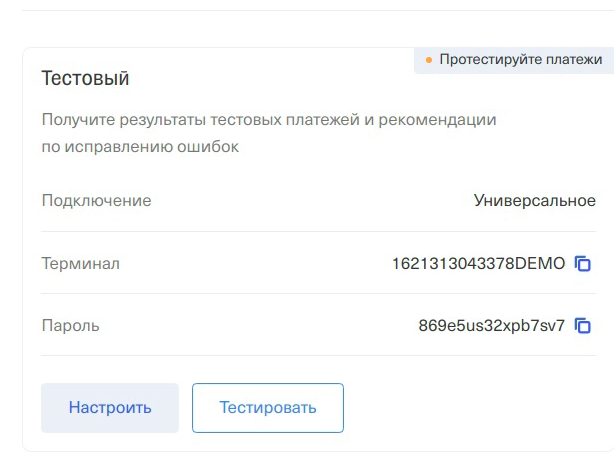
Once your application is reviewed, you will receive a test terminal and its password.
To connect the payment method in puzzlebot:
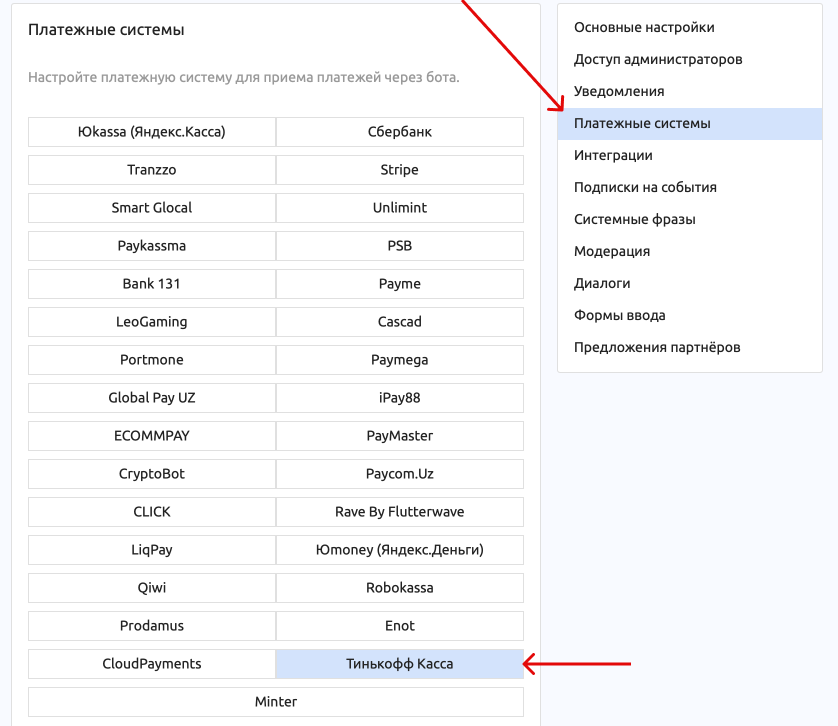
1. In the bot Settings, go to the Payment systems section and select Tinkoff Kassa.
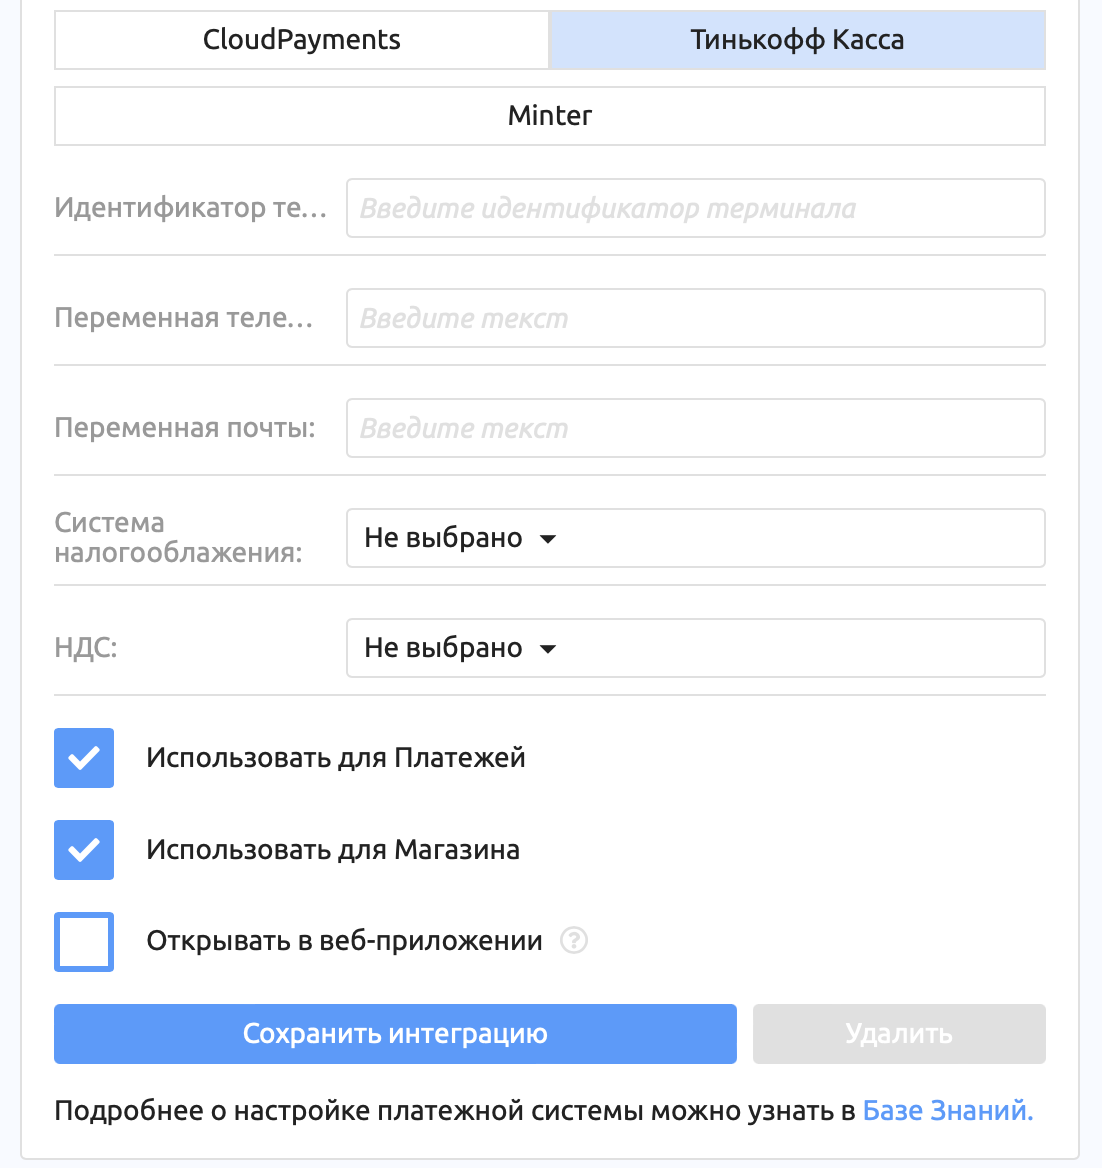
2. In the first field, paste the Terminal identifier (you can find it in your Tinkoff Kassa account).
In the next two fields, enter the variables with the phone number and email; you can choose just one of them. Tinkoff requires the phone/email of the person making the payment. You can collect this data with an input form.
The remaining fields depend on the tax regime of your legal entity, so select the corresponding tax system and VAT rate.
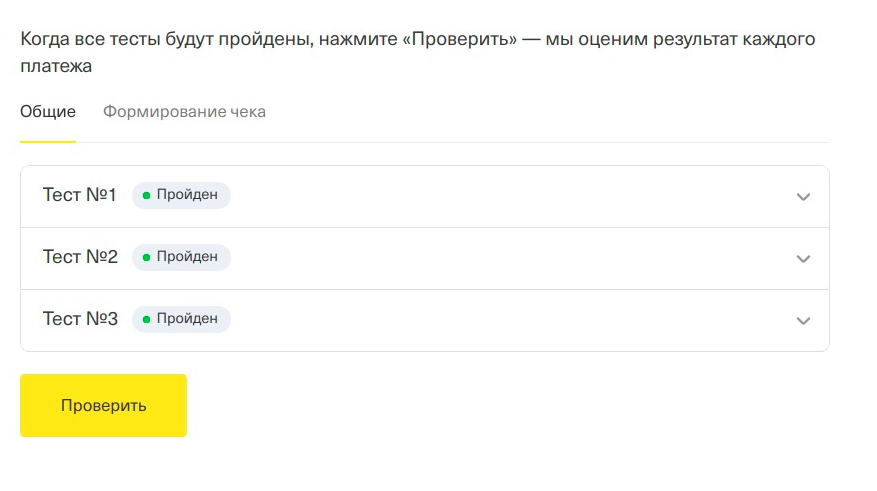
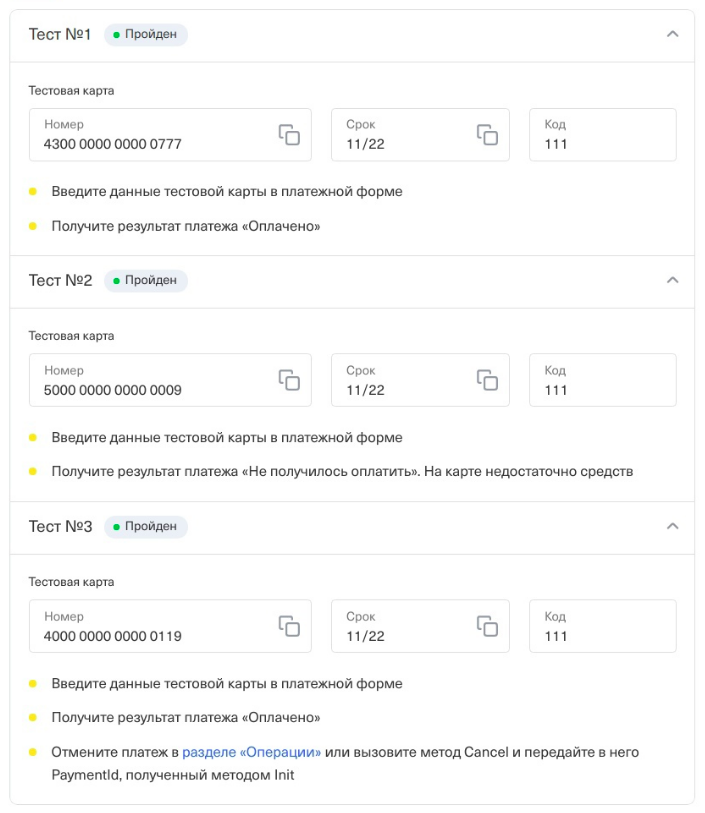
Next, you need to pass three tests in your Tinkoff account.
Prodamus
Before connecting, register a store on the payment service website — https://prodamus.ru/#form
To integrate with puzzlebot, you need the payment form URL and the secret key:
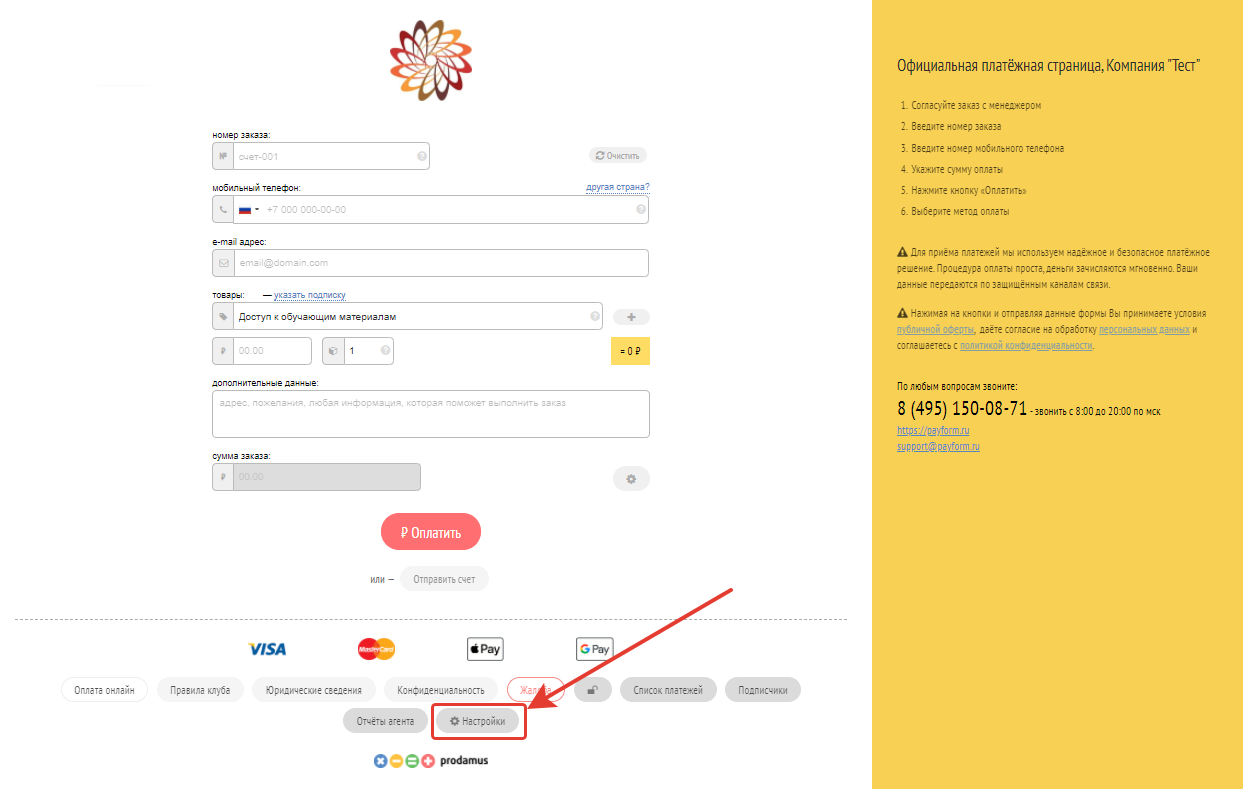
In the bottom menu, click Settings.
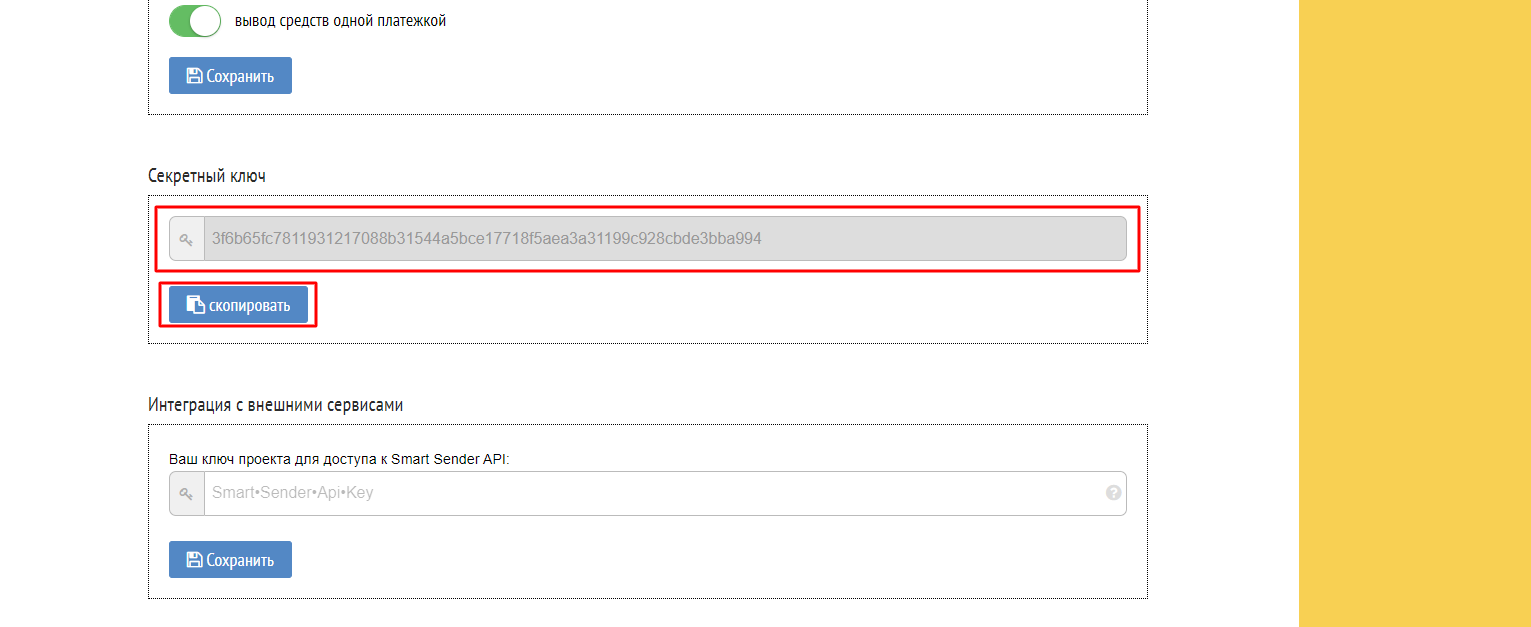
Here you can find the secret key.
In the store settings:
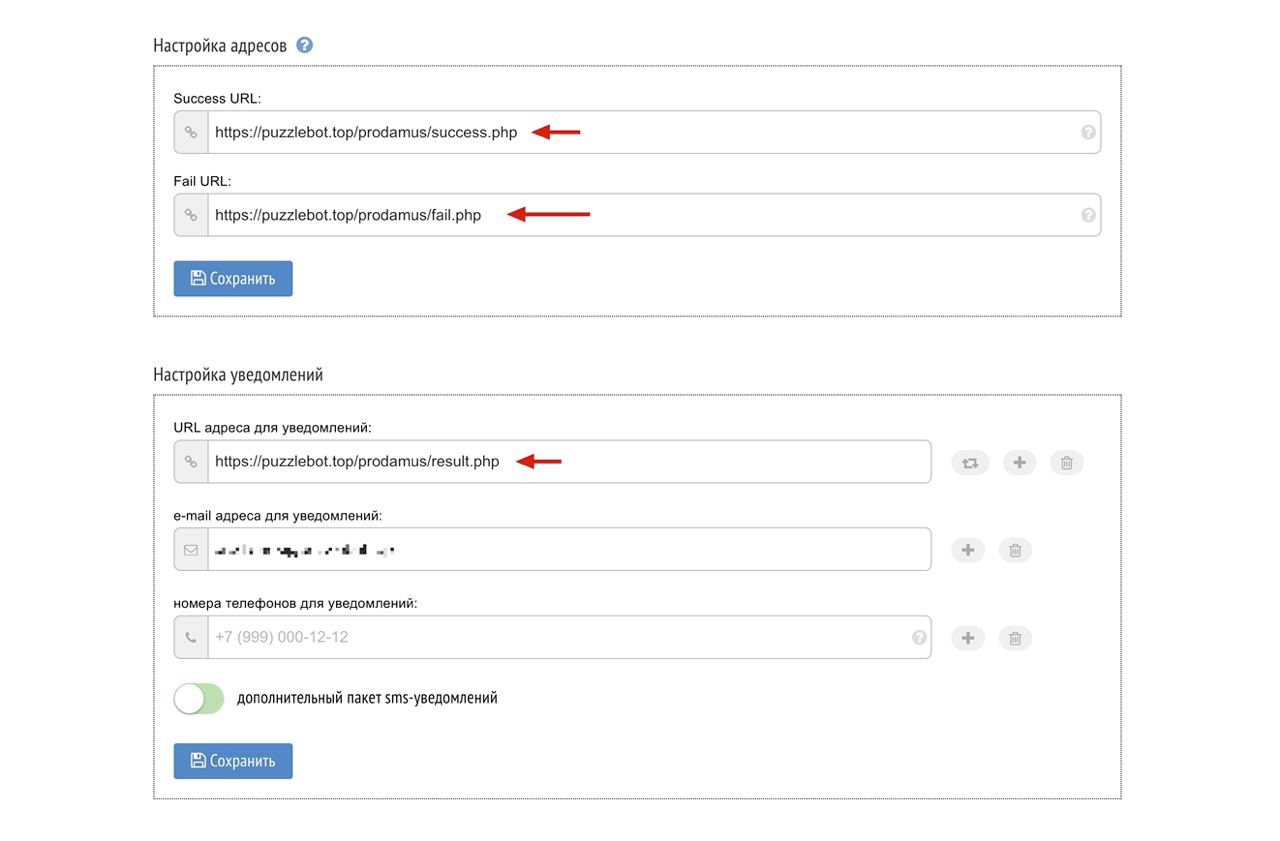
• Add the Result Url: https://pay.puzzlebot.top/payment_result.php?ps=prodamus
• Add the Success Url: https://puzzlebot.top/prodamus/success.php
• Add the Fail Url: https://puzzlebot.top/prodamus/fail.php
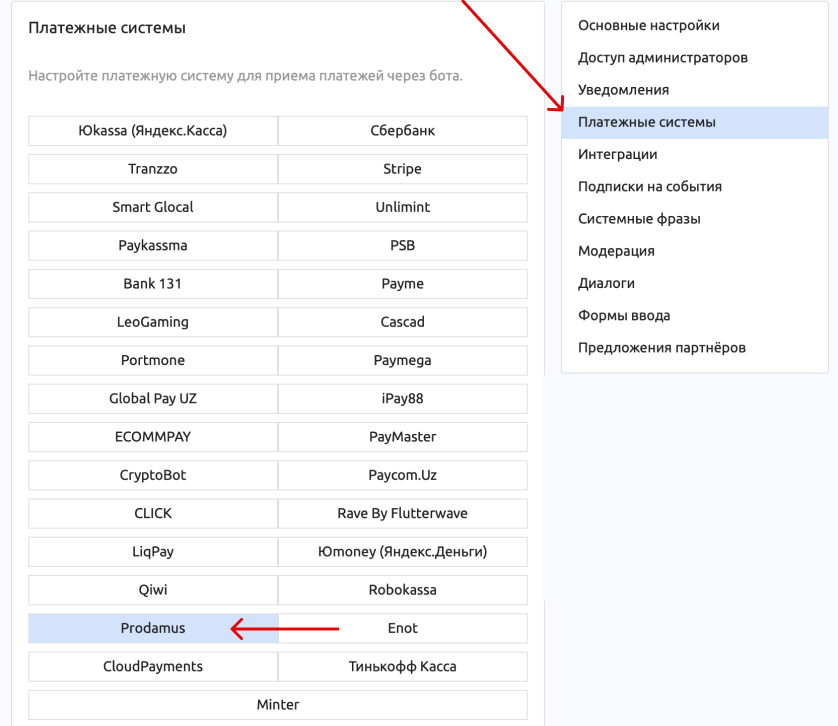
In the bot Settings, go to the Payment systems section and select Prodamus.
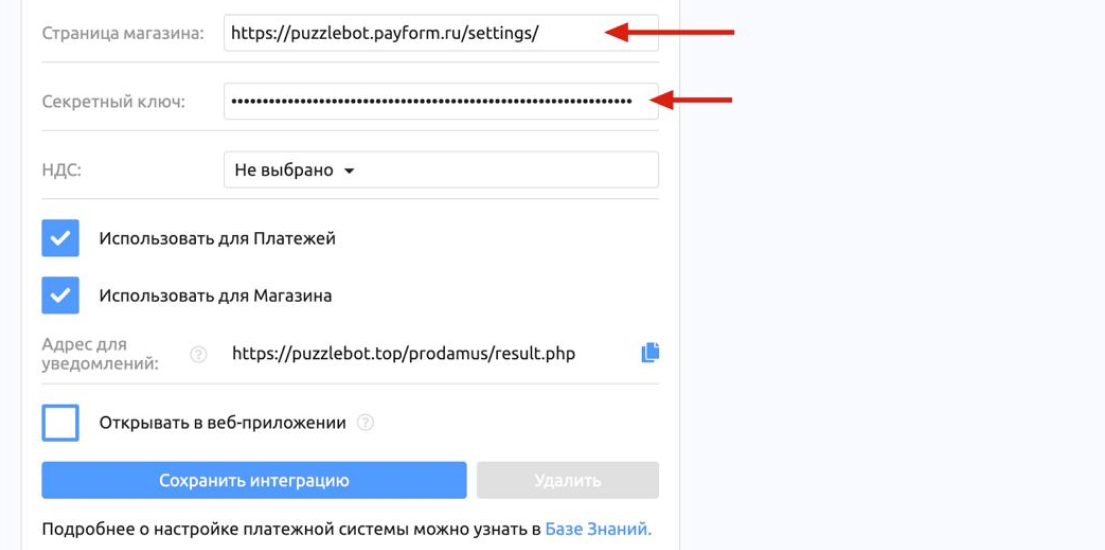
Paste the Store page and the Secret key into the corresponding fields and click Save integration.
Once you have completed all these steps, the Prodamus connection is done.
For individuals
Let's go through the setup of YooMoney (Yandex.Money), Qiwi and Enot.
YooMoney (Yandex.Money)
Integration with this service lets you accept payments from individuals directly to your wallet.
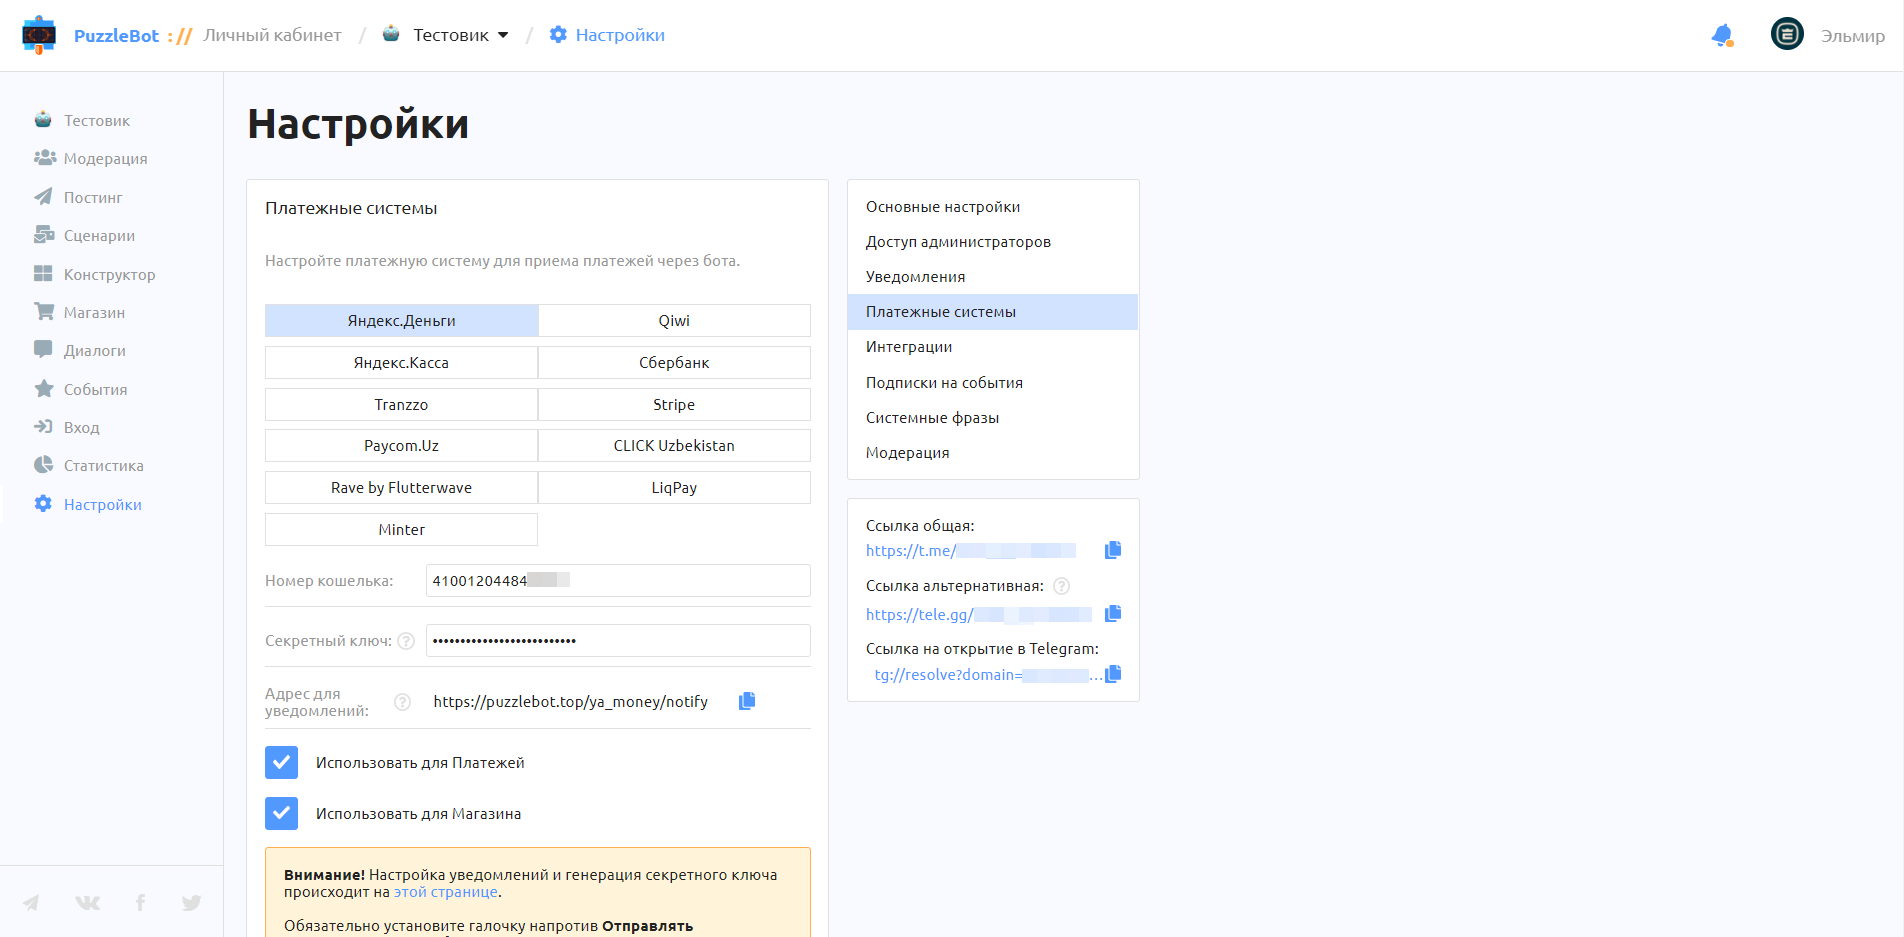
To connect the service, specify:
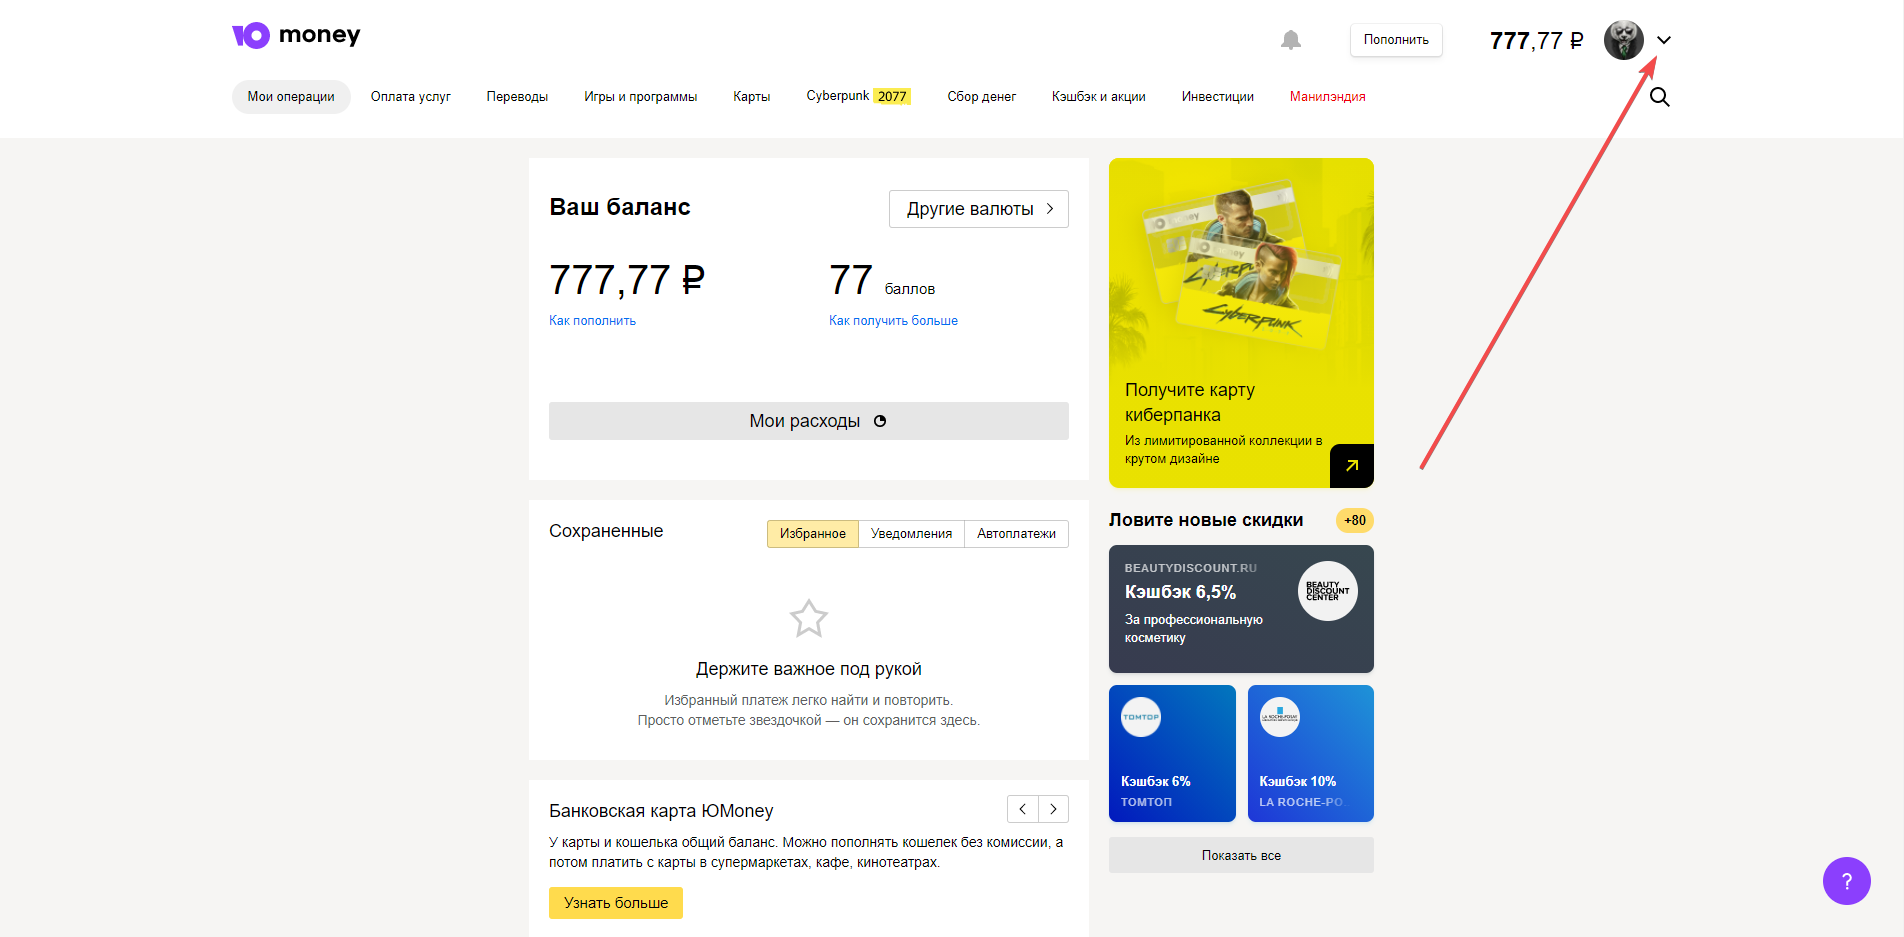
1. Wallet number — go to the home page, click the down arrow in the upper-right corner and copy the number.
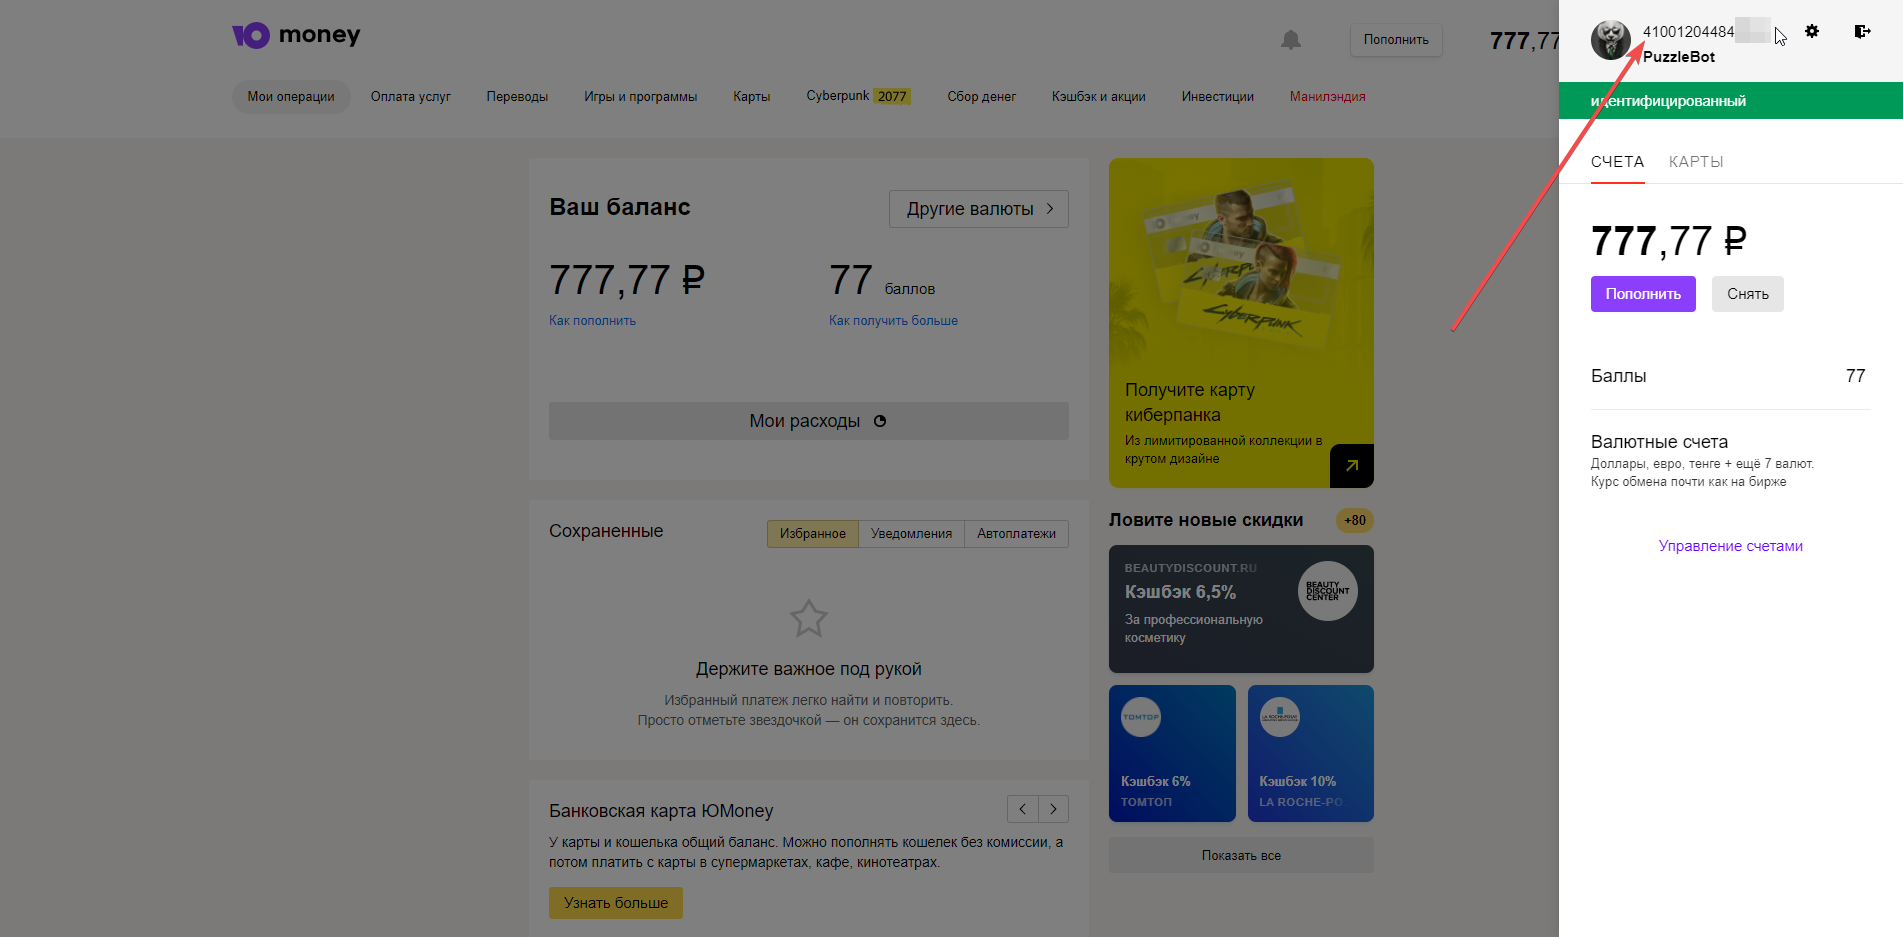
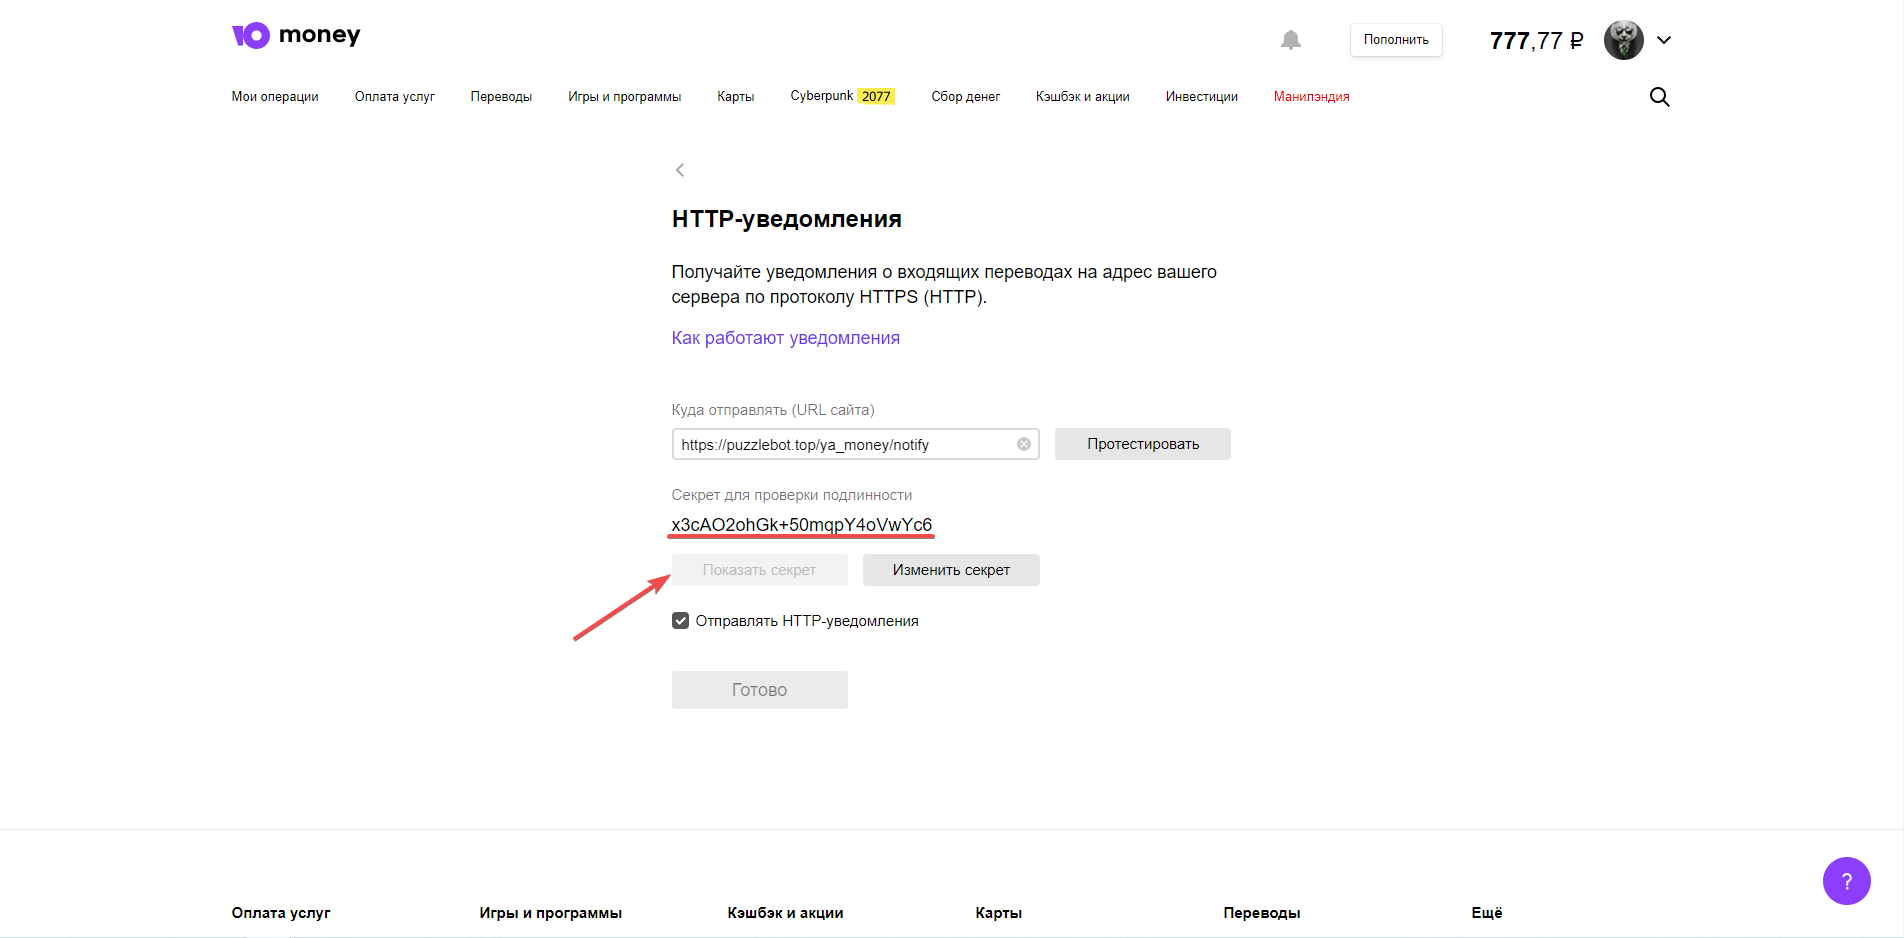
2. Secret key — go to the special settings page; if a secret key has not been created yet, click the Generate secret button (or Show secret) and copy it.
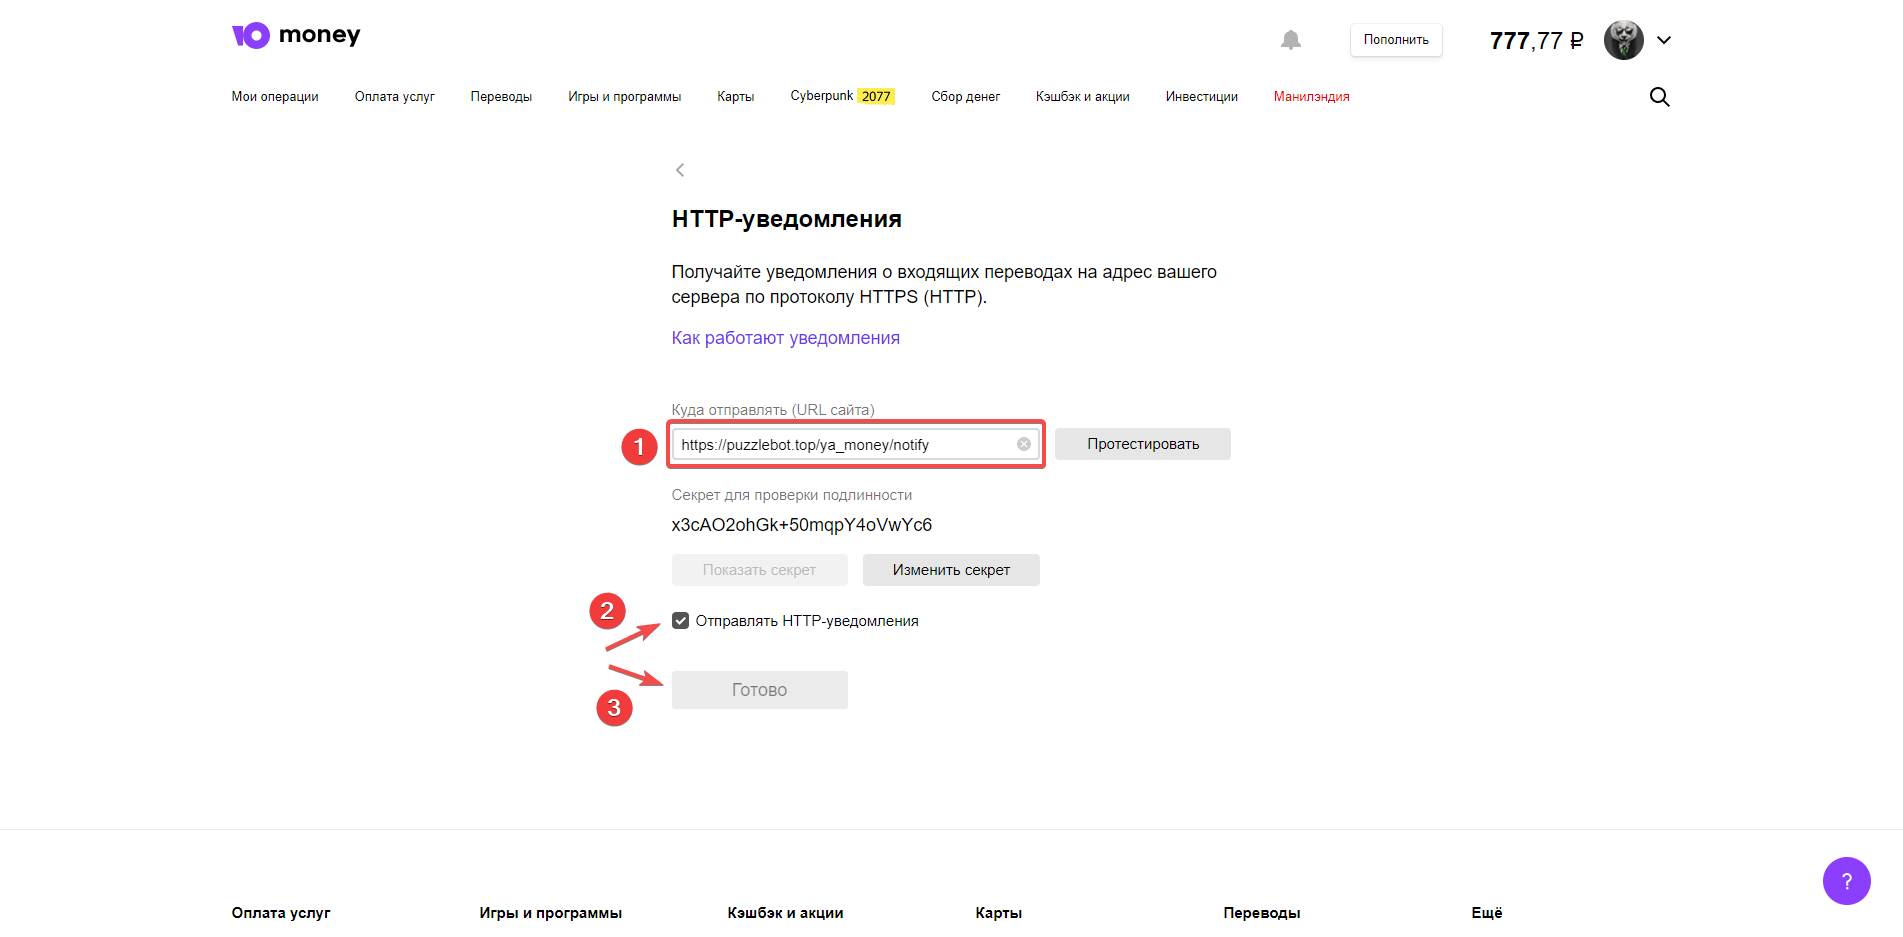
3. Notification address — on the same special settings page, enter the address for receiving notifications https://pay.puzzlebot.top/payment_result.php?ps=yandex_money , check the box next to Send HTTP notifications and click Done.
Once you have completed all these steps, the YooMoney (Yandex.Money) connection is done.
Qiwi wallet
Integration with this service lets you accept payments from individuals directly to your wallet.
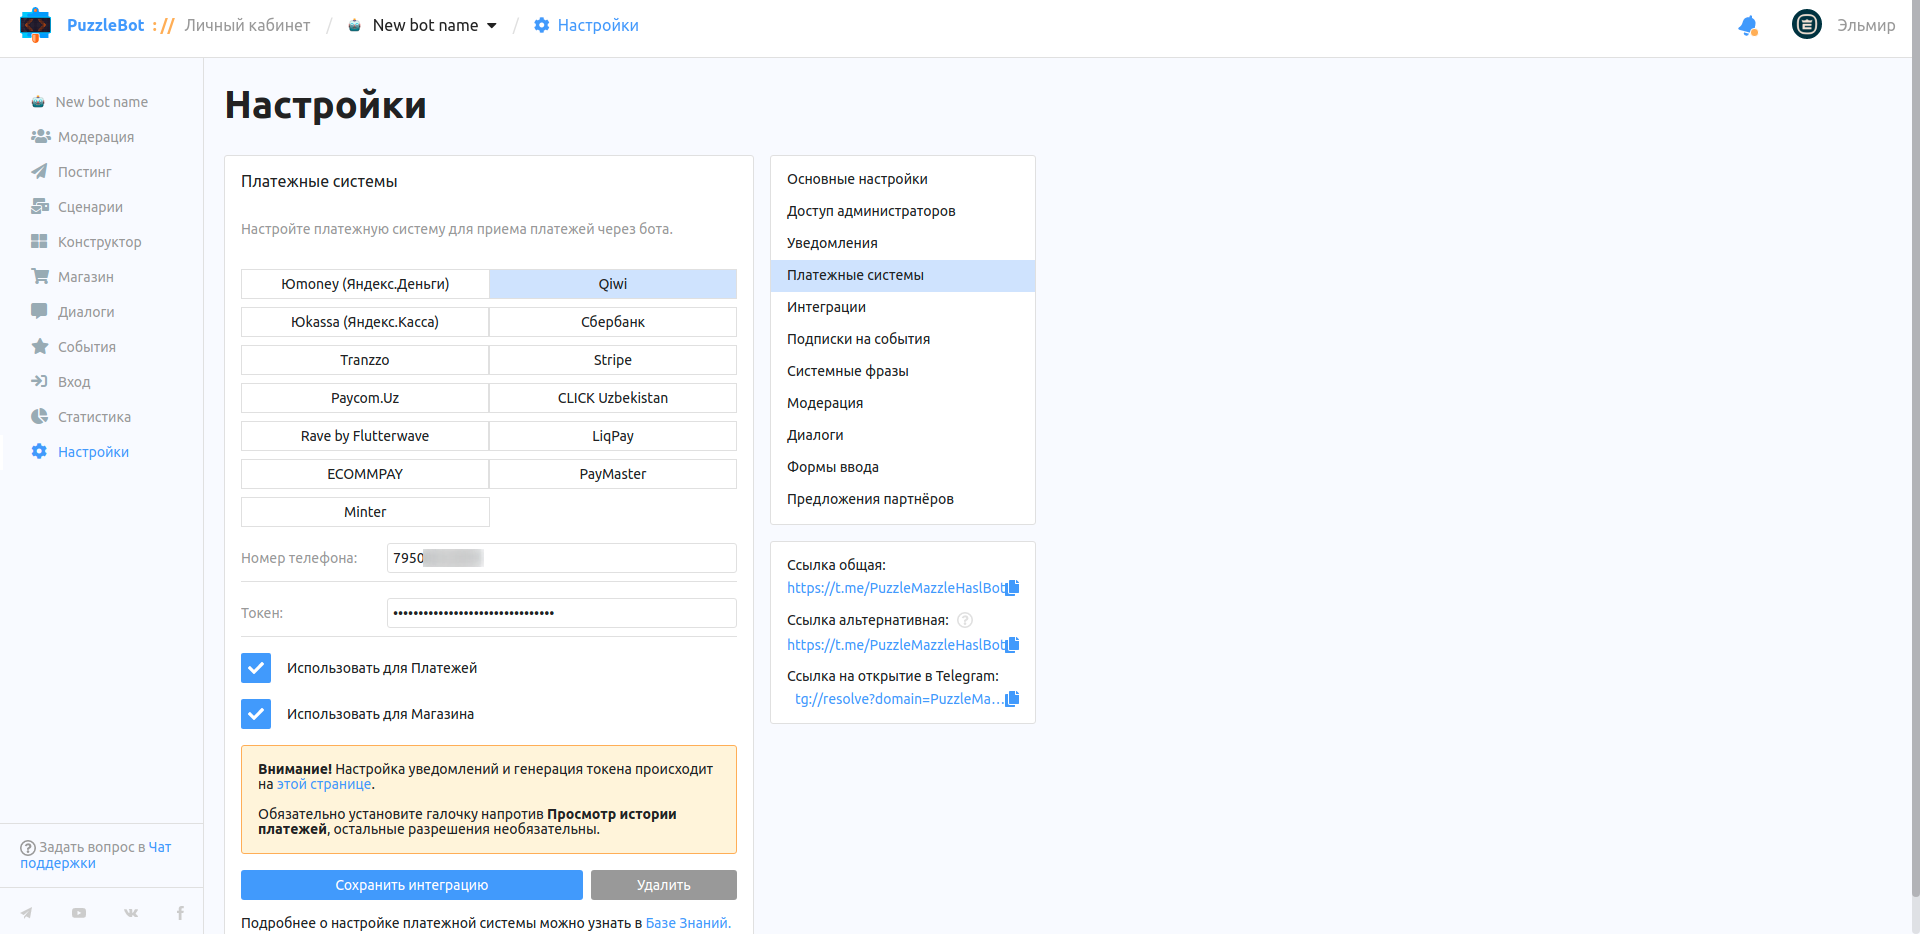
To connect the service, specify:
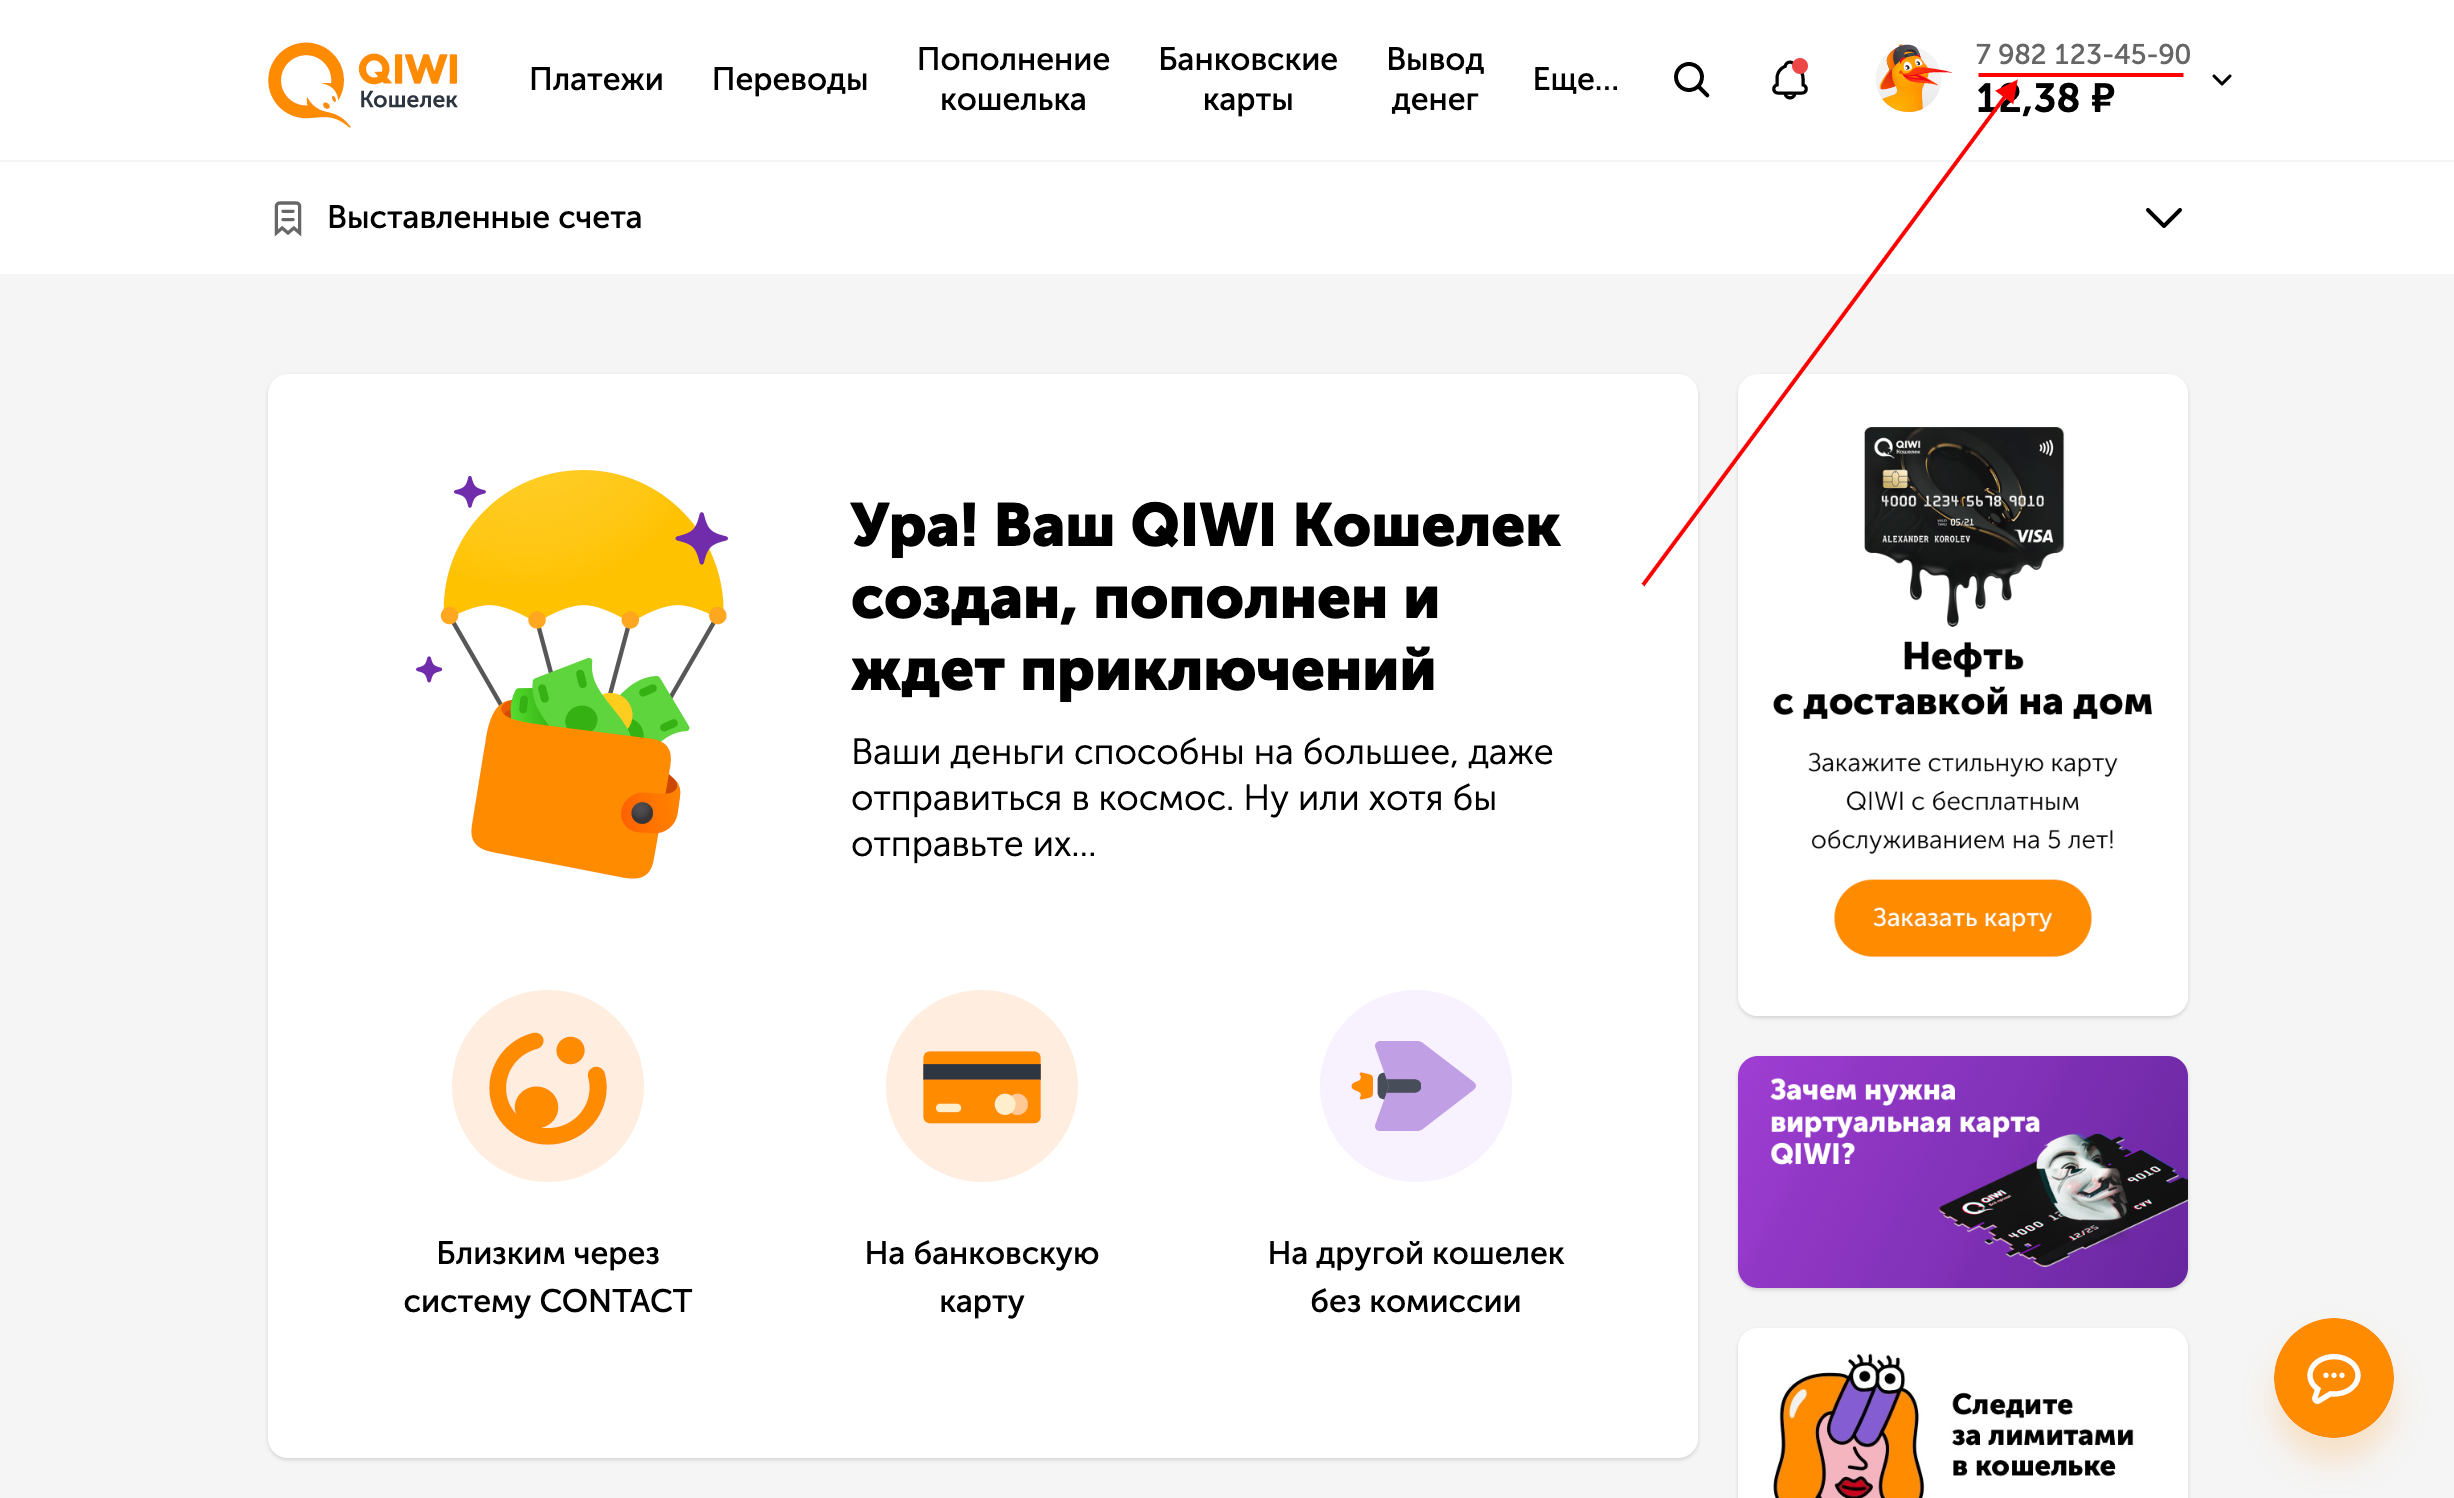
1. Wallet number — this is your phone number. Just type it in, or copy it from the upper-right corner of any tab.
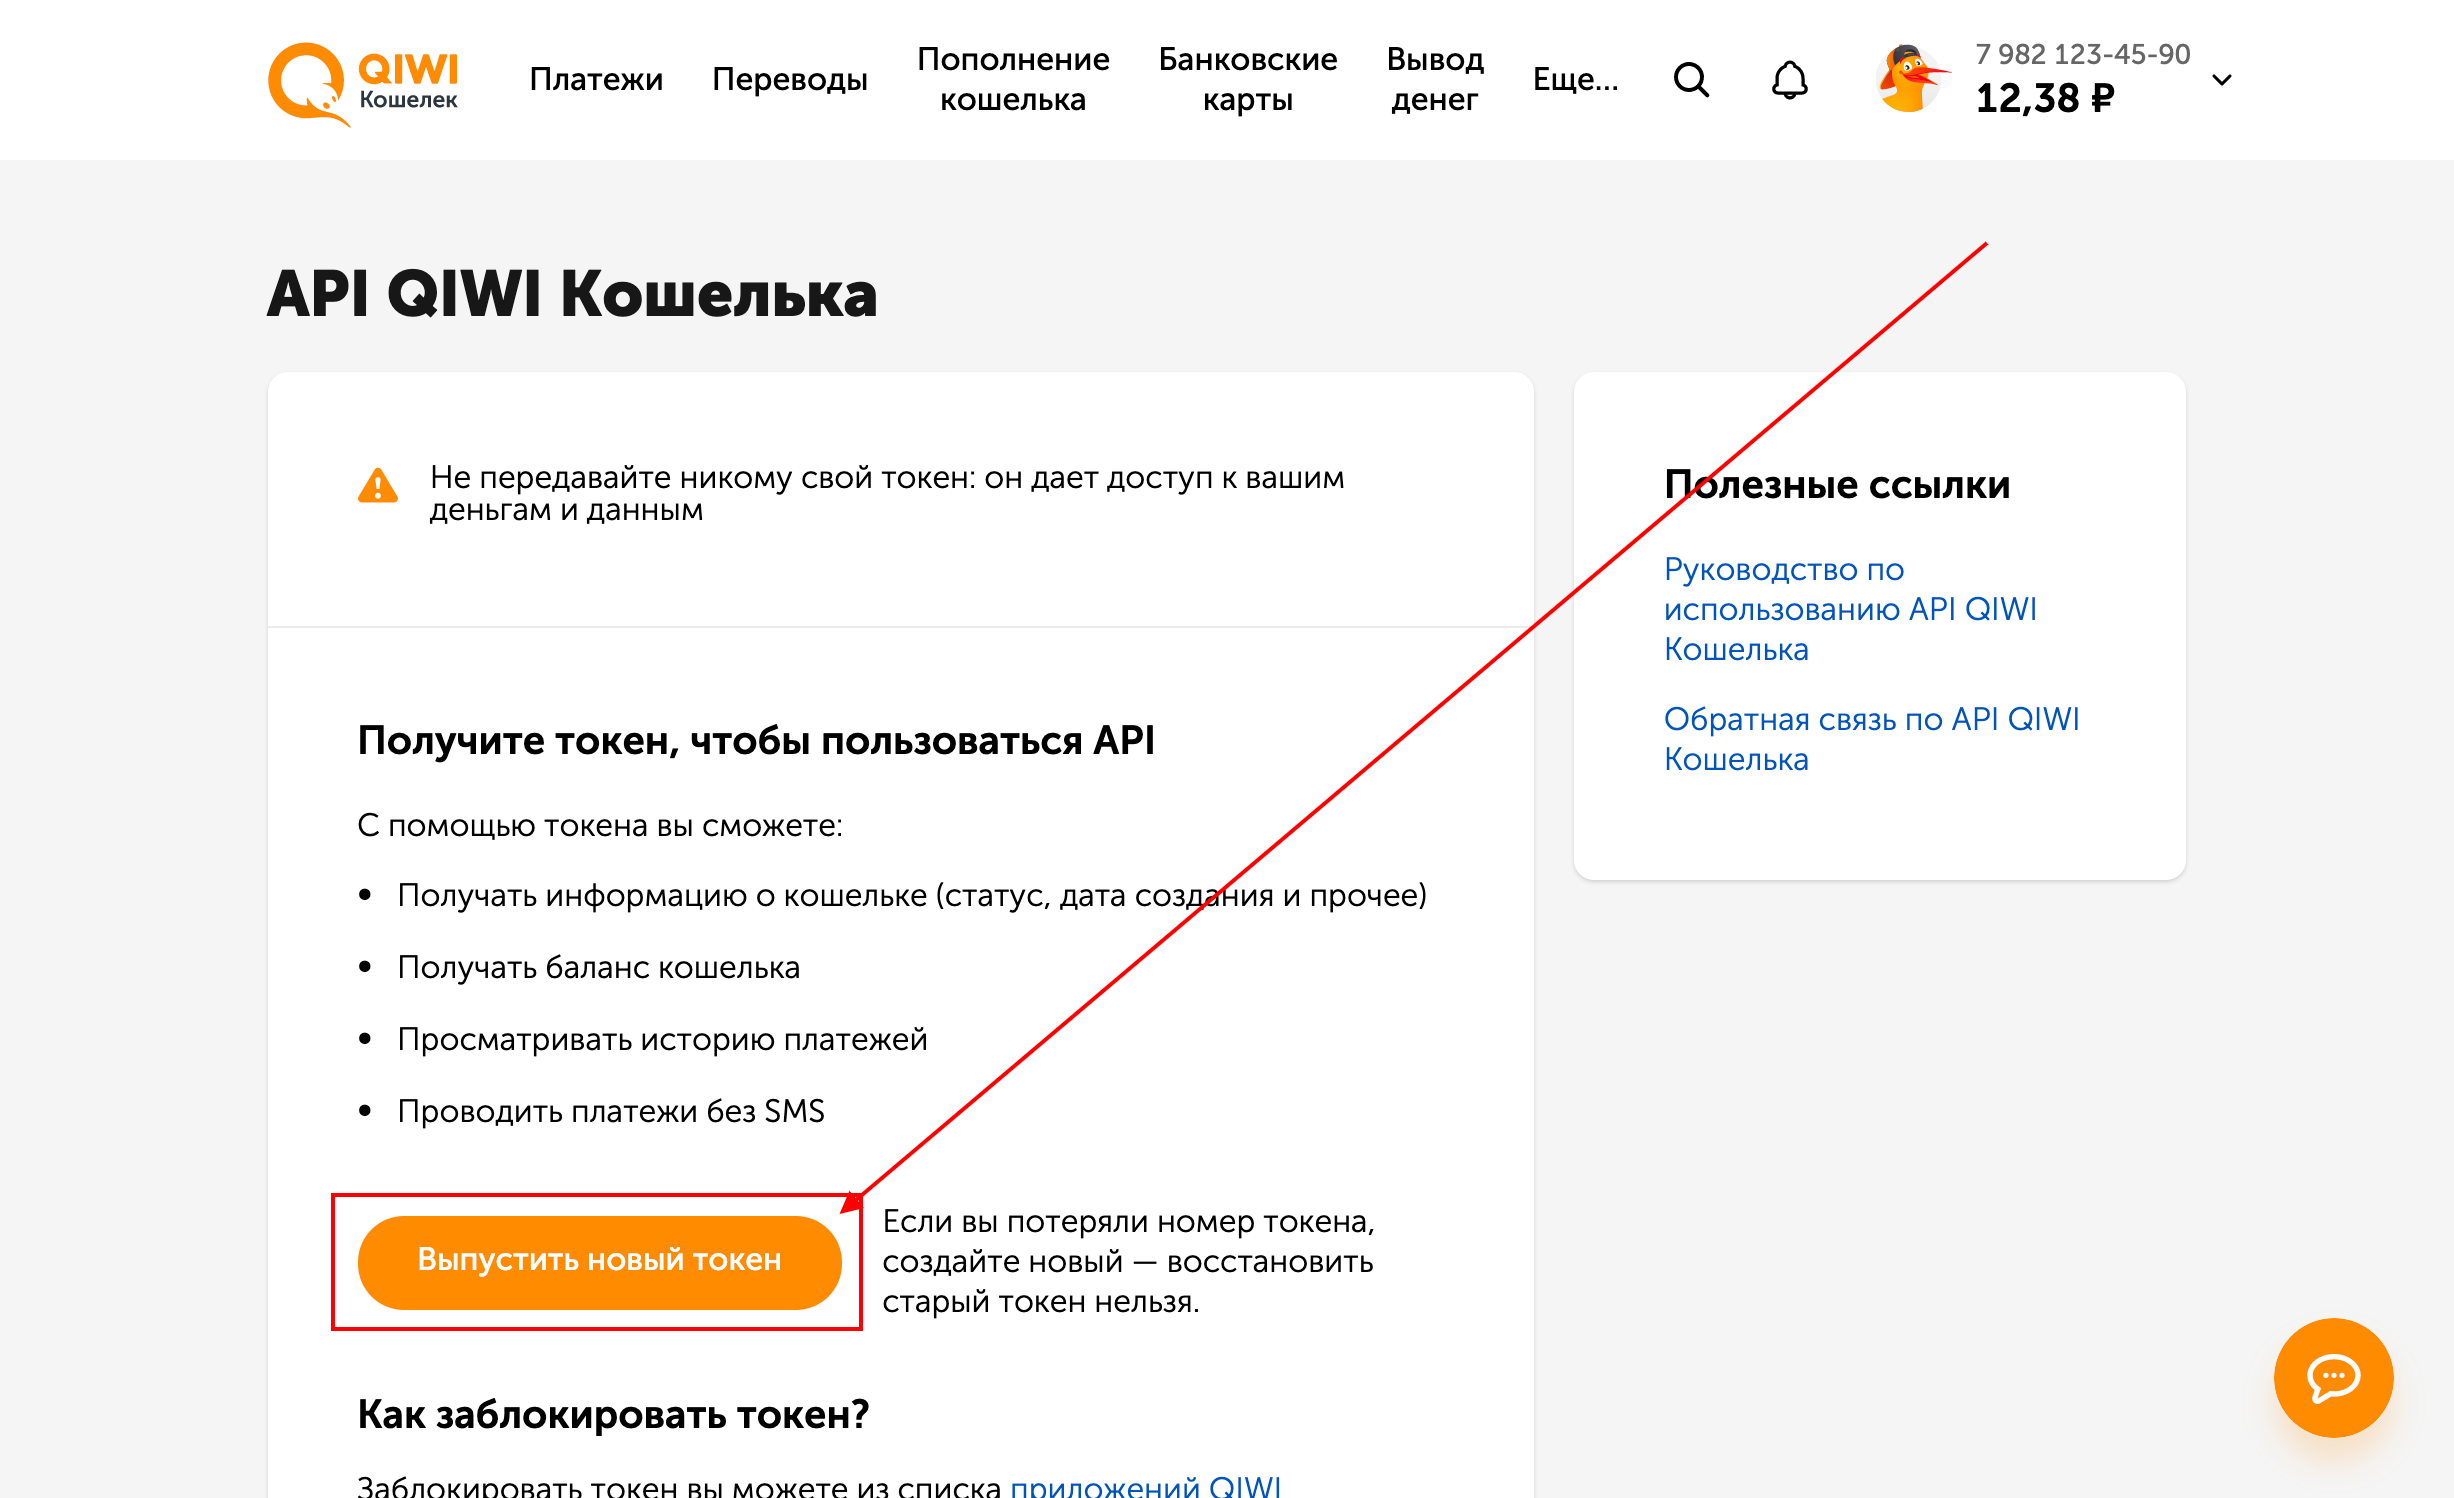
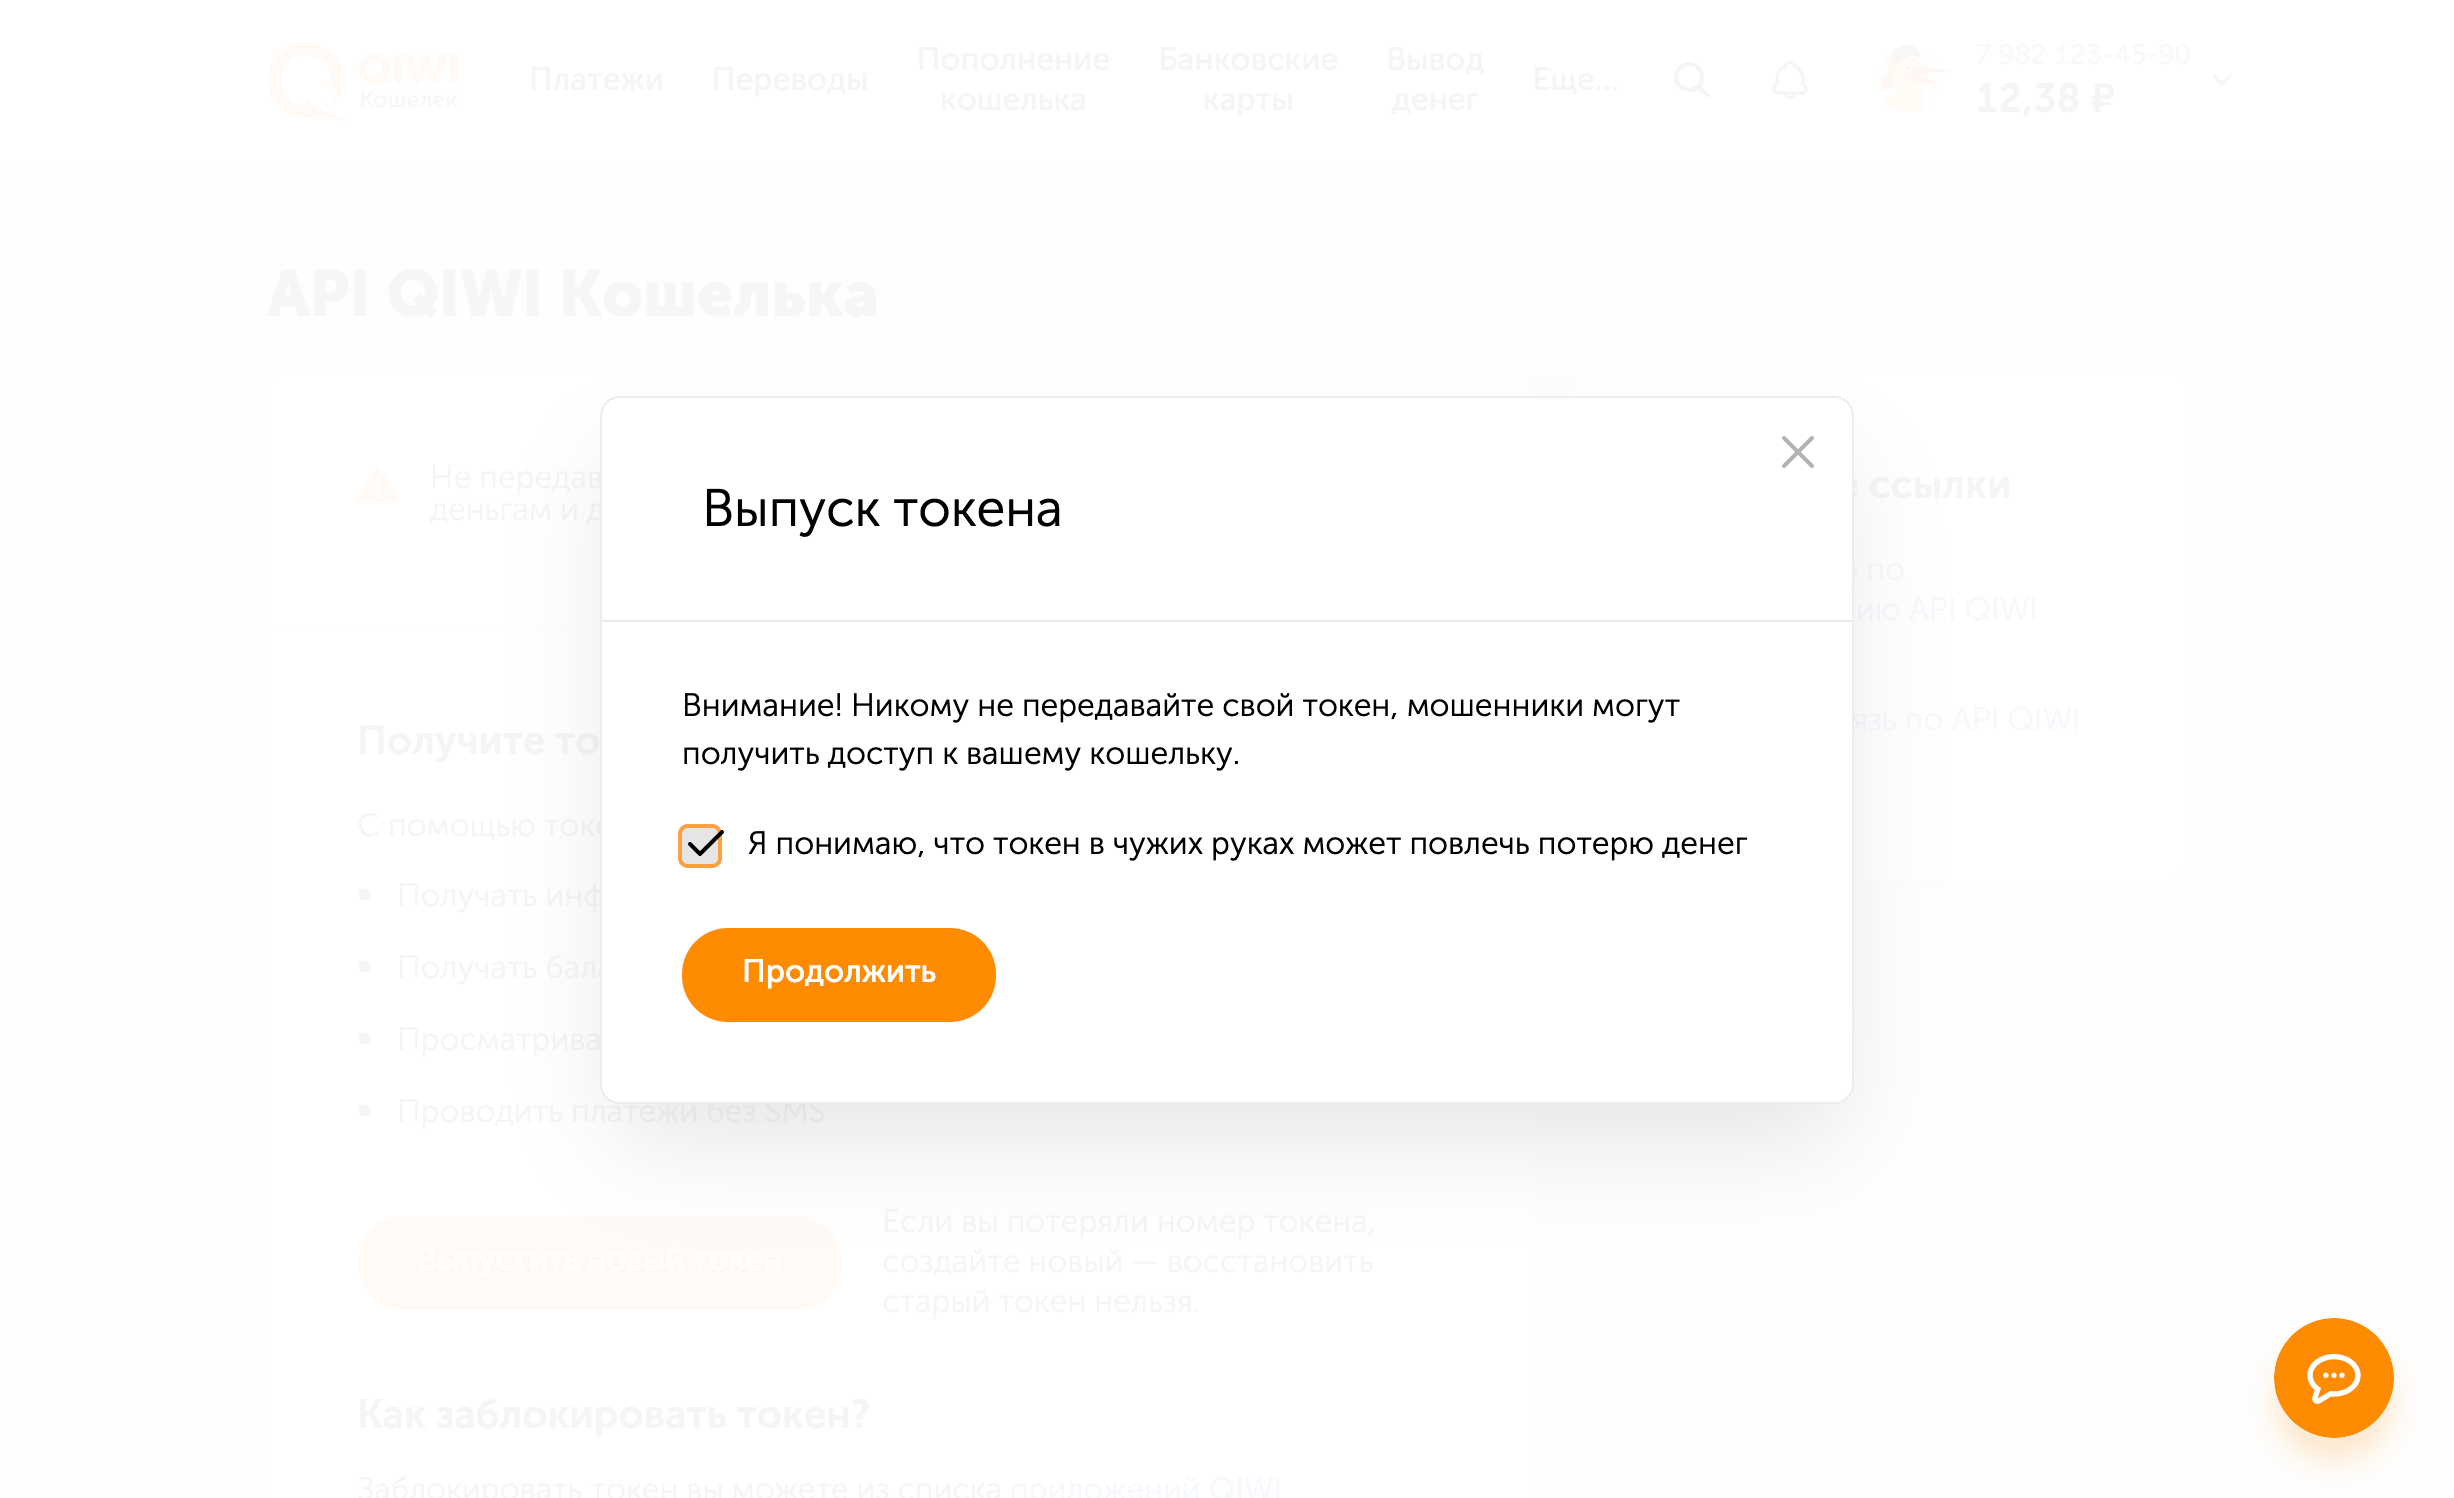
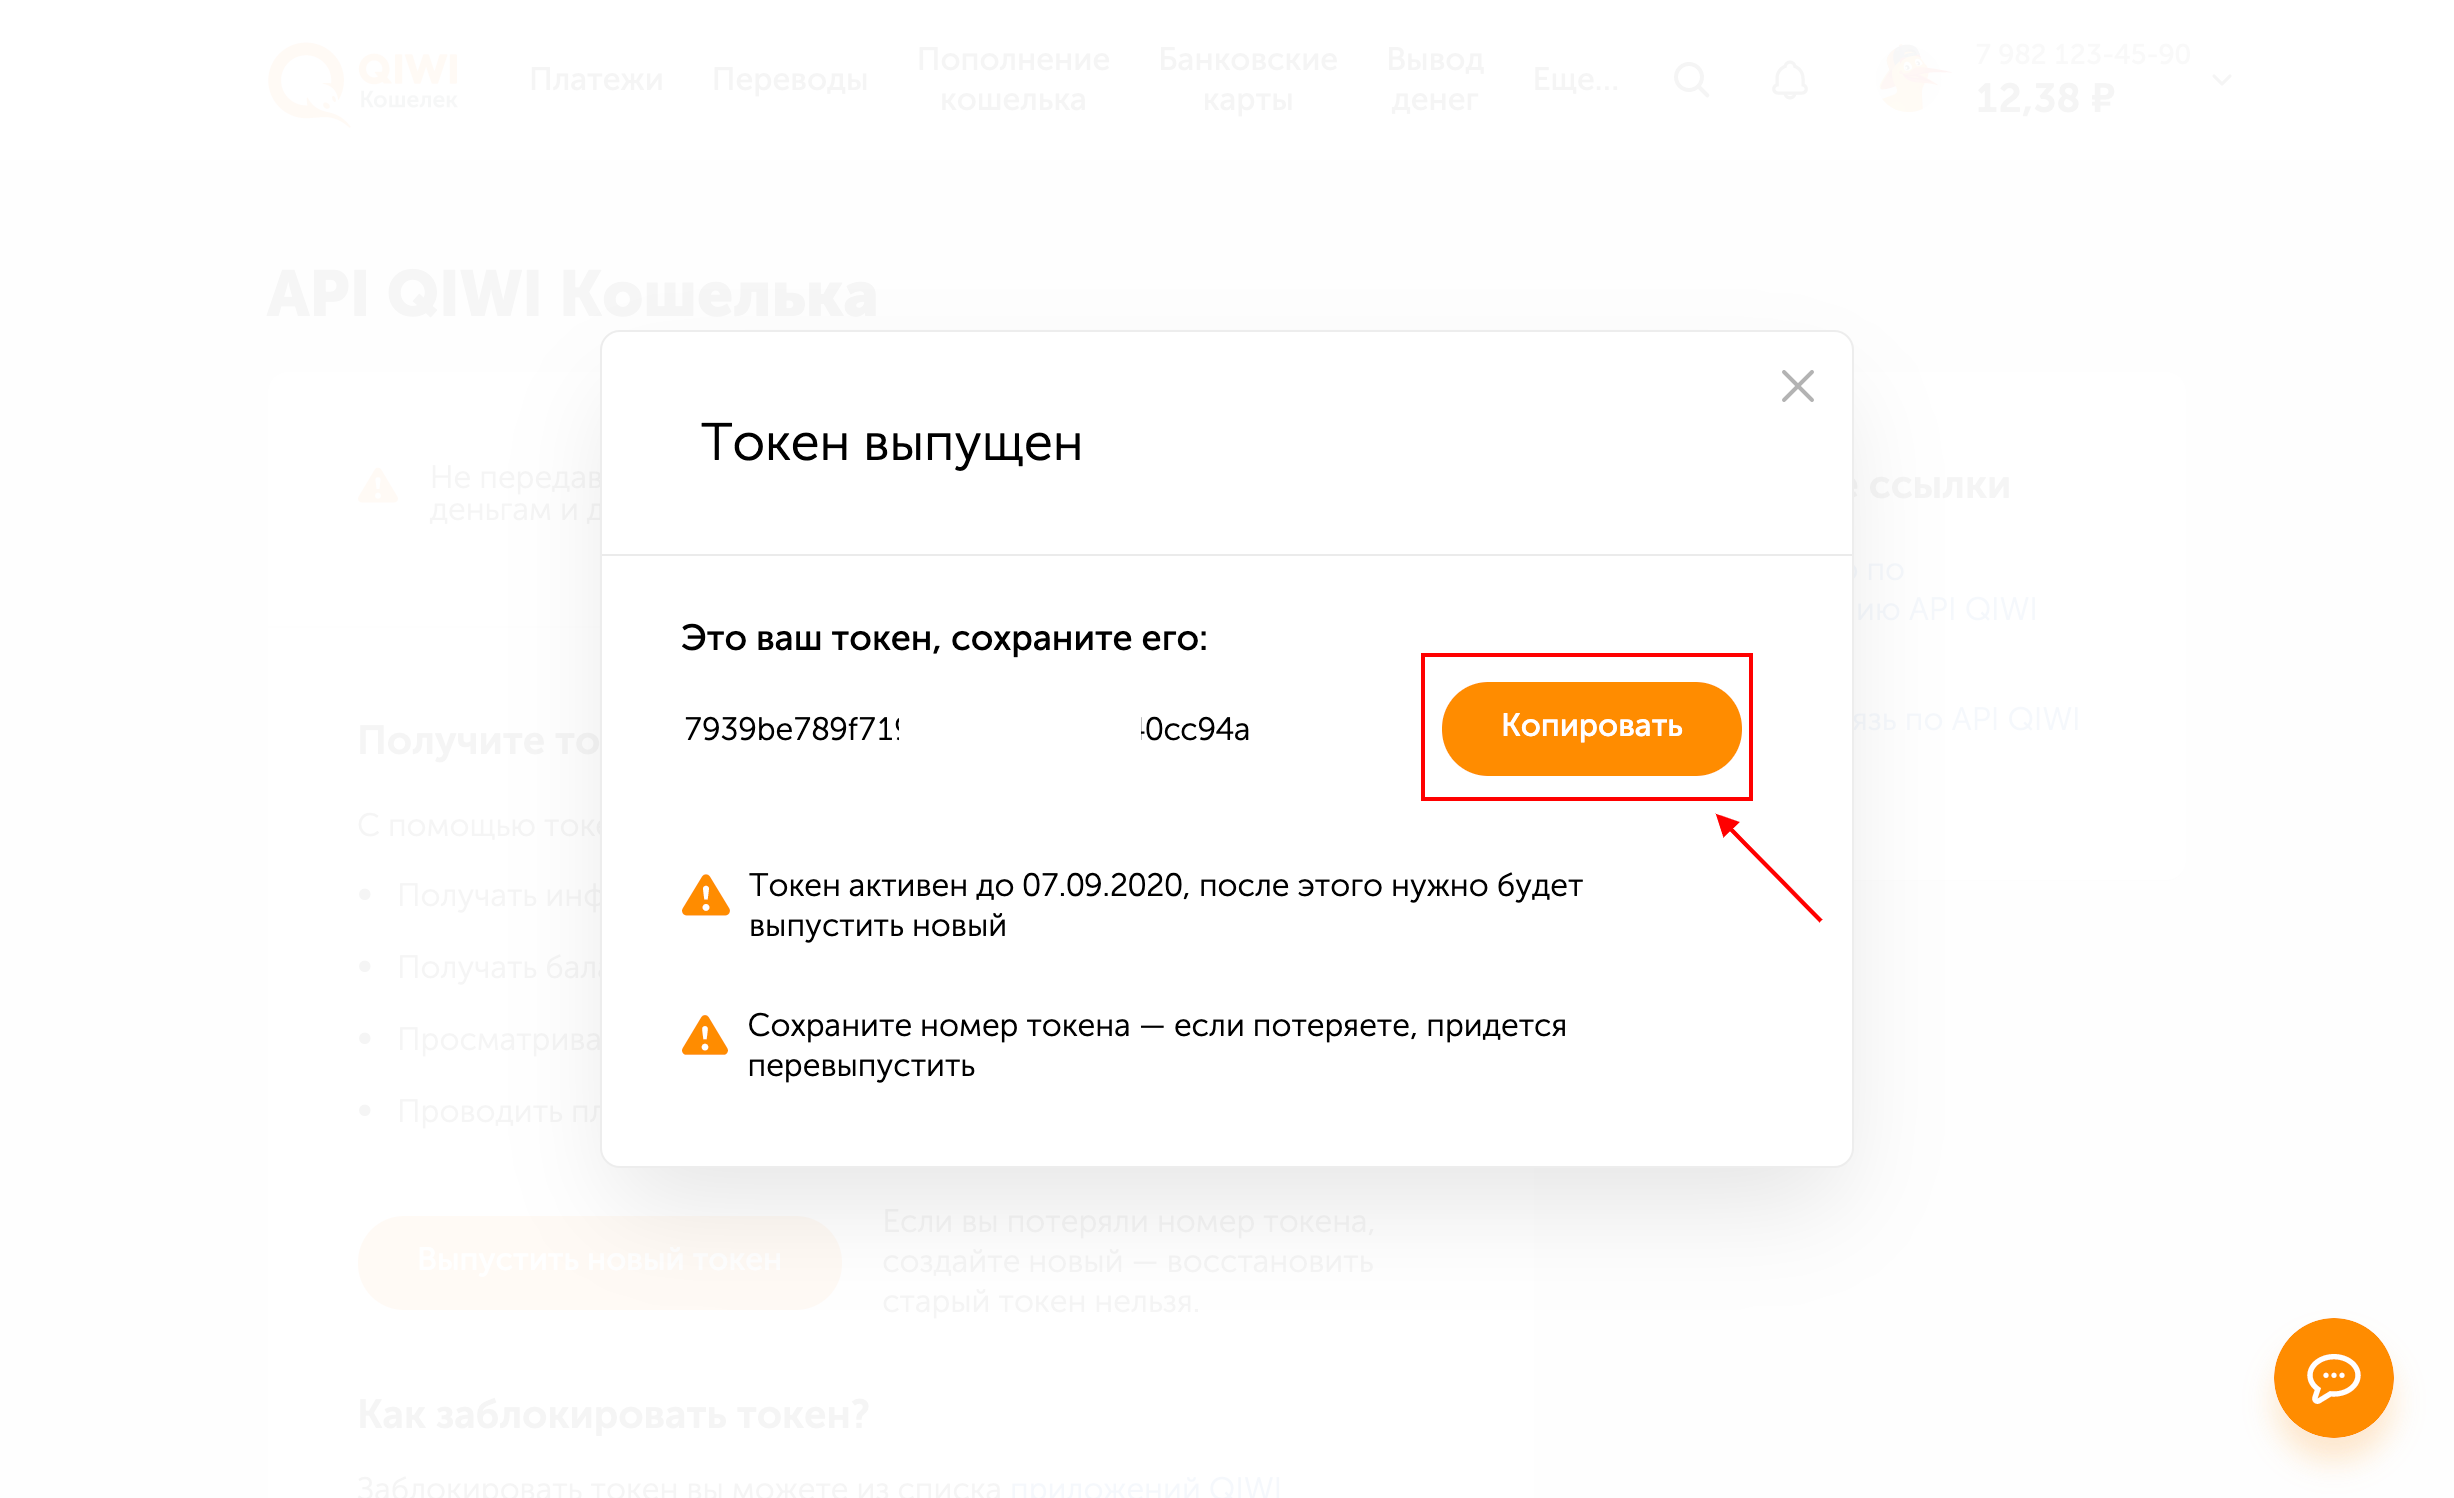
2. Token — go to the special settings page and click the Issue a new token button.
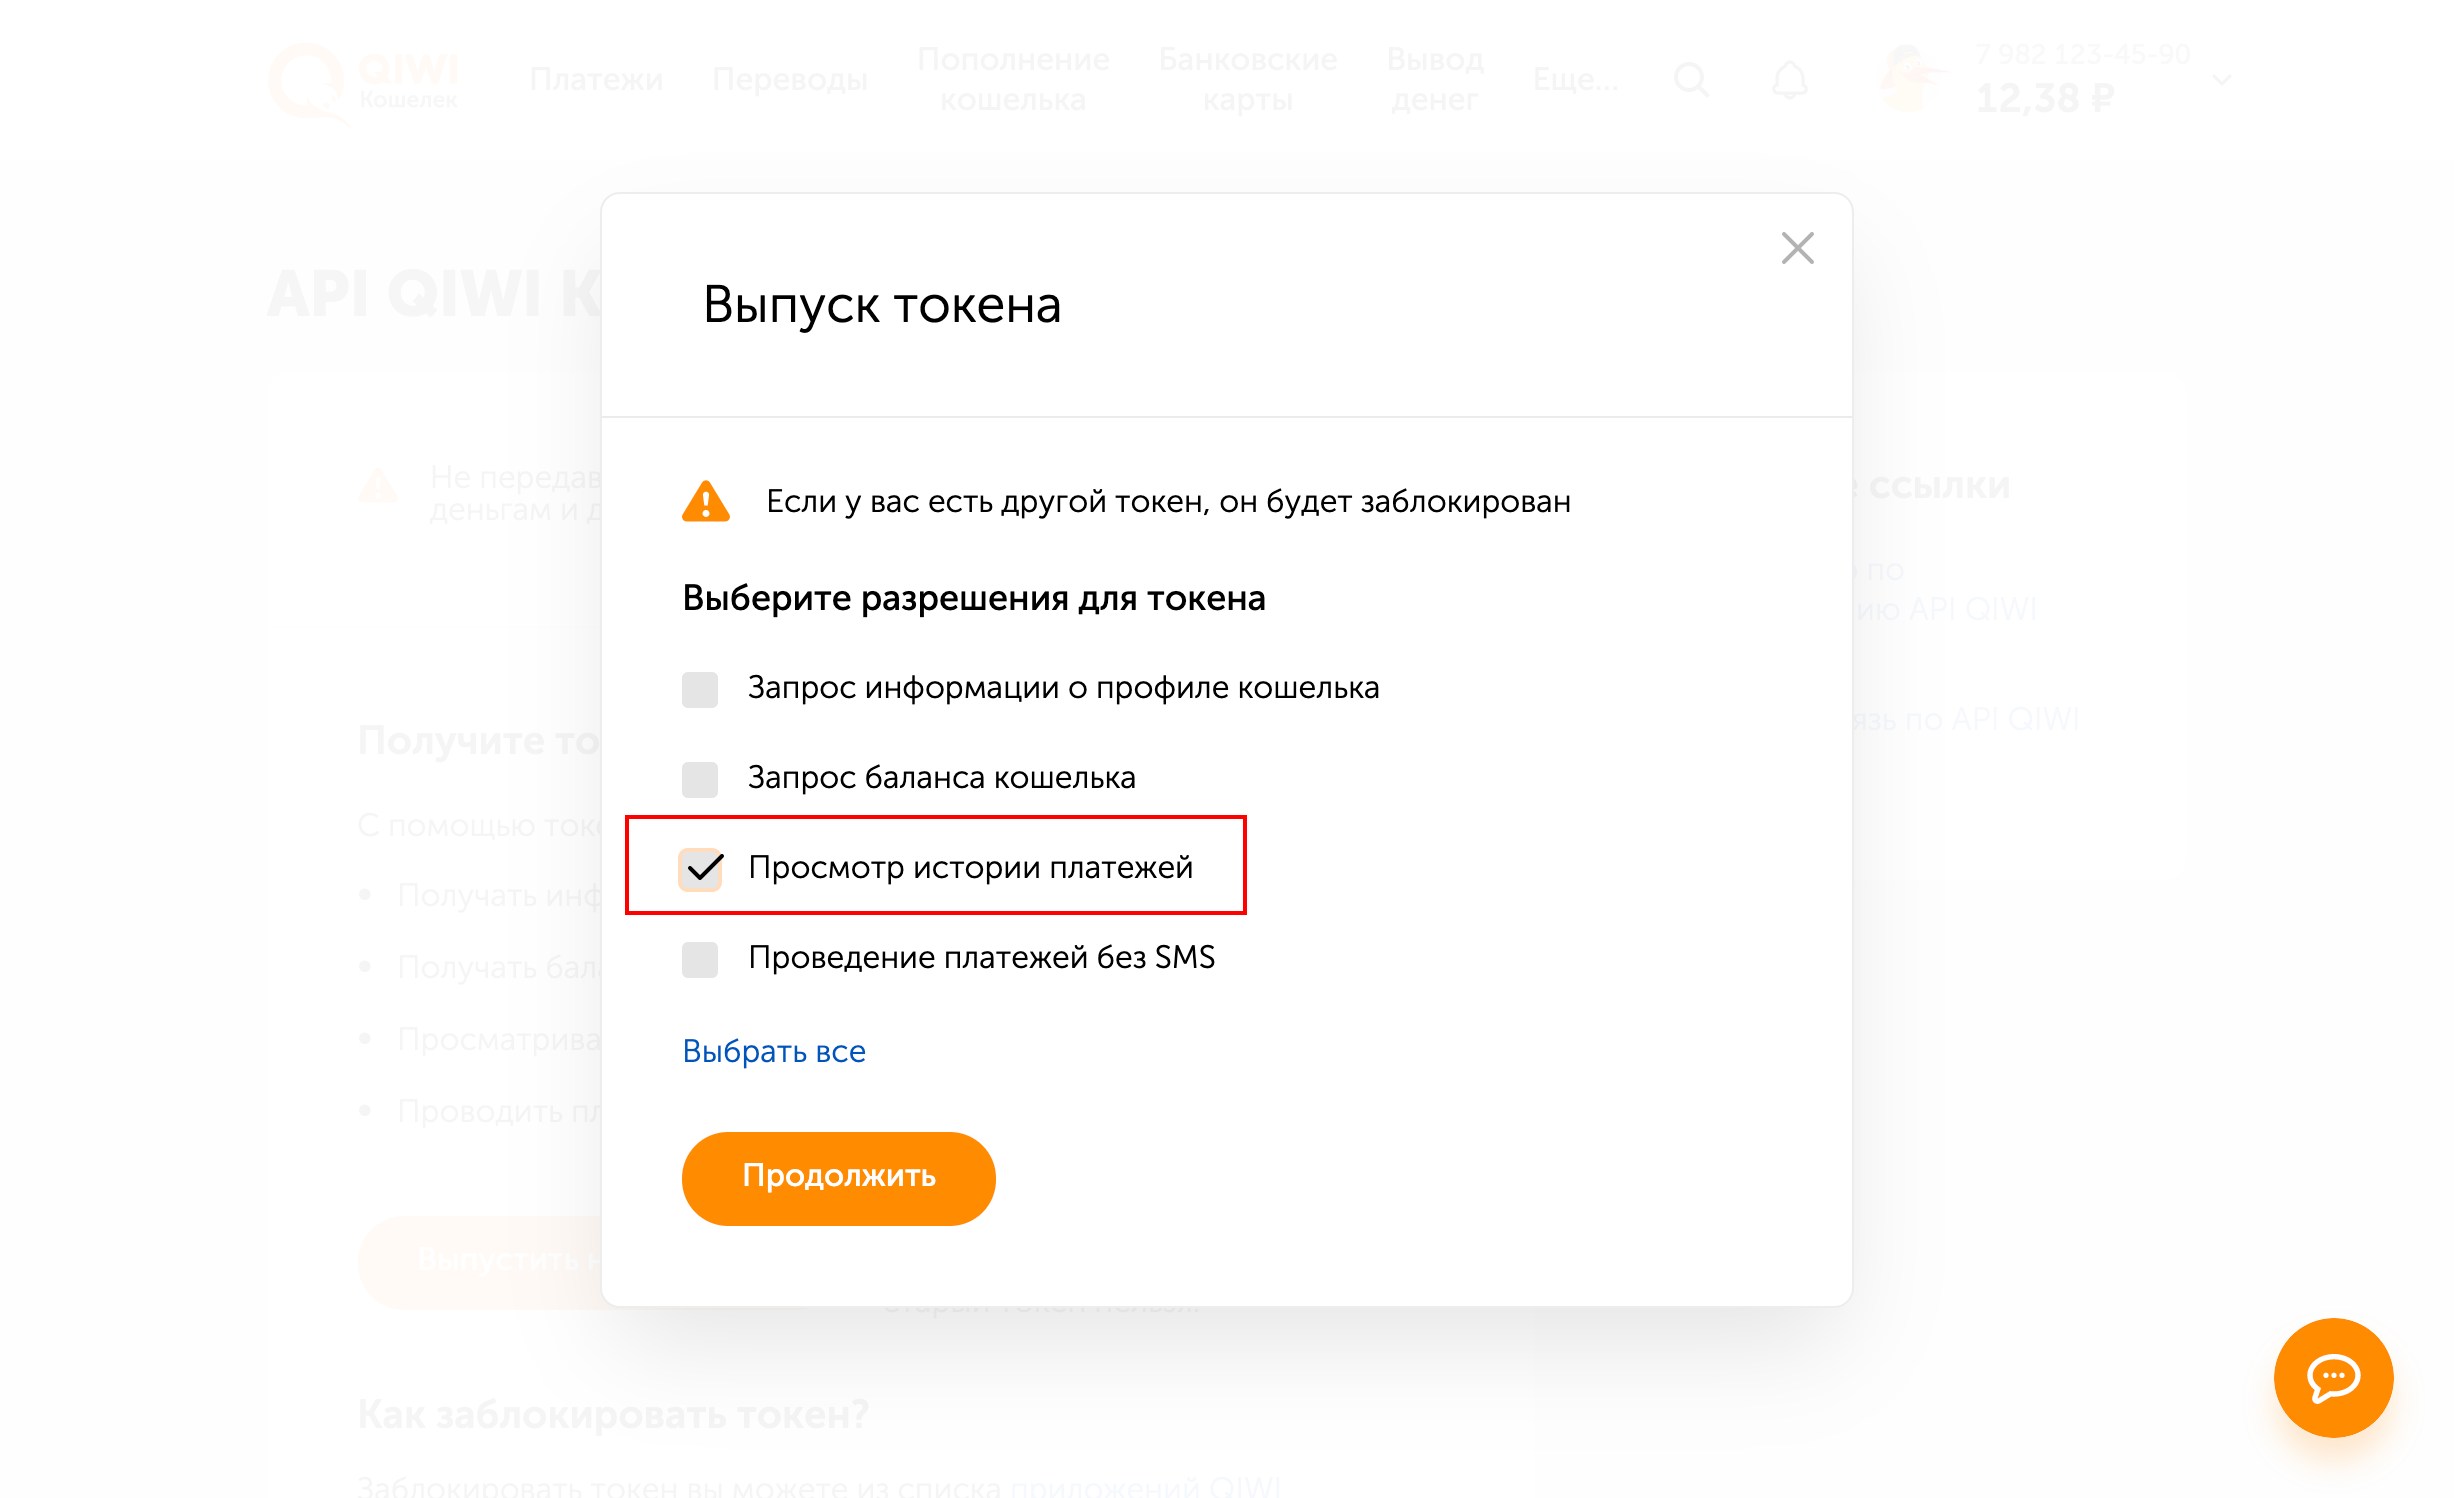
3. In the permissions, select only View payment history.
Once you have completed all these steps, the Qiwi wallet connection is done.
Enot
Integration with this service lets you accept payments from individuals directly to your wallet.
Before setting up the integration, create a cash desk in the https://enot.io/ service and link it to your website.
Important! When creating the cash desk, you must specify the domain of your own website (not puzzlebot.top) and verify it using any of the offered methods. If you do not have a website, contact the payment service support at https://t.me/Enot_support_bot
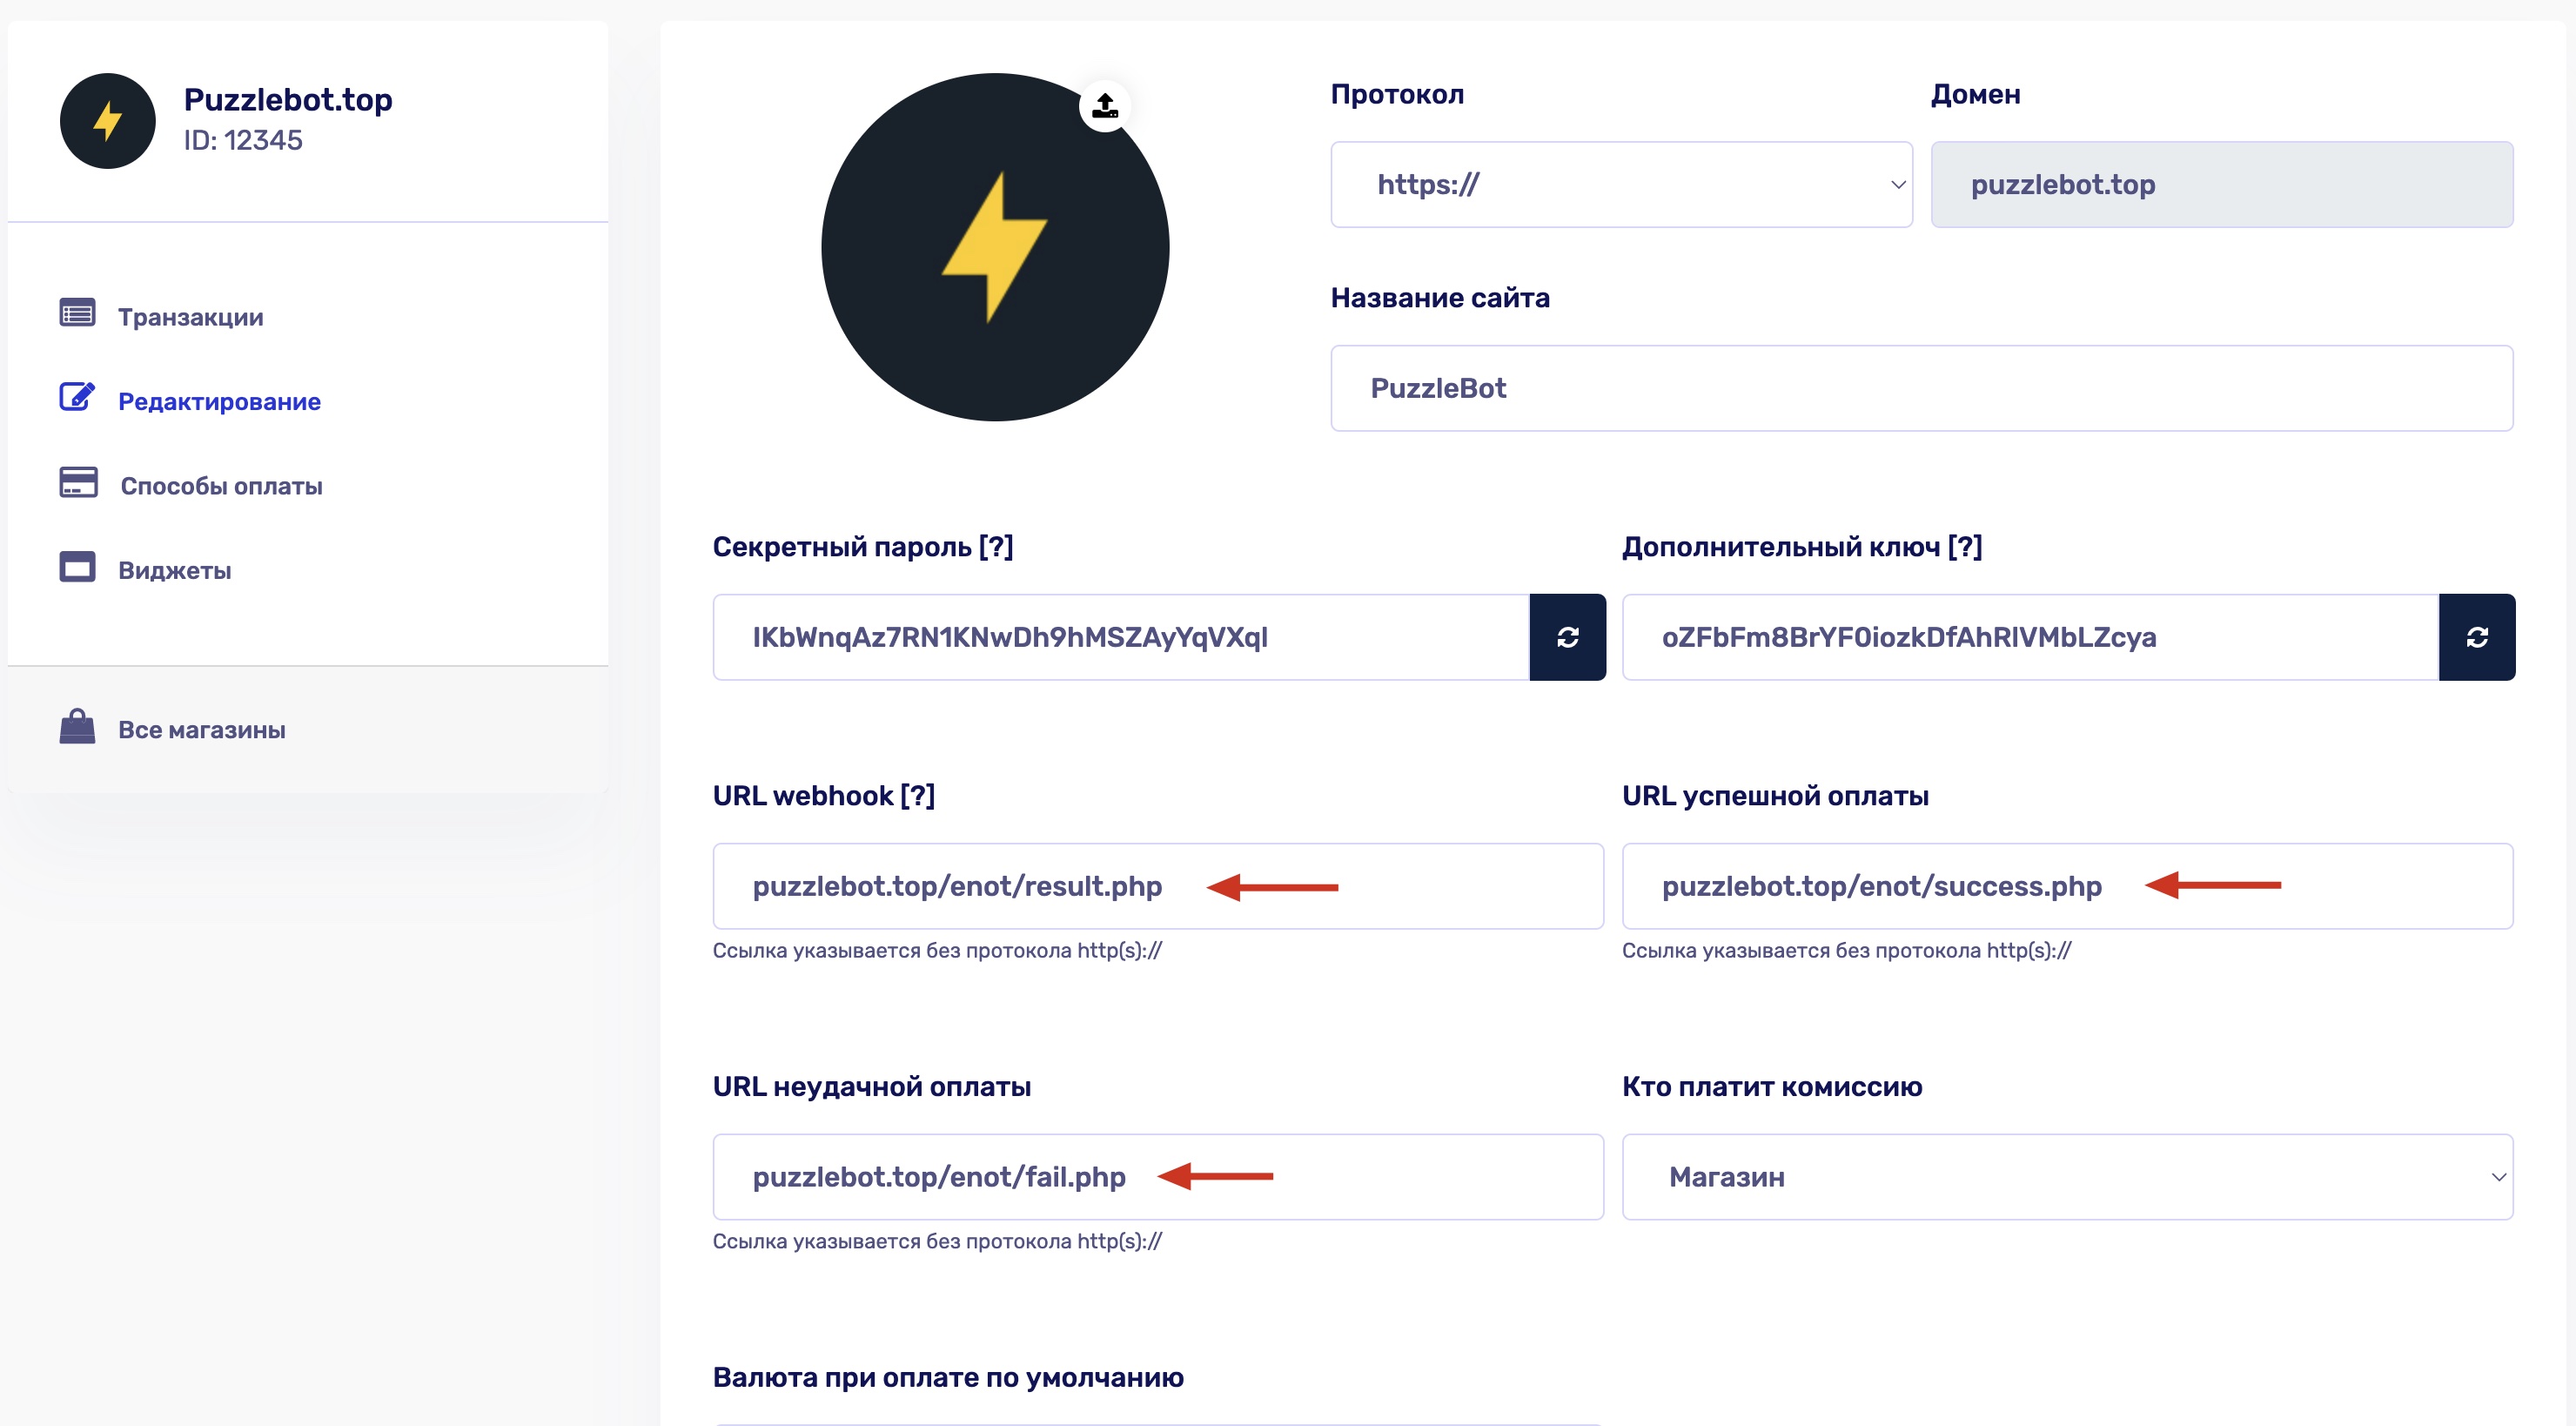
In the store settings:
Add the Webhook Url:
https://pay.puzzlebot.top/payment_result.php?ps=enotAdd the Successful payment Url:
https://puzzlebot.top/enot/success.phpAdd the Failed payment Url:
https://puzzlebot.top/enot/fail.php
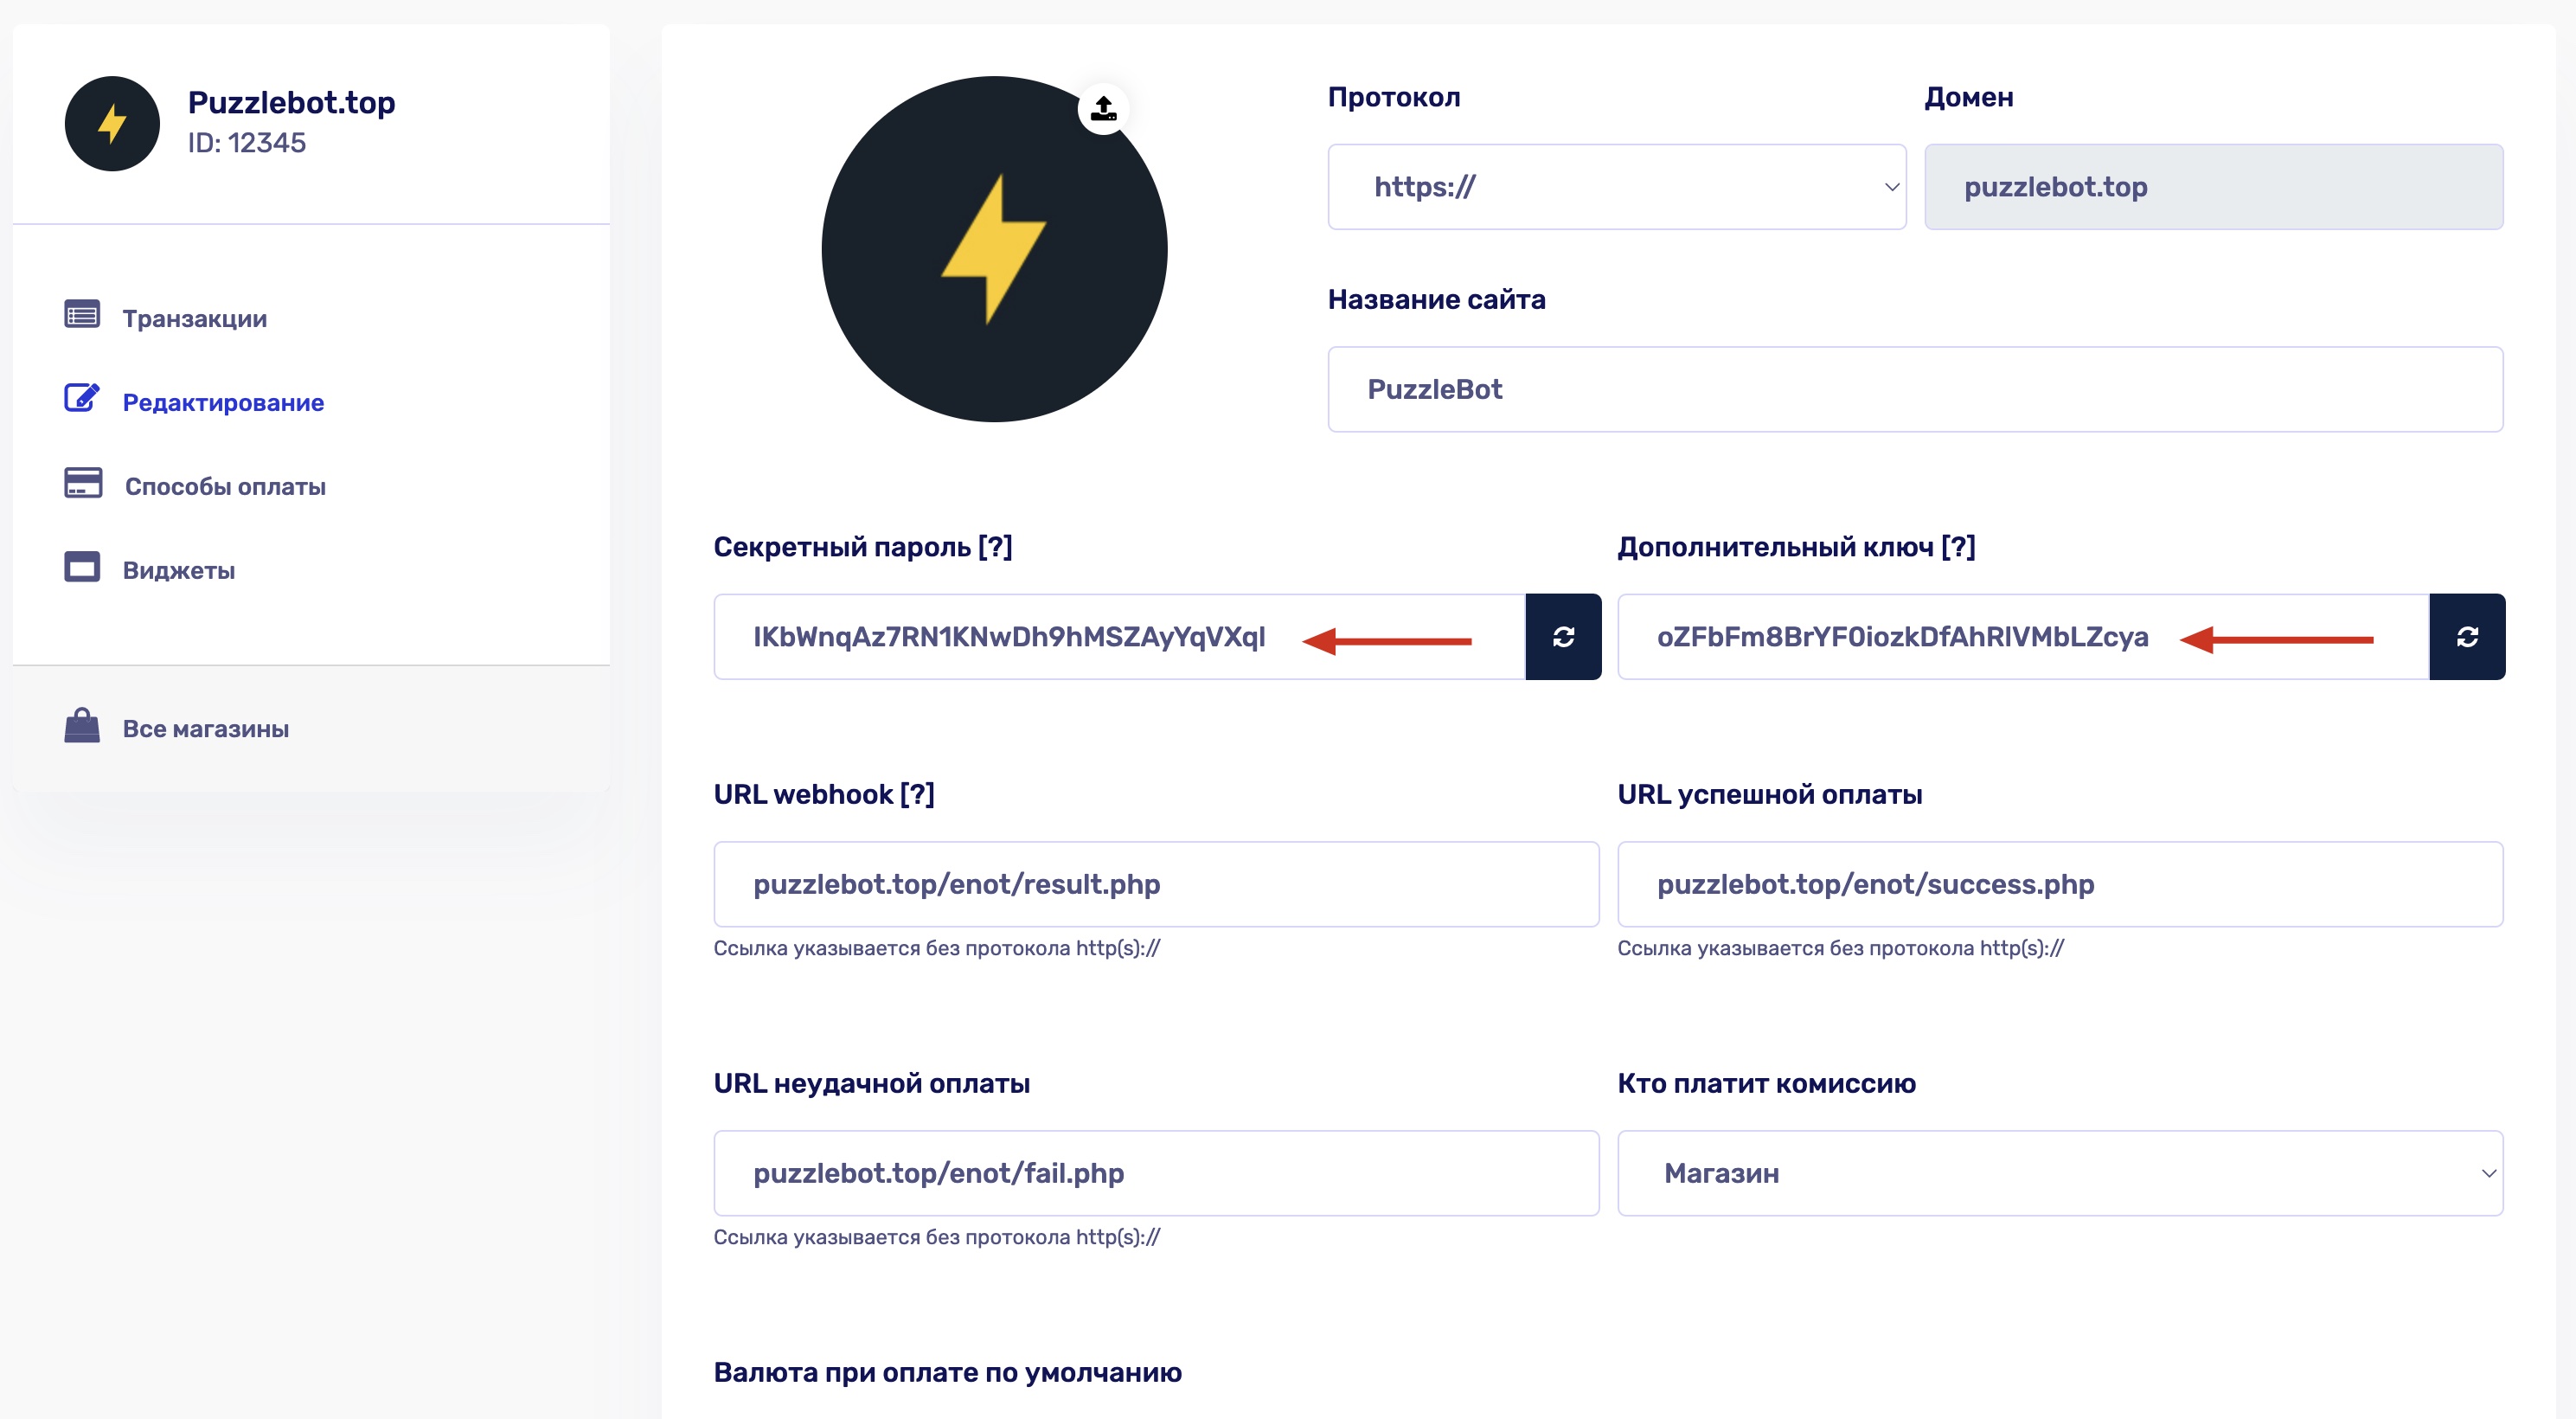
4. Copy the Secret password and the Additional key.
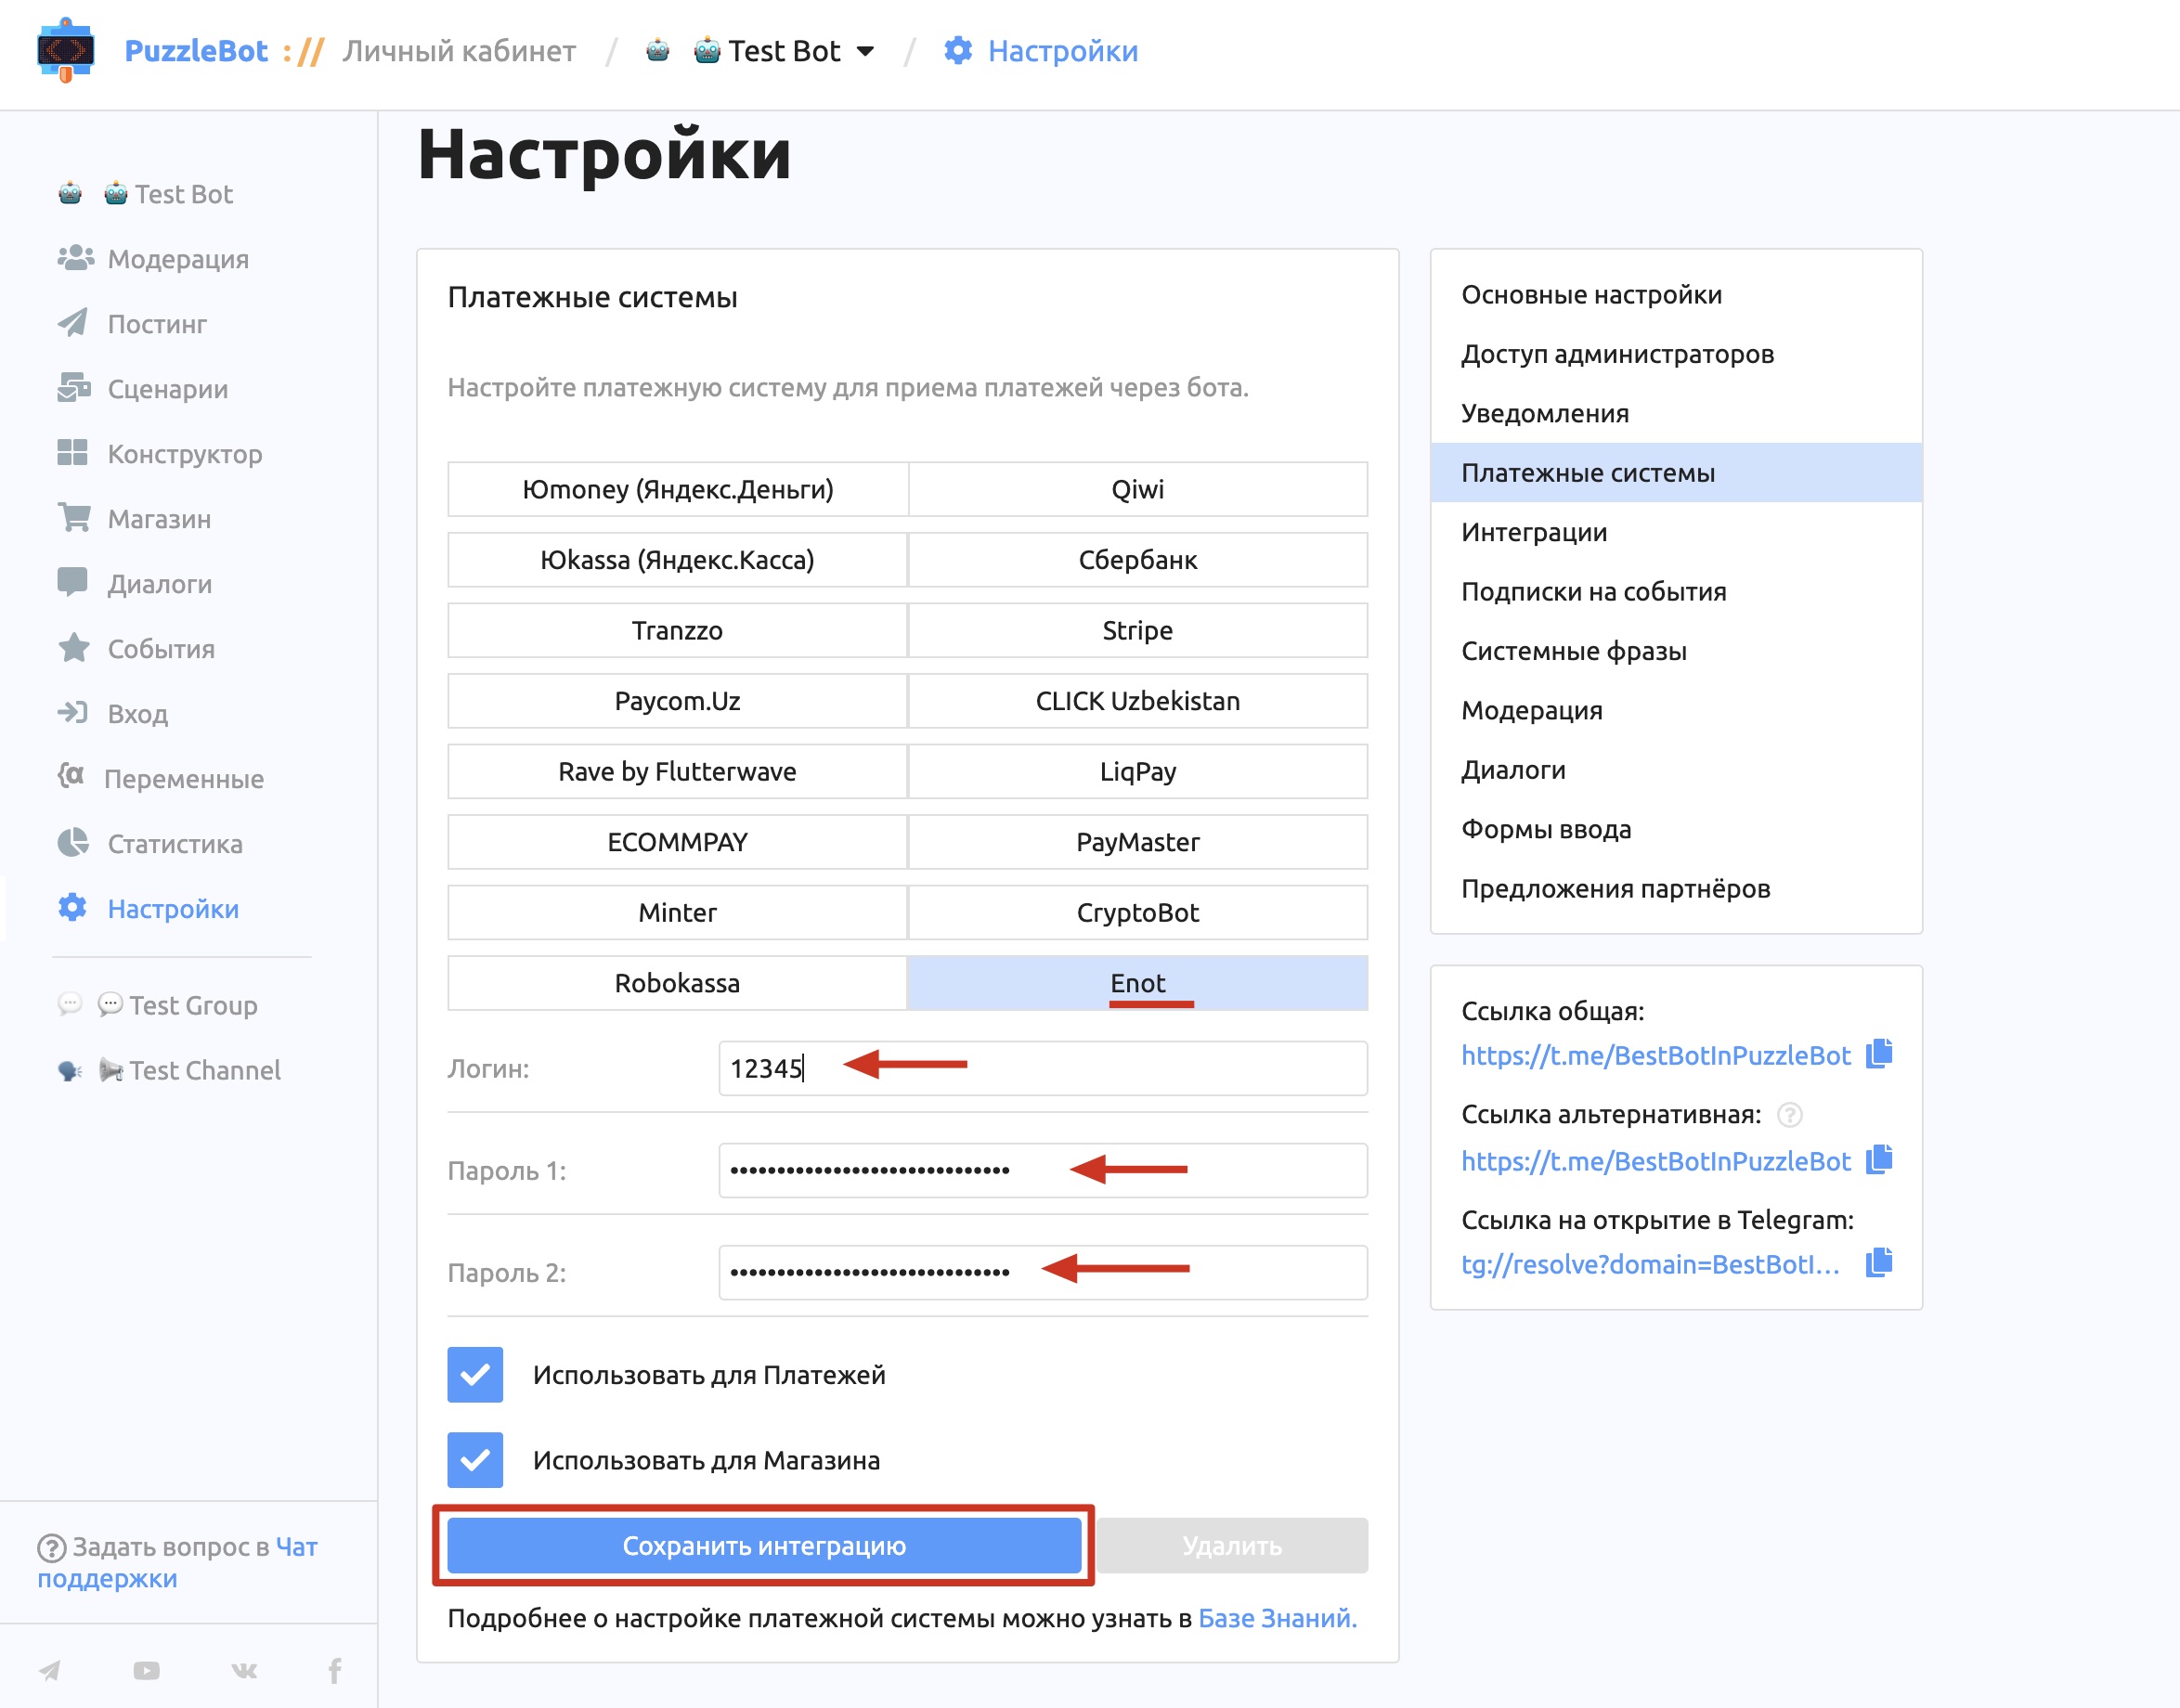
5. Paste the Cash desk ID into the "Login" field and the passwords into the corresponding fields.
6. Save the integration in puzzlebot and save the data you entered in Enot.
Once you have completed all these steps, the Enot connection is done.
Cryptocurrency
CryptoBot
Integration with CryptoBot lets you accept payments in cryptocurrencies: TON, BTC, USDT, BNB, BUSD, USDC.
To connect it, follow these steps:
1. Start a chat with @CryptoBot in Telegram. Go to Crypto Pay — Create app — API token.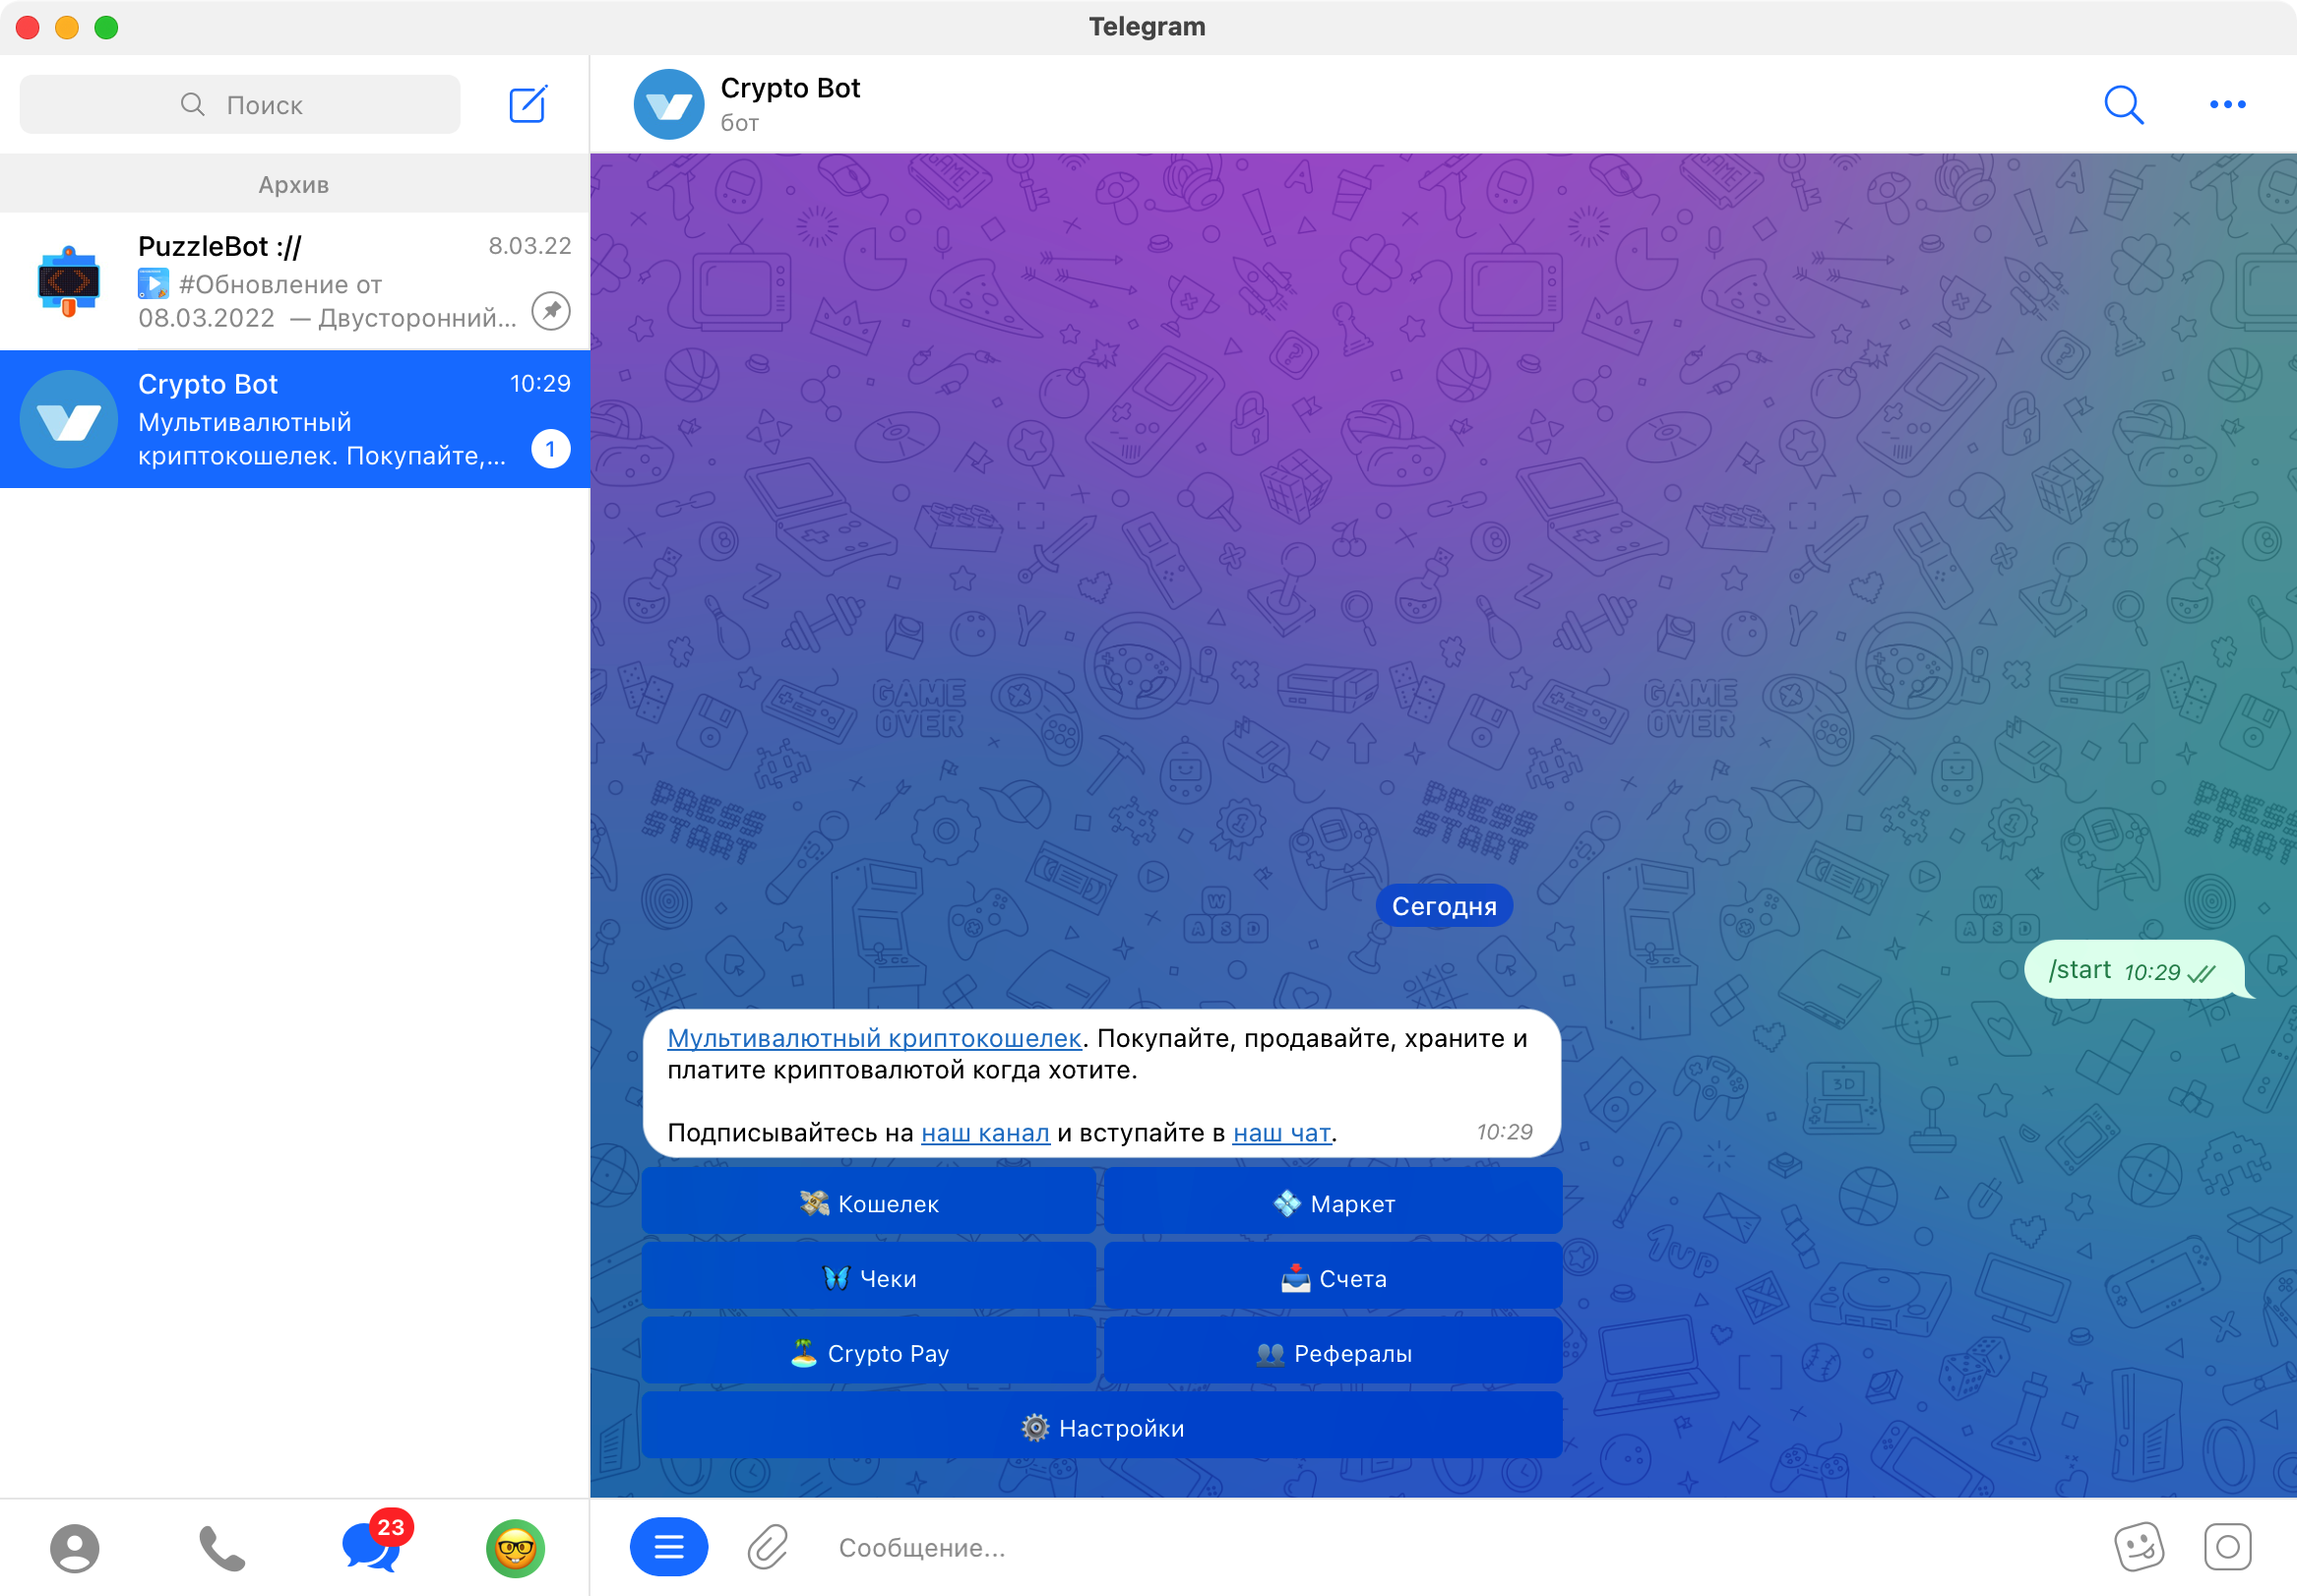
2. Copy the API token from the bot.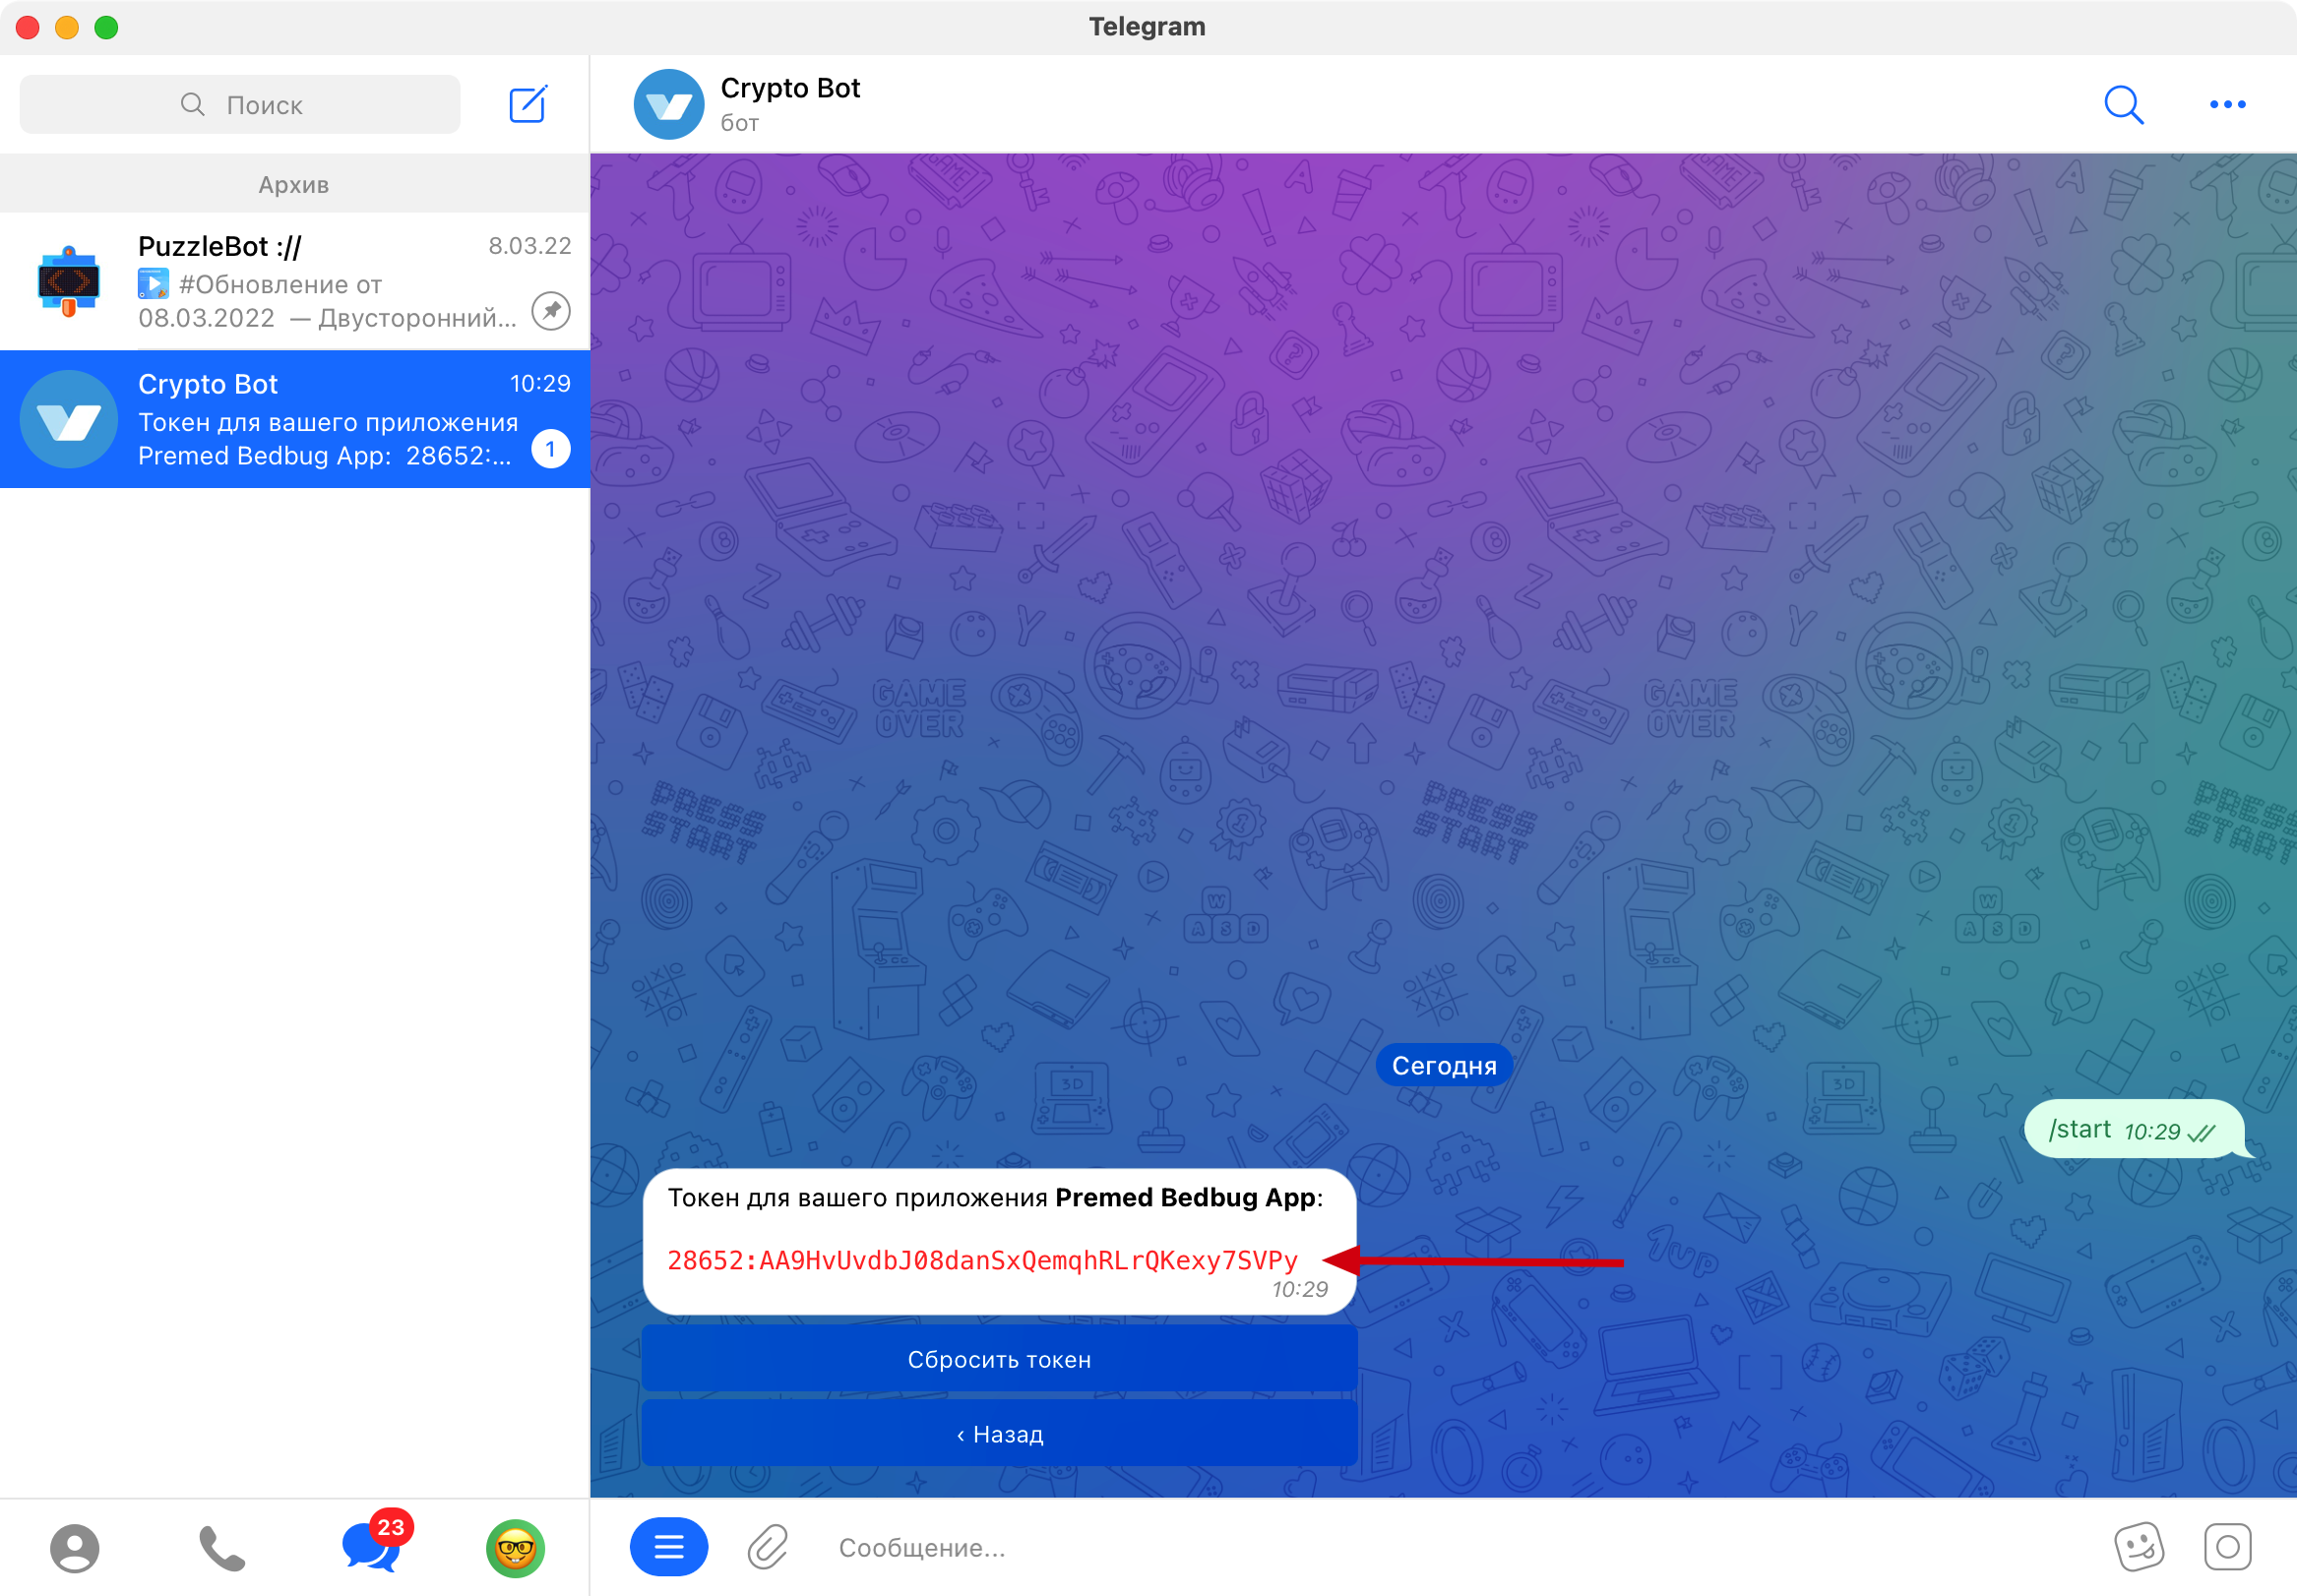
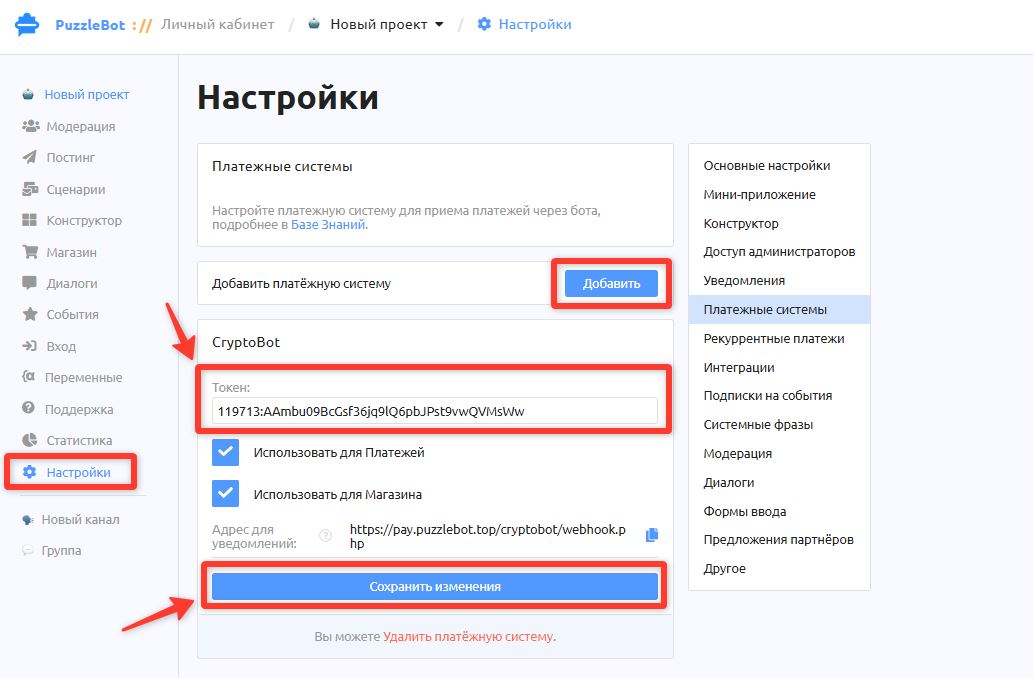
3. Go to Settings → Payment systems → Add → CryptoBot → paste the API key.
Important! After entering the API token, do not forget to save changes.
3. In the bot, enable Webhooks.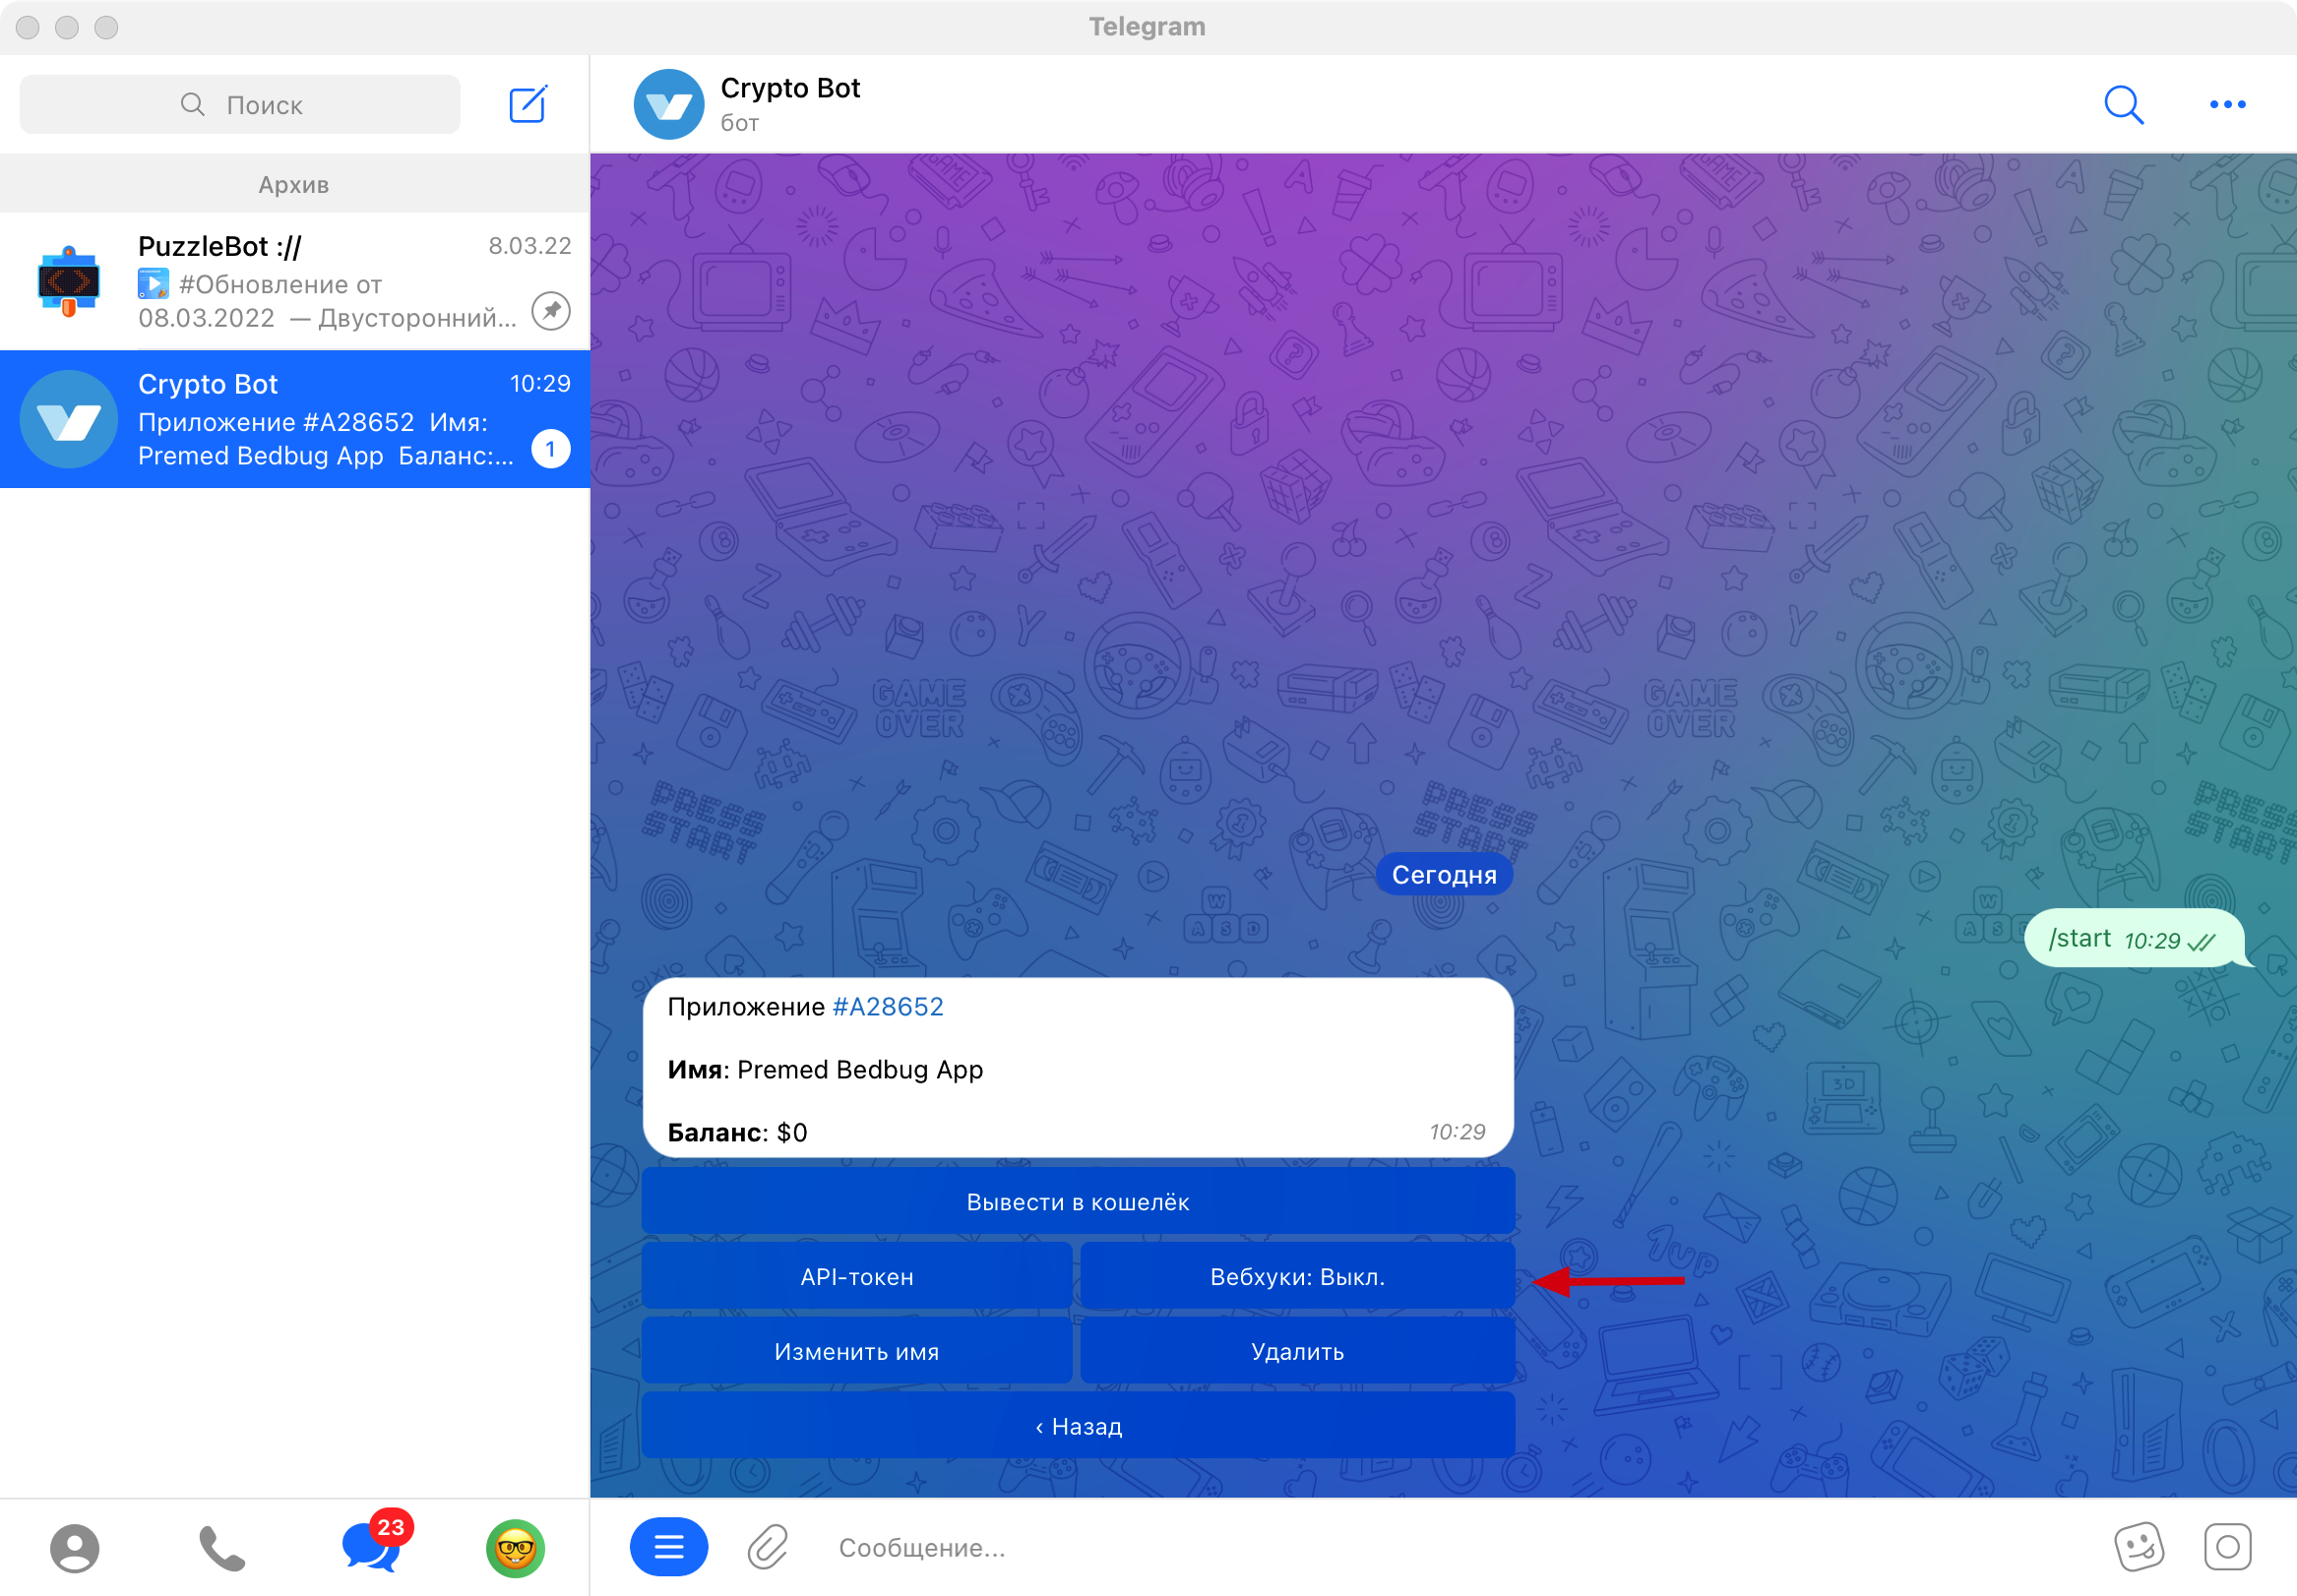
4. Copy the notification address: https://pay.puzzlebot.top/cryptobot/webhook.php and send it to the bot.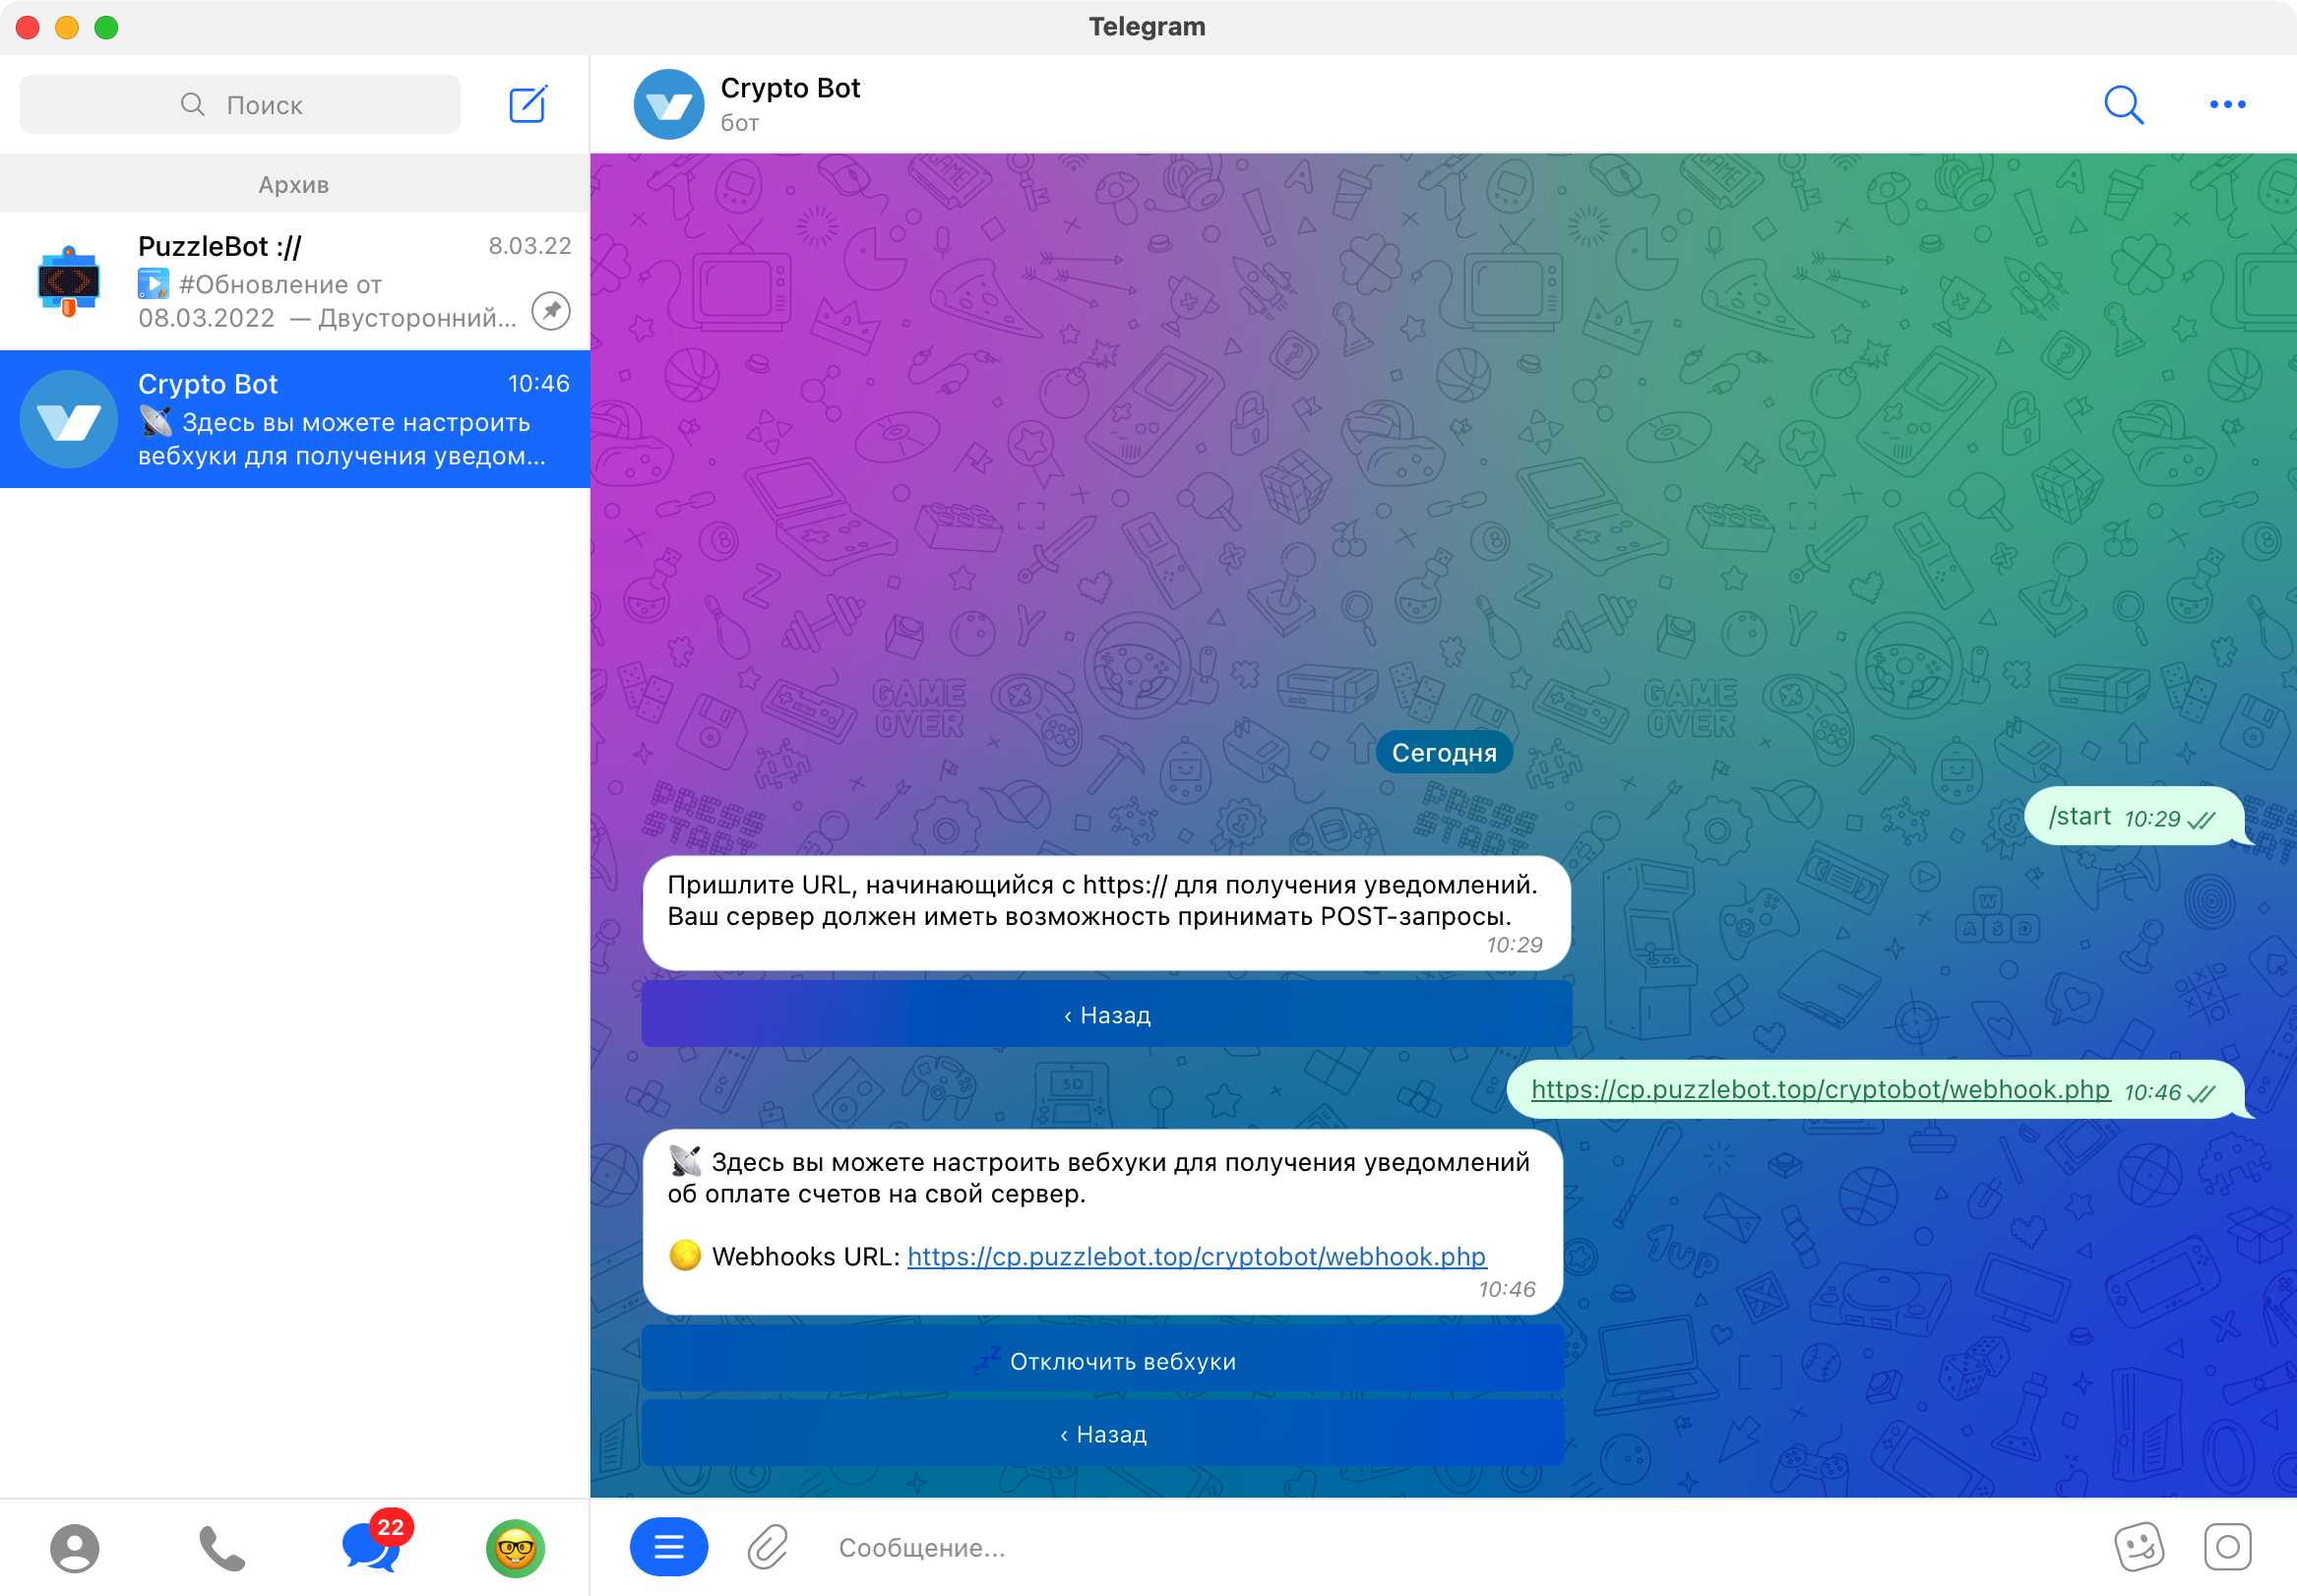
Done! The connection is complete.
Connecting the Custodex payment system
Custodex is a service for accepting cryptocurrency payments: it supports several dozen popular assets (USDT, BTC, ETH and other coins and stablecoins), charges a fee of just 1%, and can convert to USDT.
Step 1. Sign up
Go to https://pay.custodex.sv/register and sign up.
When signing up, provide a valid Telegram contact — you will be contacted through it to activate your account.
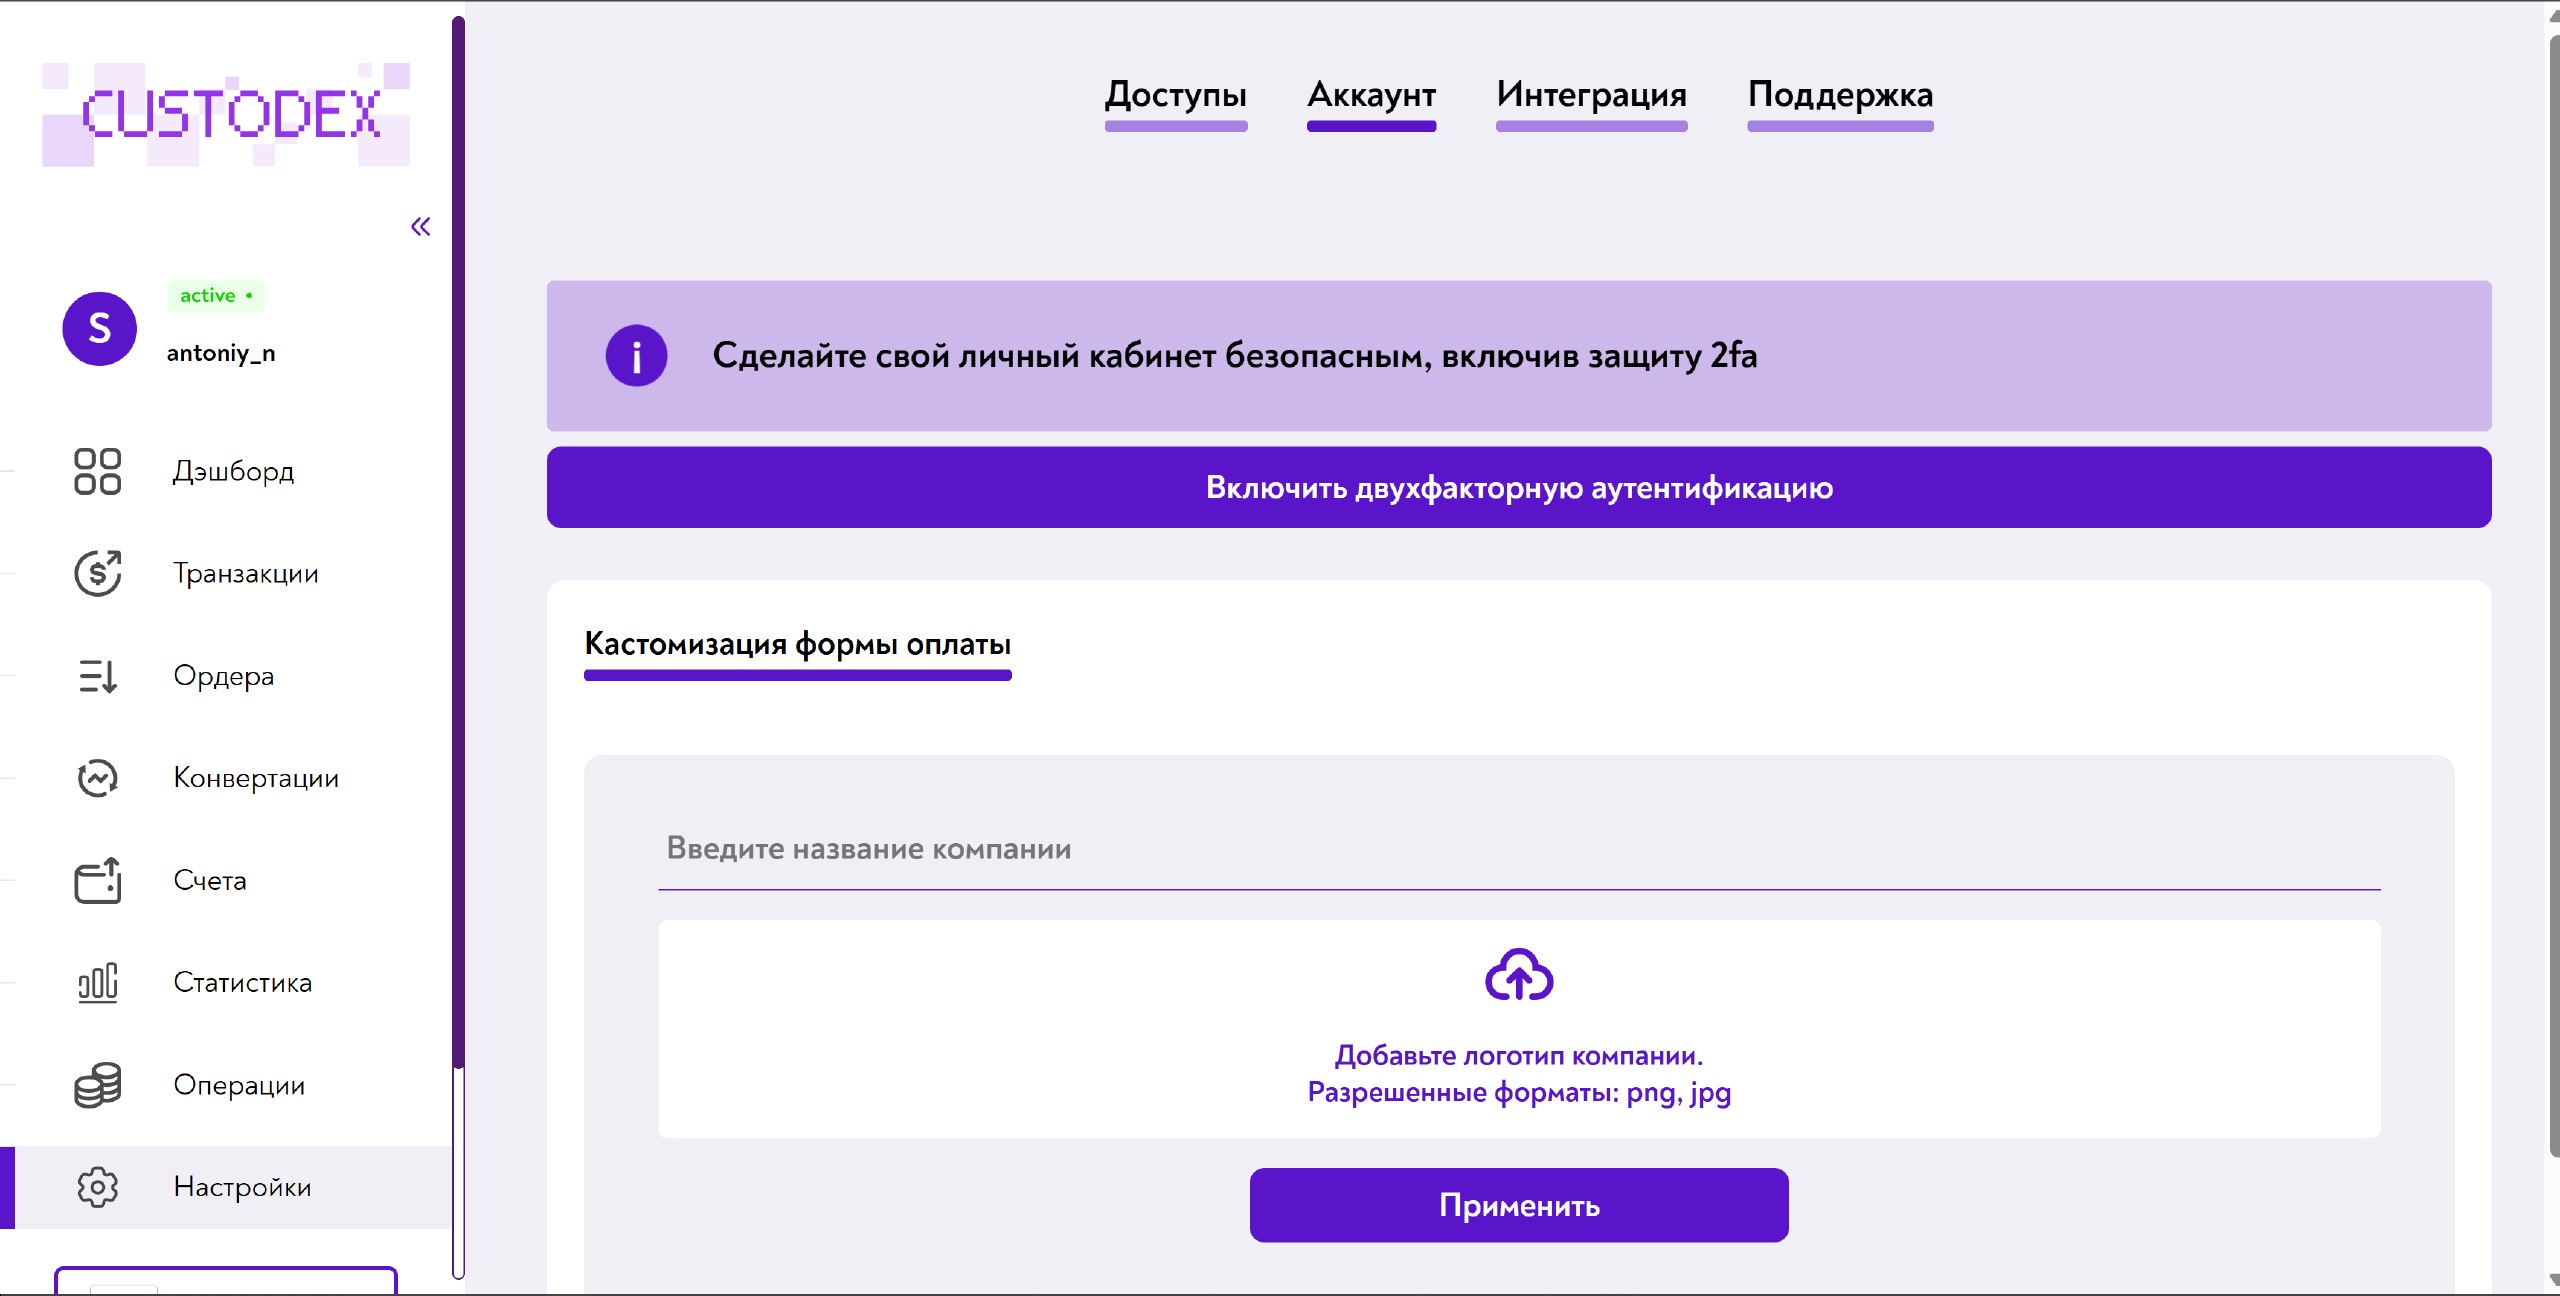
Step 2. Enable two-factor authentication
In your account, open Settings → Account and click Enable two-factor authentication. Follow the instructions — you will need an authenticator app (for example, Google Authenticator).
This step is mandatory — without 2FA enabled, you will not be able to create an account in Step 4.
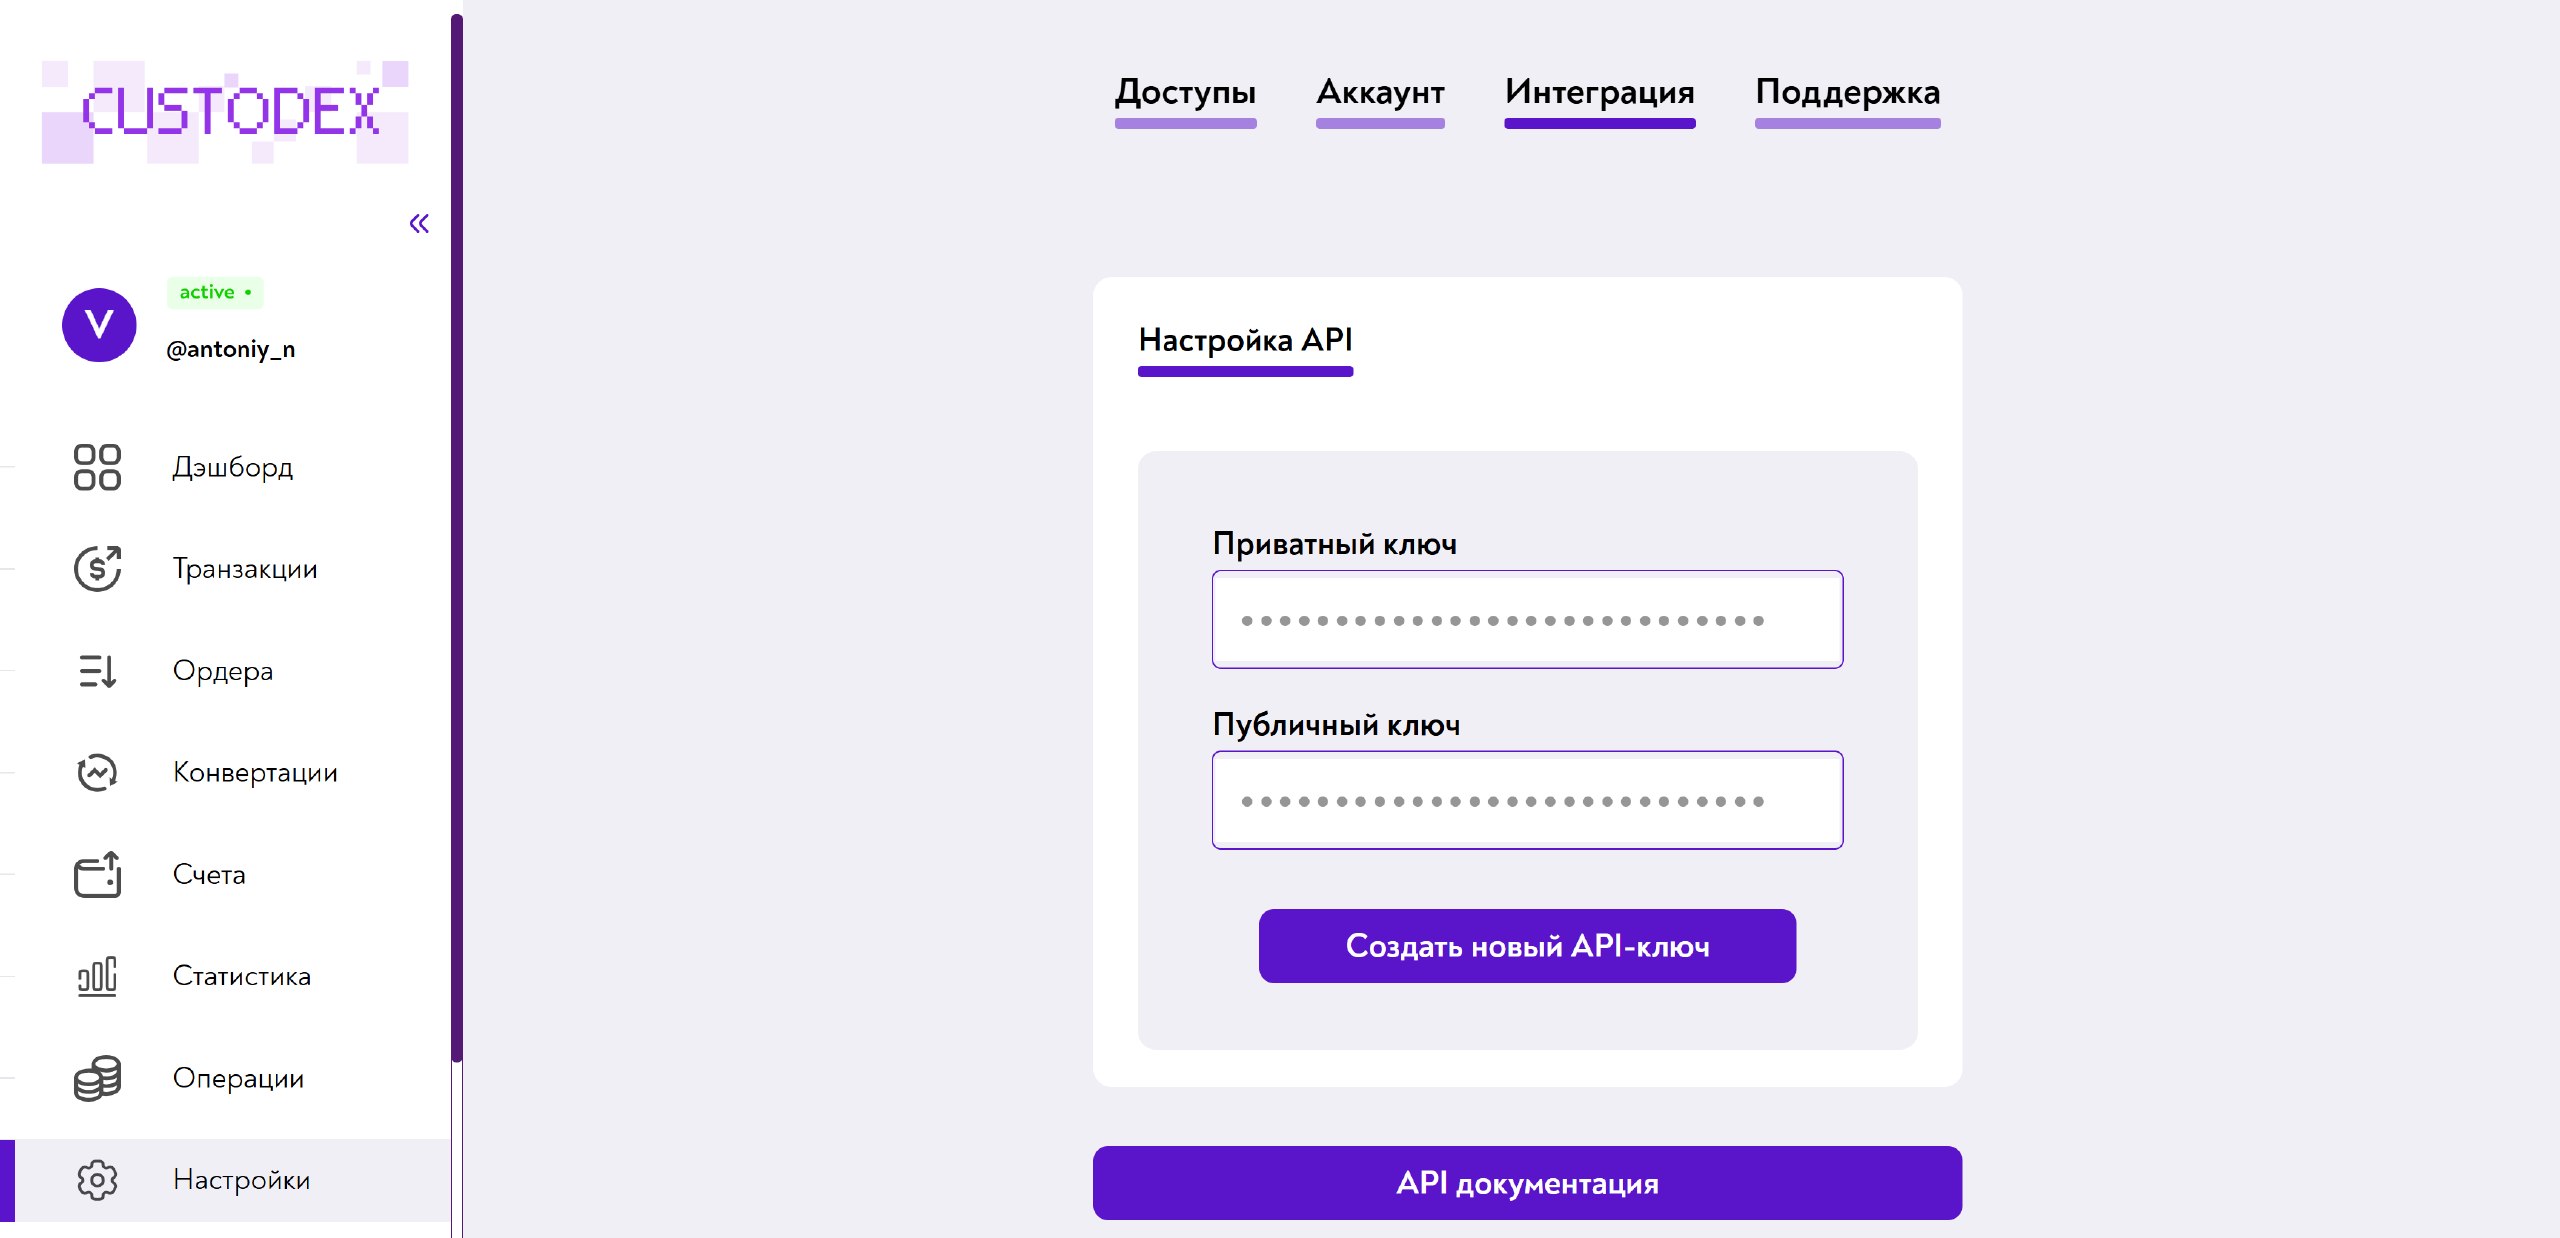
Step 3. Get the integration keys
Go to Settings → Integration and copy the Private key and the Public key.
Important! The private key is like a password — do not share it with anyone and do not publish it.
Step 4. Create a Merchant ID
In your Custodex account, open the Accounts section.
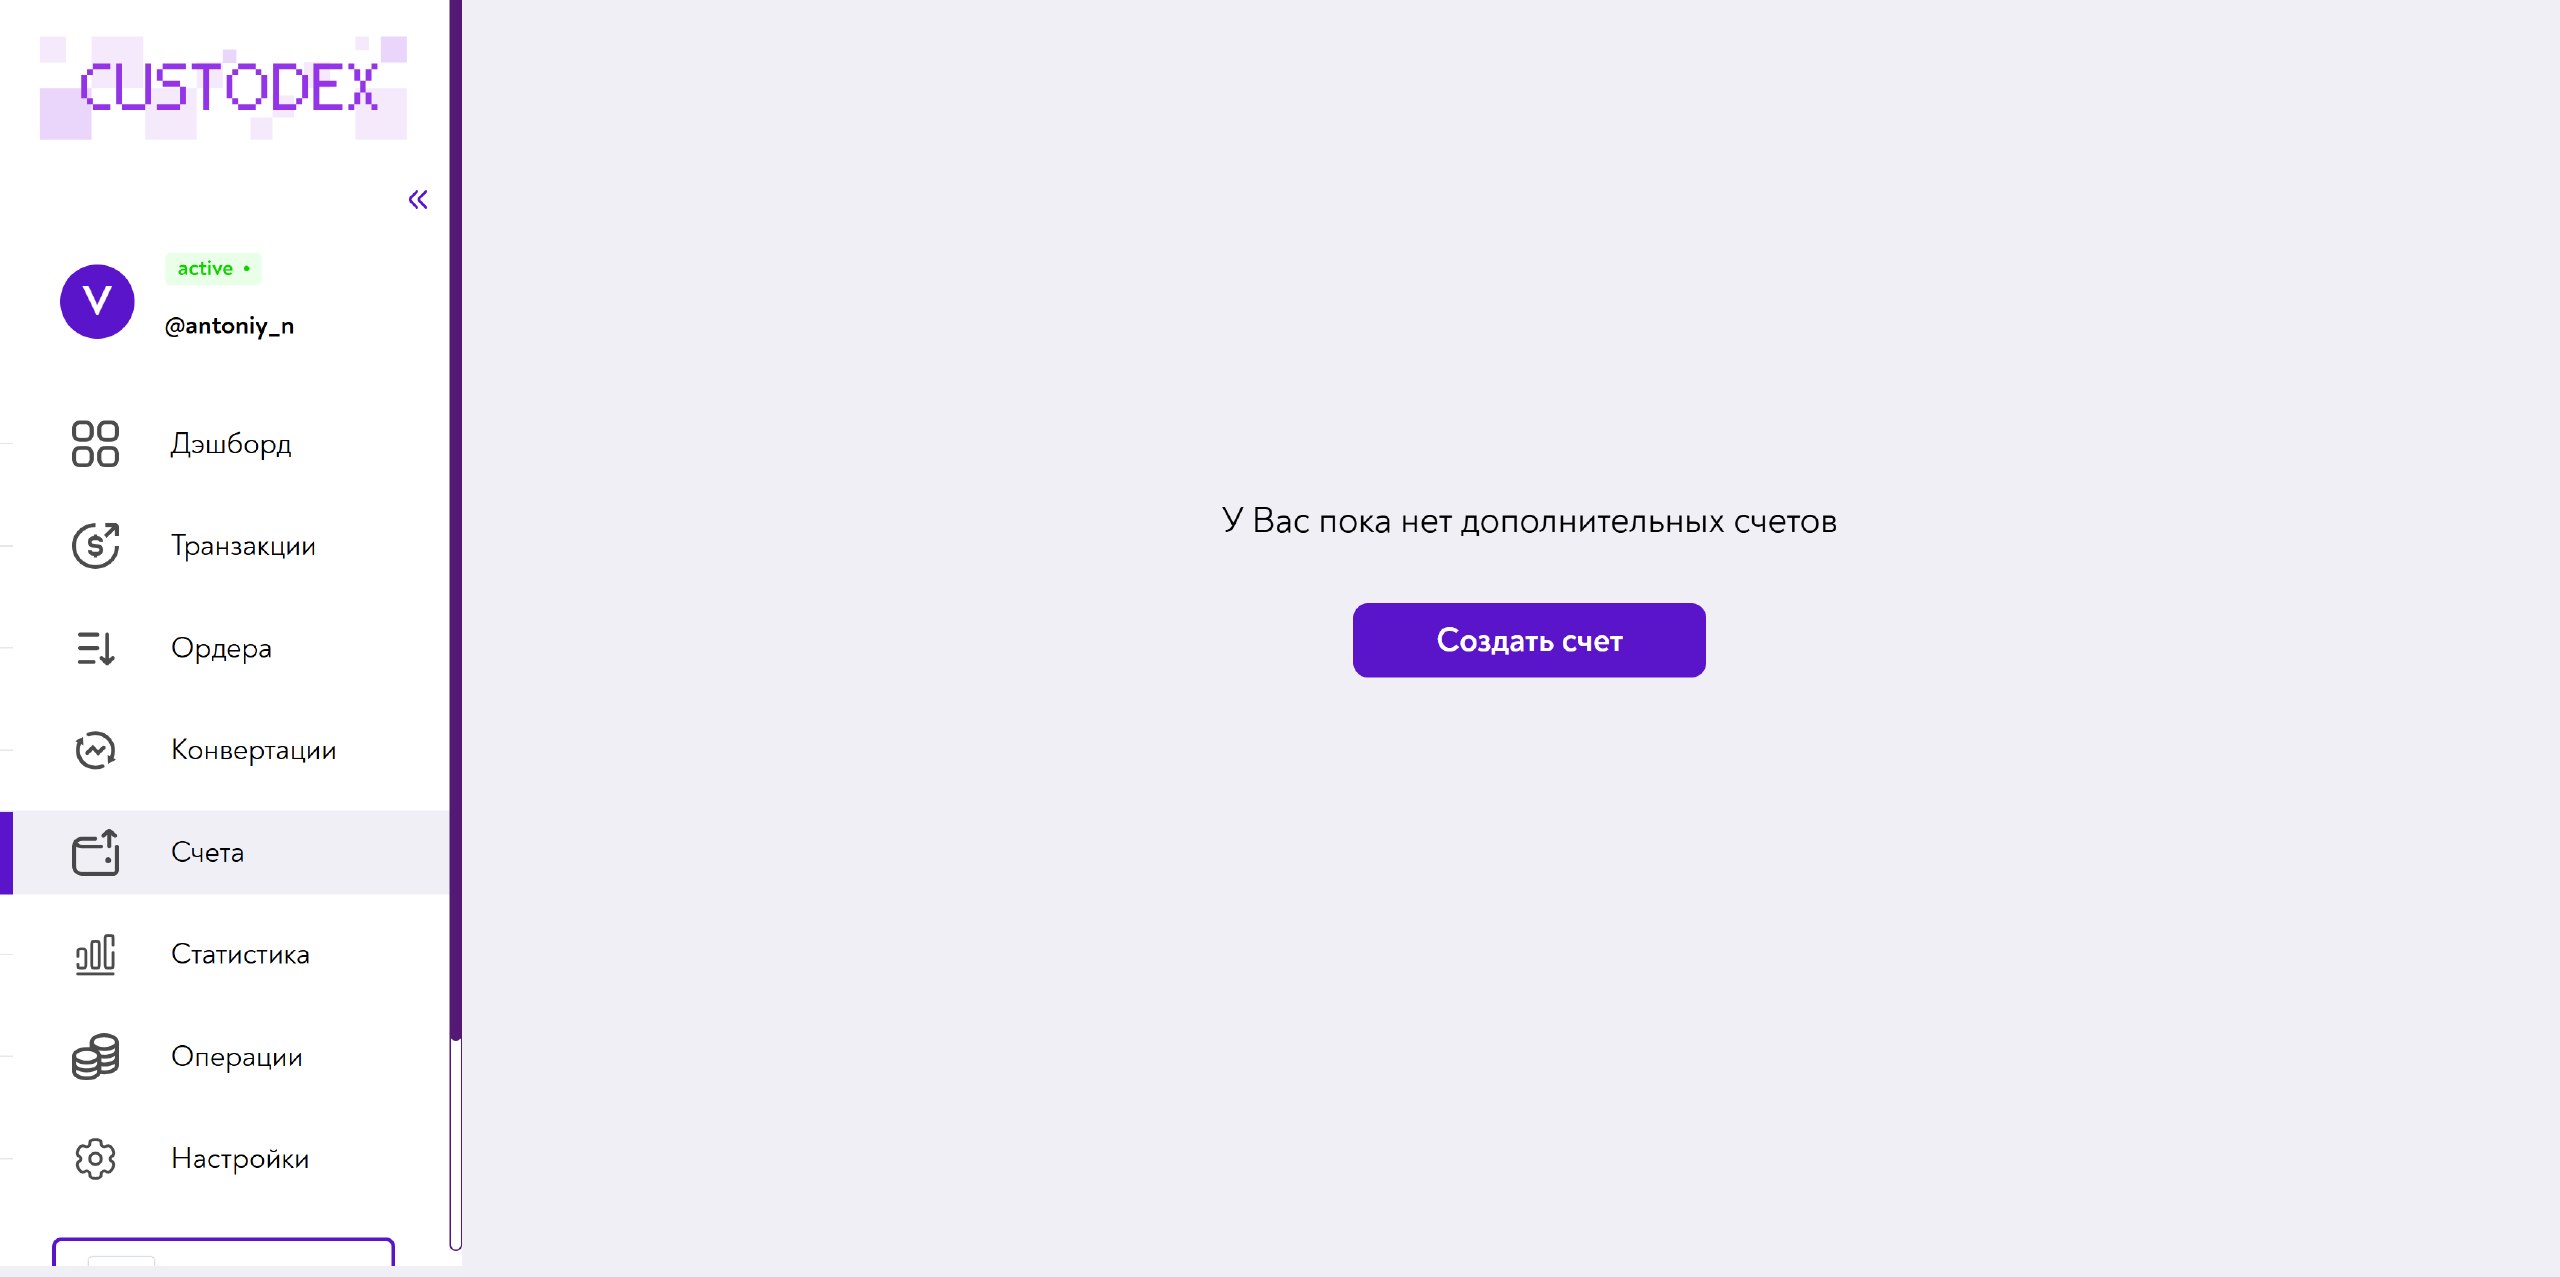
Click Create account. In the window that opens, enter an account name (any name, for your own convenience) and the 2FA code from the authenticator app.
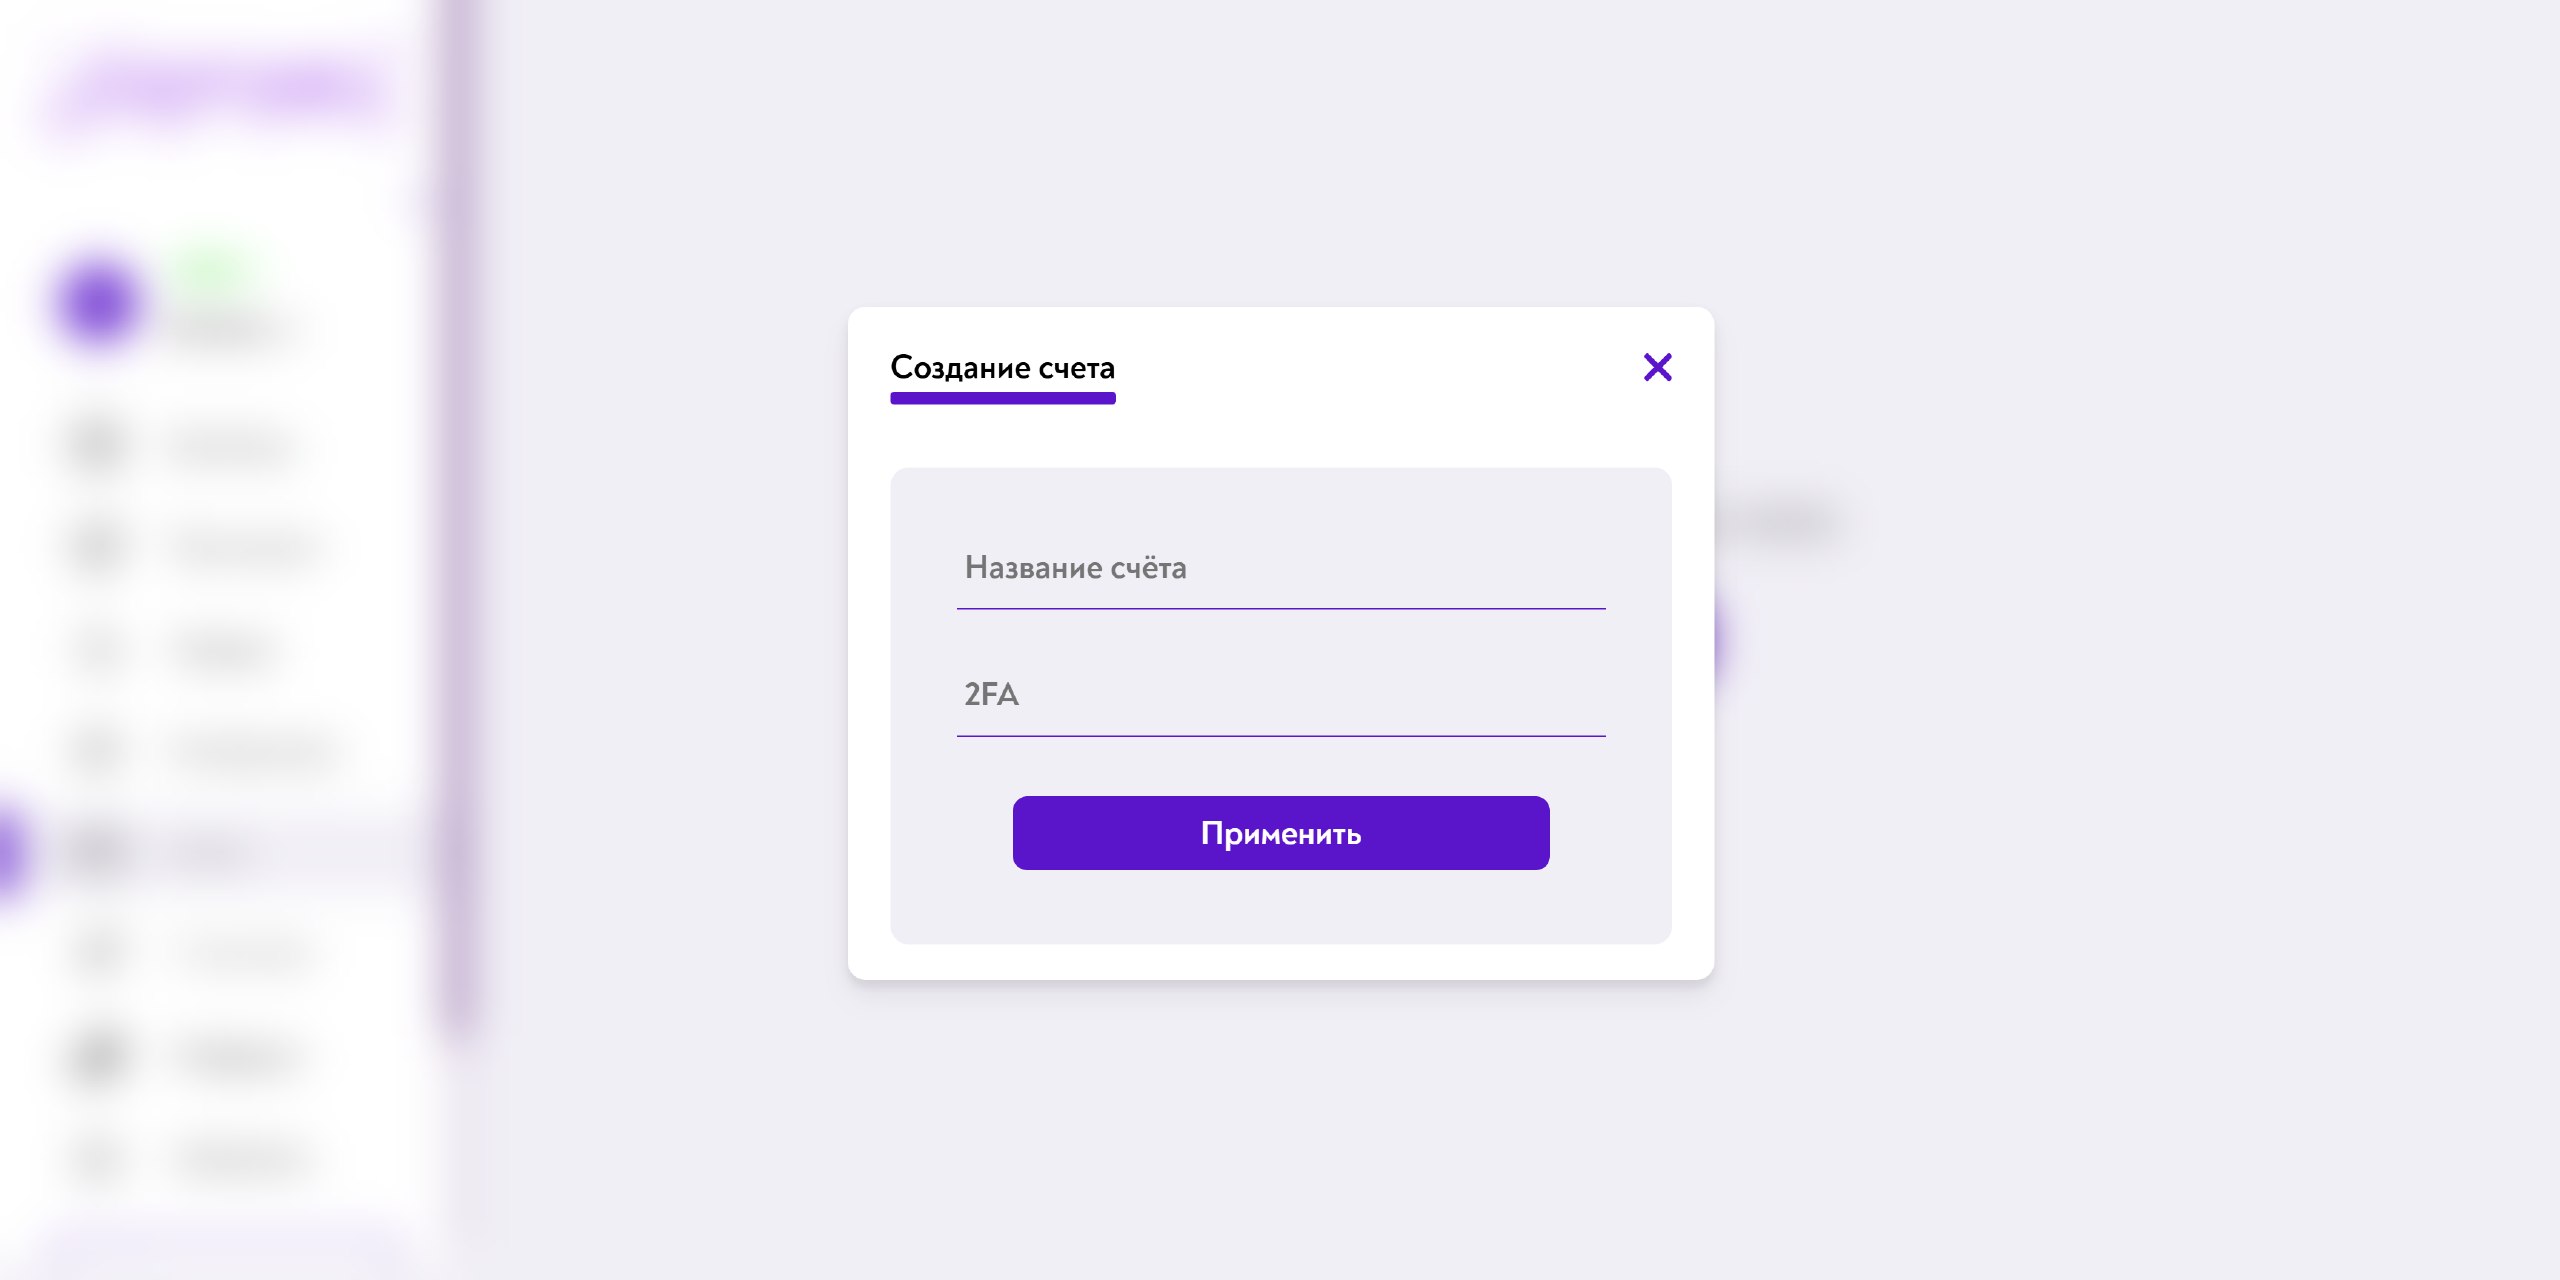
Click Apply — the account appears in the list along with its Merchant UUID.
Step 5. Set up in puzzlebot
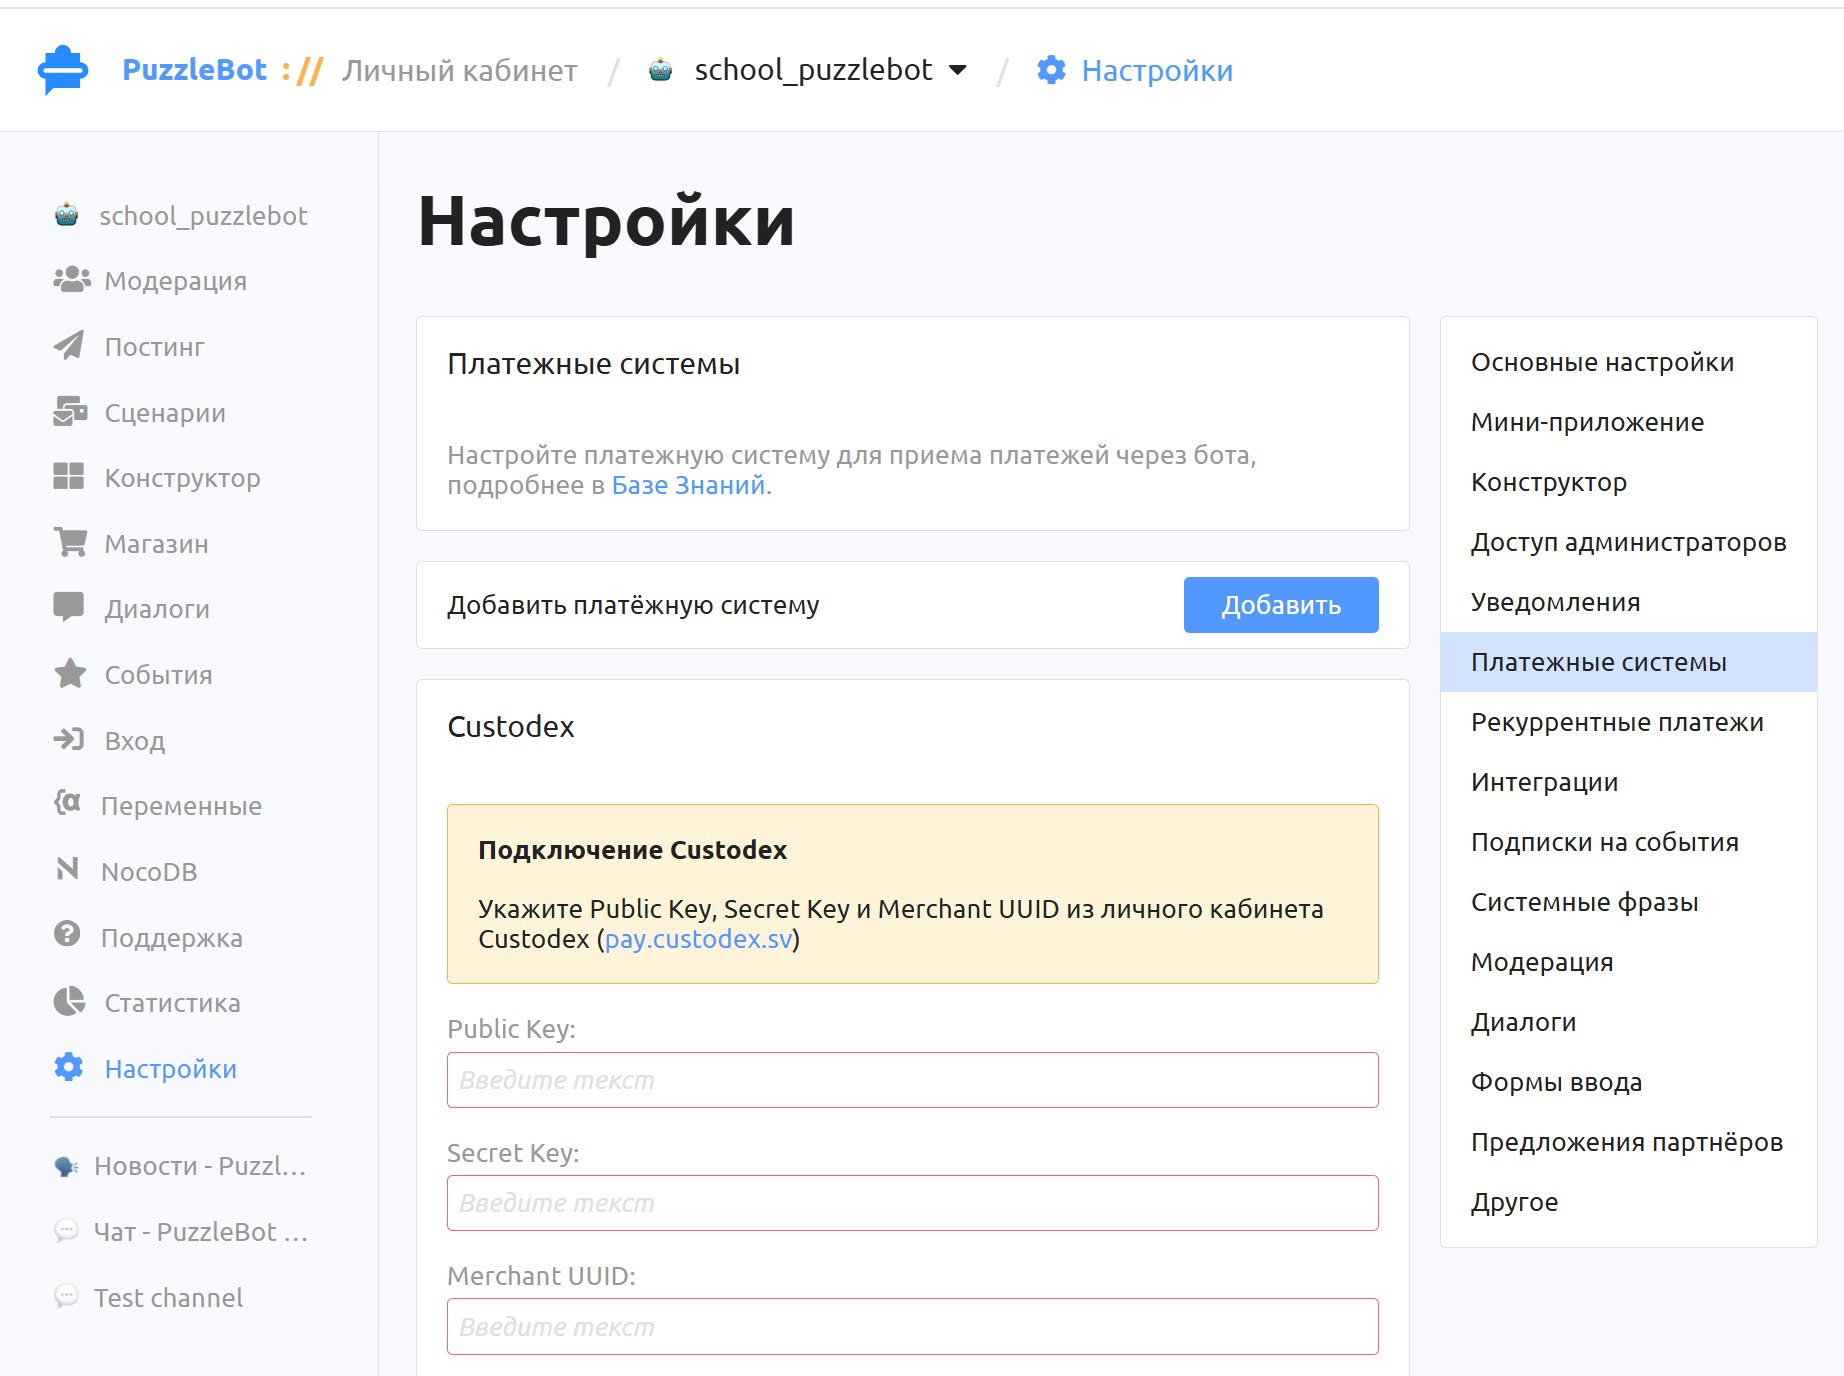
In the bottom menu, open the bot Settings, go to the Payment systems section and click Add. Select Custodex in the list that opens.
In the fields that appear, paste the values you obtained earlier — Public Key, Secret Key and Merchant UUID — and click Save changes.
Step 6. Test
Create a payment button in the bot with an amount of 2–5 dollars and make a test payment. Make sure the command you set as the action after a successful payment is triggered. If the command runs, the integration is set up correctly.