This article takes a detailed look at one of the Constructor features: input forms.
An input form is a block that accepts any information or files a user sends and stores them in a table.
Important! Input form notifications (and other notifications) are sent to your bot. If you are not receiving notifications, check that you have started a chat with the bot in Telegram.
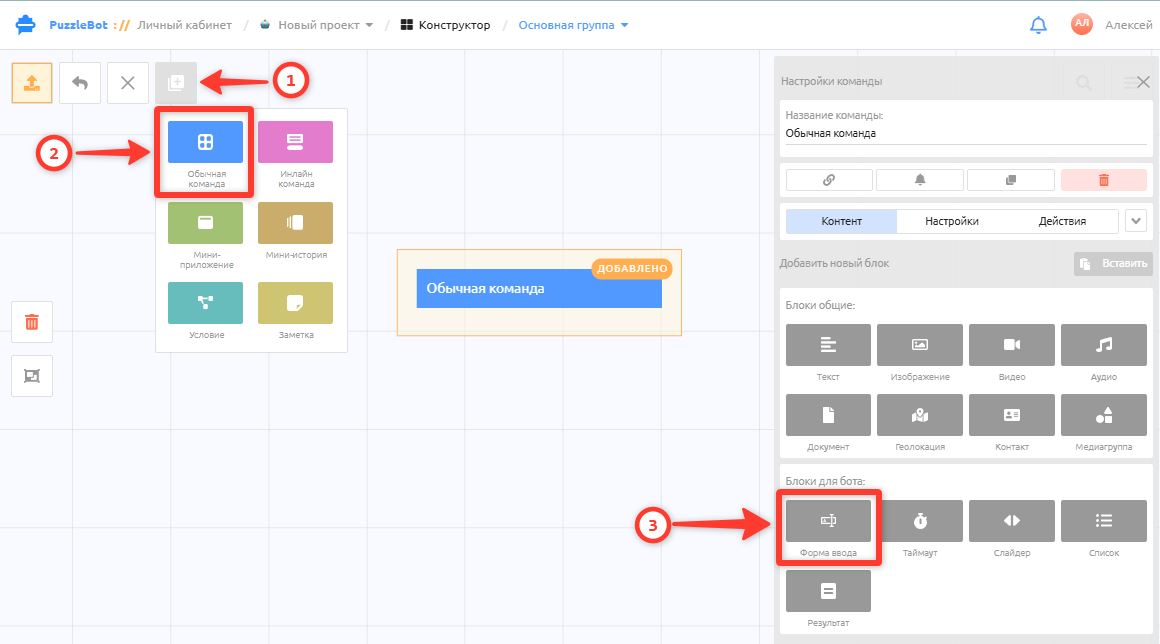
To create an input form, go to the Constructor, select or create a Regular command and choose the Input form block.
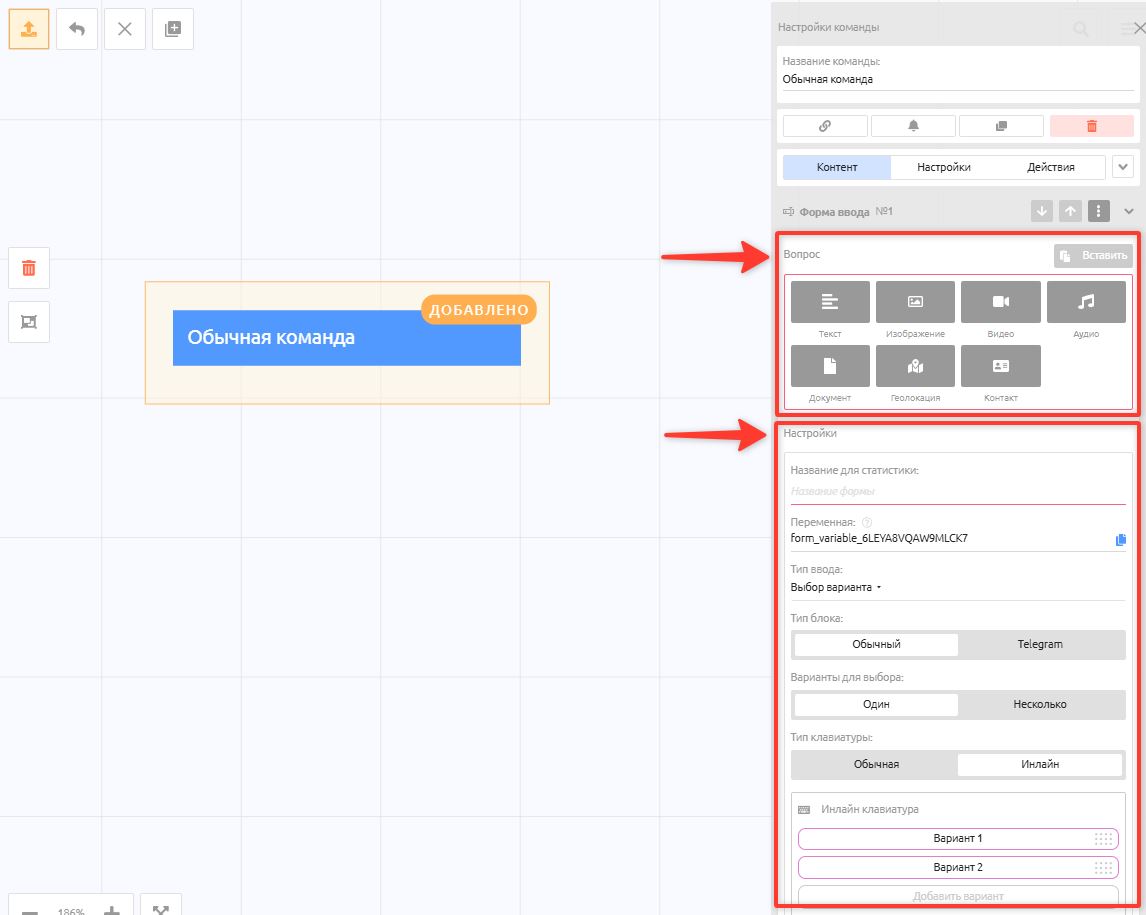
An input form consists of two required blocks:
Question — a required block.
Settings — a required block that contains the form's answer settings.
Error — sends a message with your error text if the user sends the wrong type of answer, for example when a number was requested but the user sent text or an image. This block is required for the following input types: Sending a message, Location request and Contact request.
Time is up — a required block if the Limit answer time option is turned on. It sends a message and closes the form once the specified time has passed (turned on in the form's additional settings).
The form also has optional blocks:
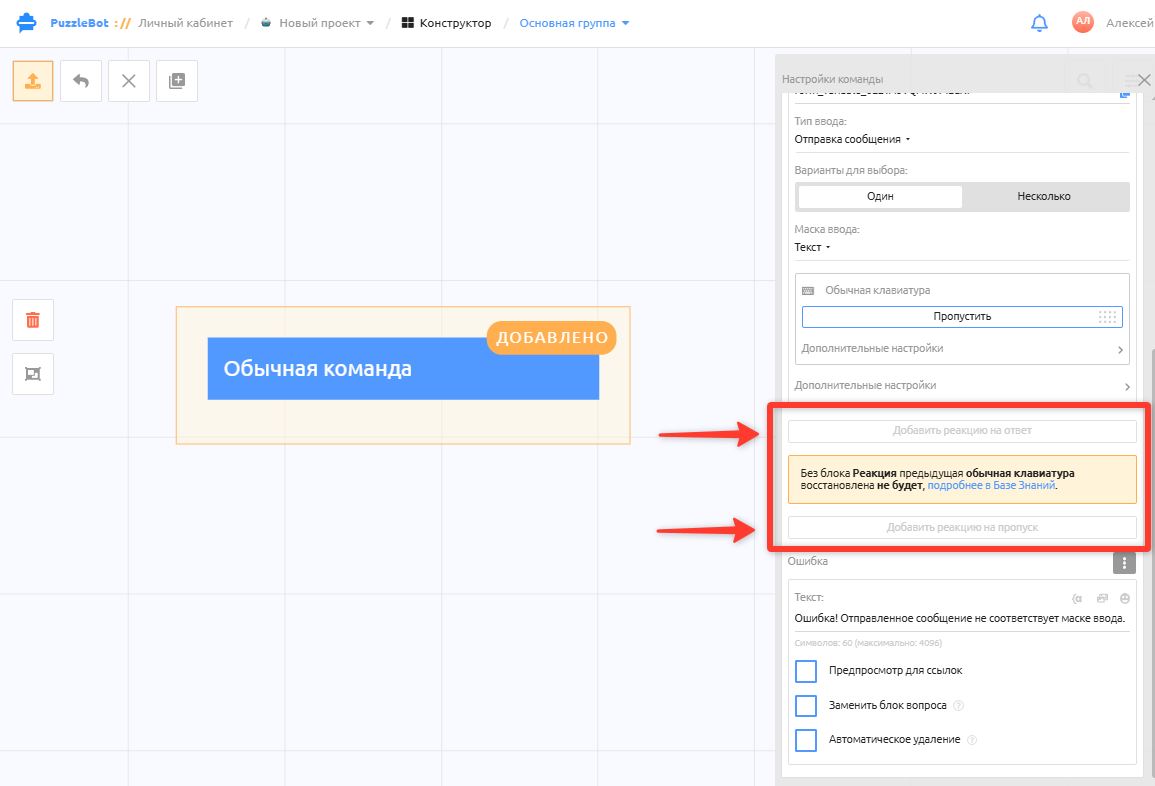
Optional blocks
Reaction to an answer — sends a message after the form is answered. The button for adding a reaction is located under the Settings block.
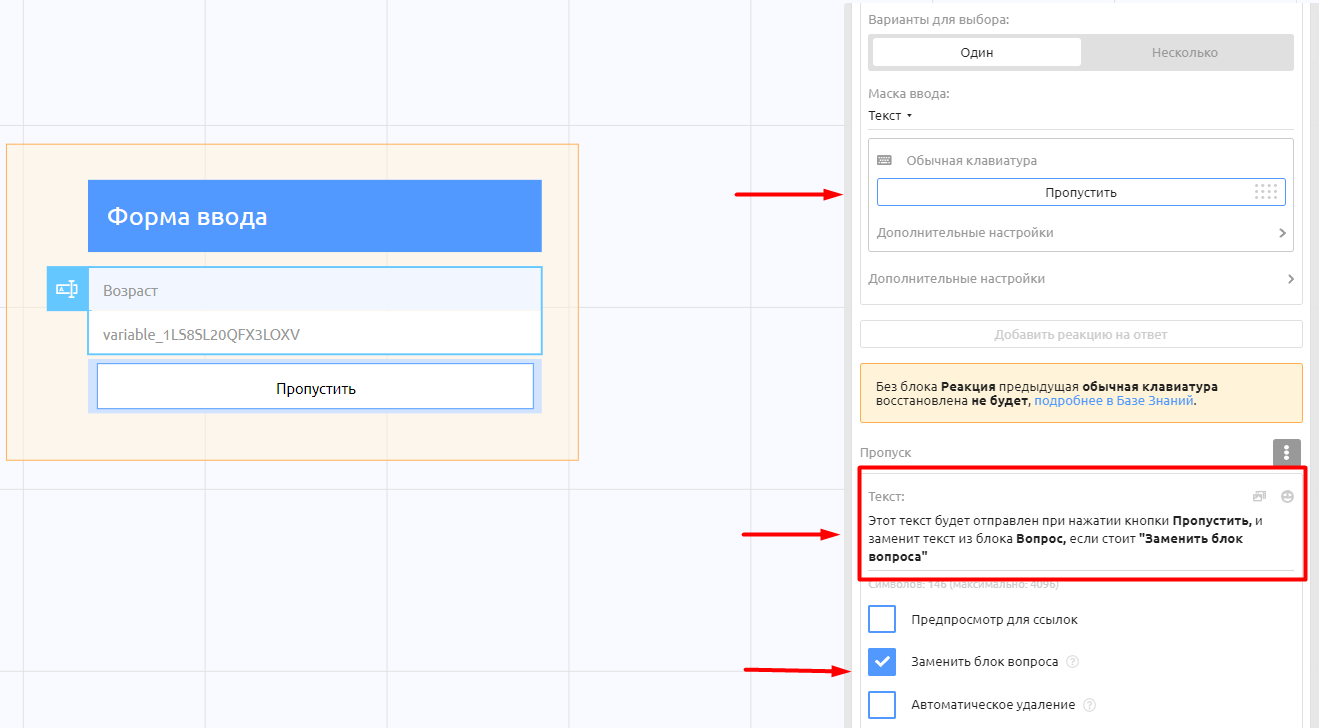
Reaction to a skip — sends a message when the user taps the Skip button (turned on in the form's additional settings).
Important! If the keyboard type in the settings is Regular and the Reaction to an answer block has not been added, the previous regular keyboard will not be restored.
In the reaction settings you can turn on the Replace question option. The Question block will then be replaced with the reaction block, or deleted if it cannot be replaced.
To create a form, fill in the following fields in the block:
Name for statistics — the name shown in Statistics (users will not see it). It tells you which form was answered. For example, if the question is "What city are you from?", you can enter "City" as the name for statistics.
Variable — set by default with a random name like "form_variable_***". You can leave it as is, but we recommend renaming it if you plan to use the variable later, for example to show the user's answer in the bot. This makes it easier to tell variables apart. For example, if the question is "What city are you from?", a clear variable name would be "city", or "name" for a name request, "email" for an email request, and so on.
The name must use only Latin letters and no spaces. You can use the "_" character.
Learn more: Variables.
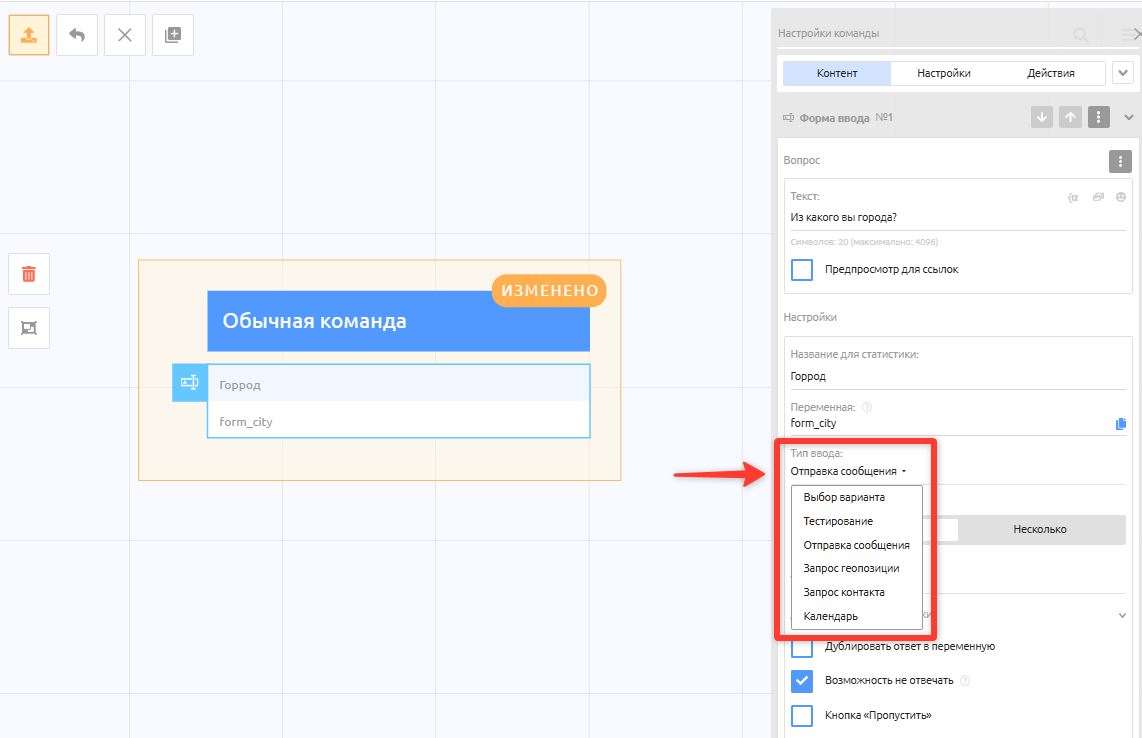
Input type — the kinds of answers:
Choice — lets you add a keyboard with answer options.
Quiz — lets you add a keyboard with answer options and mark each one as correct or incorrect.
Sending a message — lets you accept any message from the user.
Location request — adds a keyboard with a location request button.
Contact request — adds a keyboard with a contact request button.
Calendar — adds a customizable calendar made of inline buttons. A convenient way to ask for a date, for example for a booking.
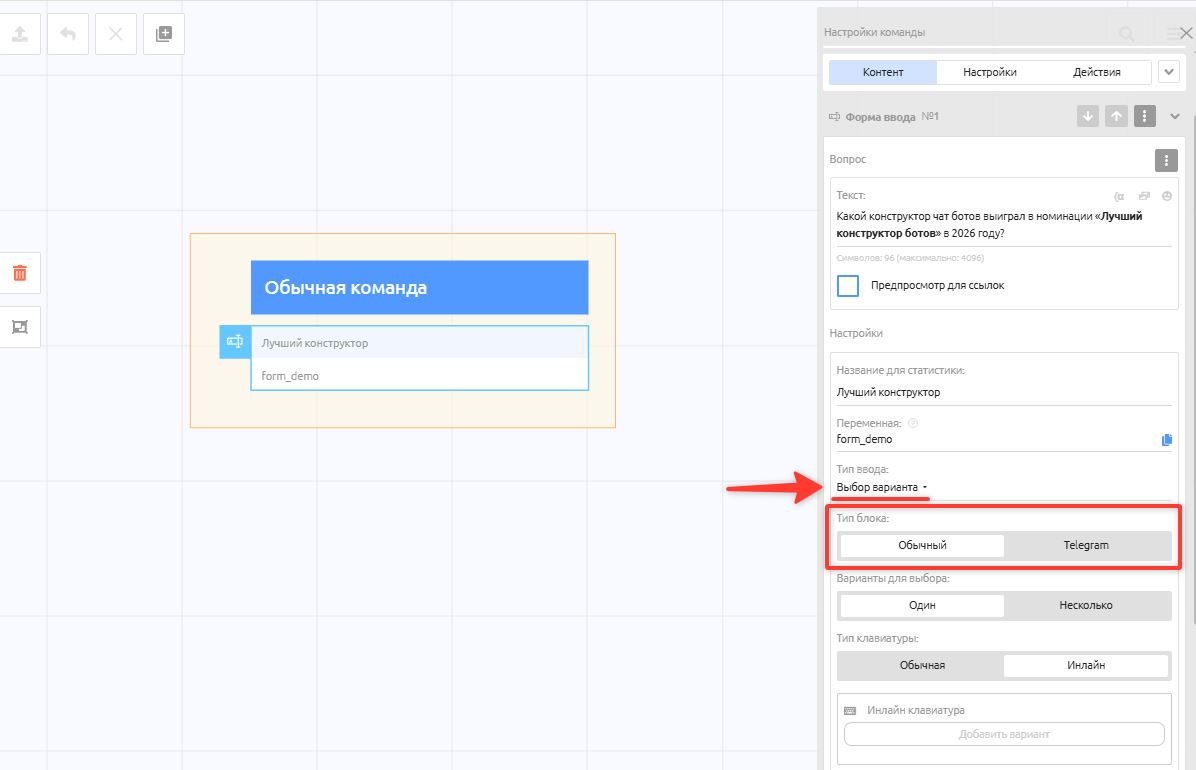
Block type: (only for the Choice and Quiz input types)
Regular — lets you add a regular or inline keyboard to the question block.
Telegram — sends a native Telegram block: a poll for Choice, or a quiz for Quiz.
Important! The Telegram block type does not let you send a Question block. Instead, a Question input field appears, and its text is used as the title of the poll or quiz.
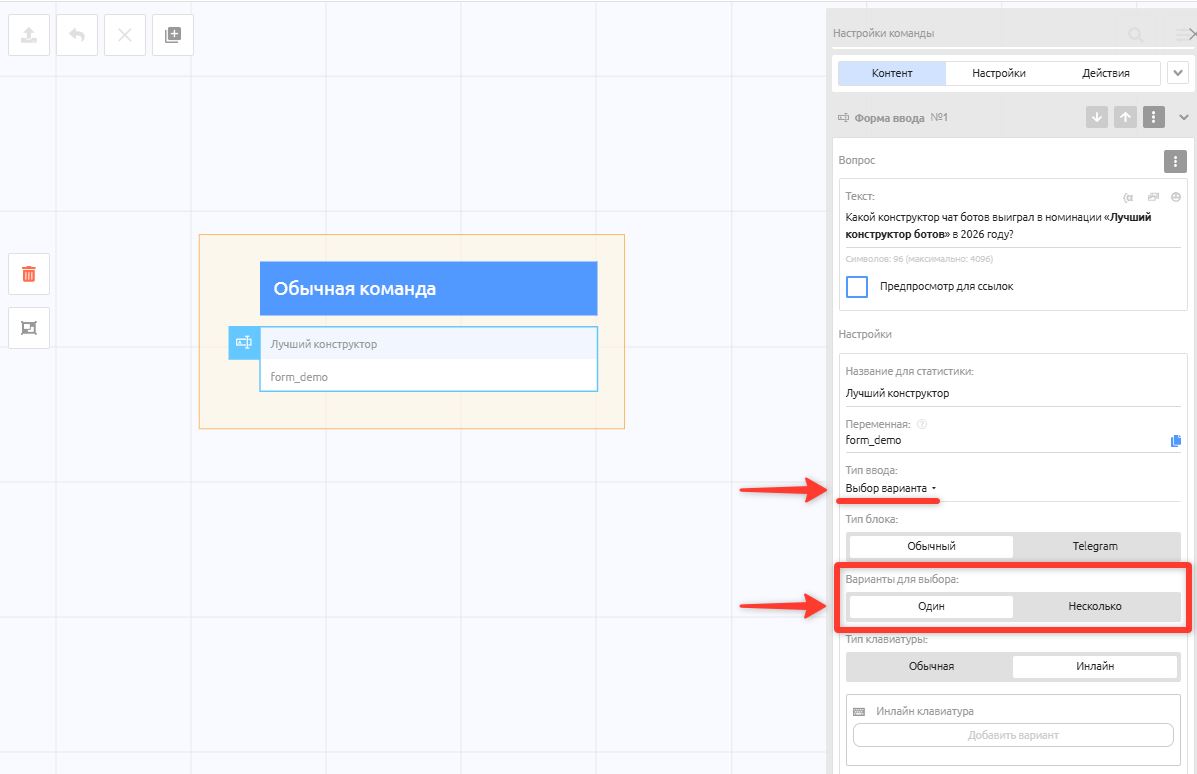
Options to choose: (only for the Choice and Quiz input types)
One — allows only one option to be selected.
Several — allows several options to be selected and adds a "Confirm" button. When it is tapped, the answer is saved and the next block is sent. This option is only available for input forms with the Inline keyboard type.
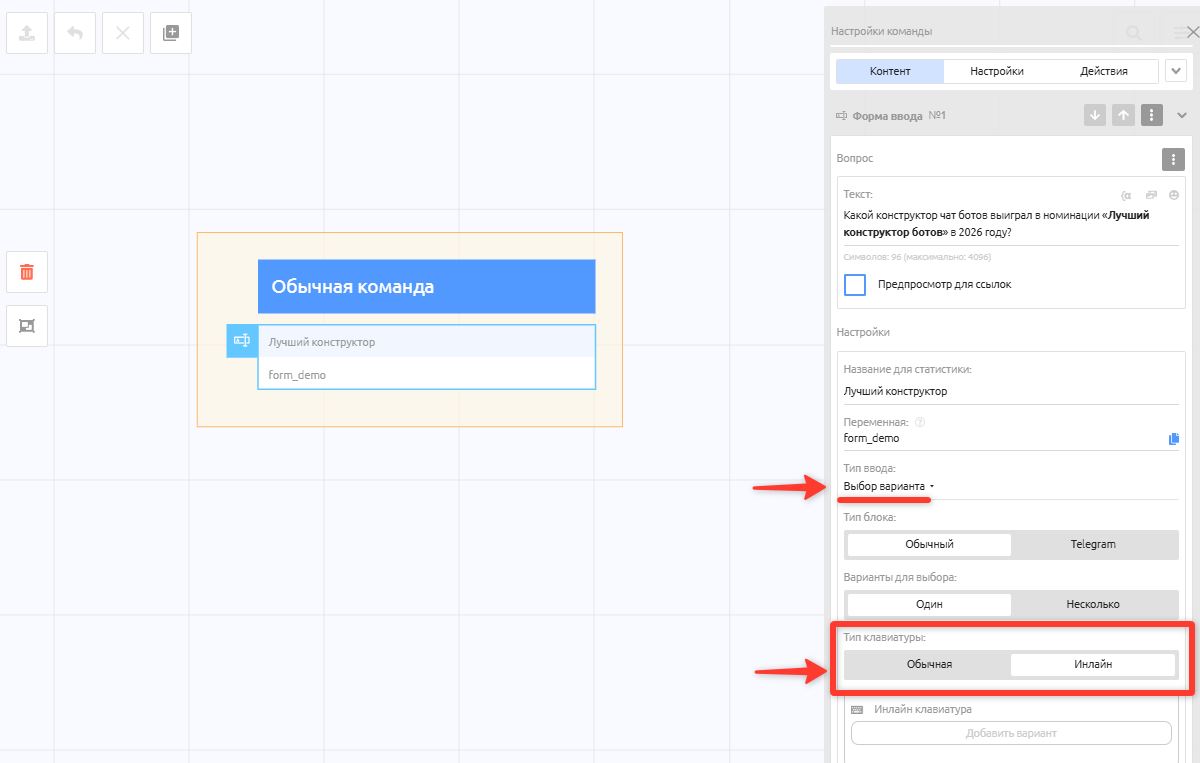
Keyboard type: (only for the Choice and Quiz input types)
Regular.
Inline.
Additional settings:
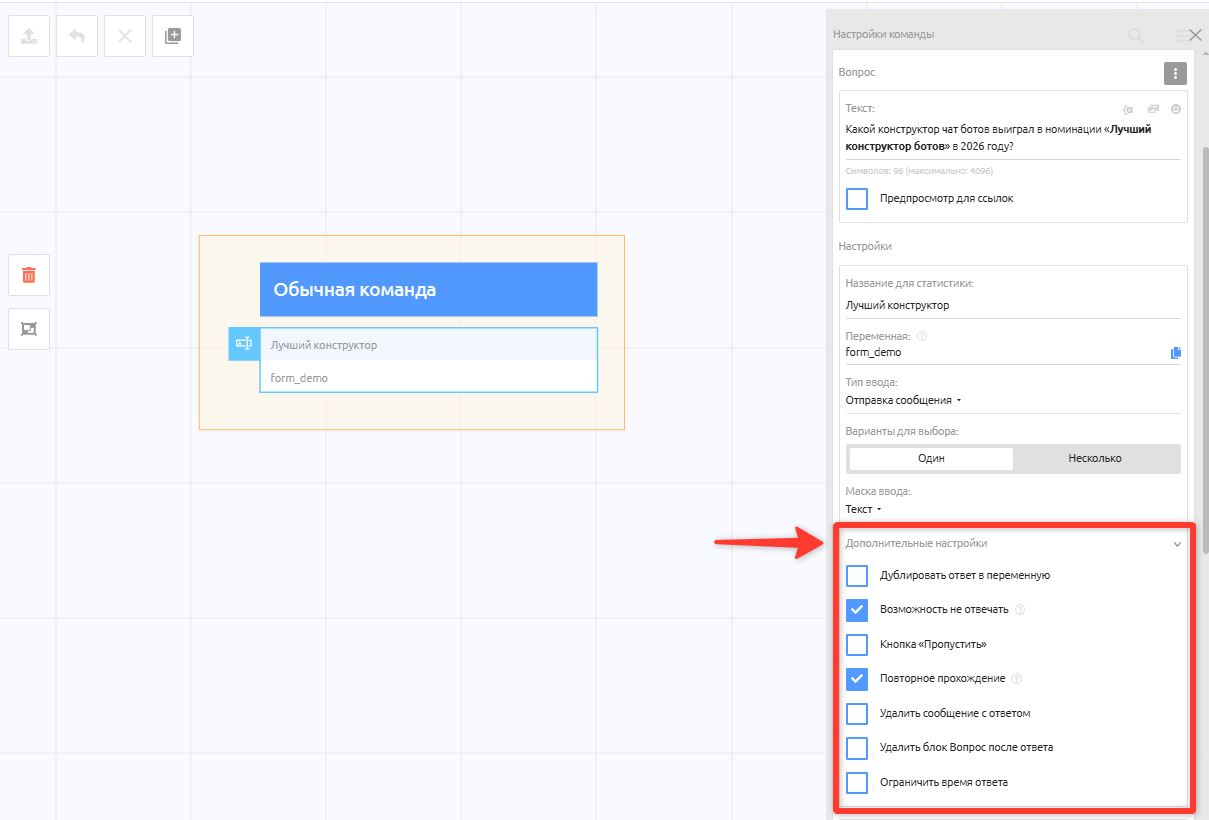
Duplicate answer to a variable — here you can specify a variable you created so that the form answer is also copied into it.
How to create a variable: Variables section overviewAllow not answering — lets the user call any other command. This option is only available for input forms with the Inline keyboard type.
Important! When the Allow not answering option is turned on, the user can return to the input form (by scrolling back through the chat with the bot) and answer it later.
Important! If this option is turned off, the bot will keep waiting for an answer to the form even after it is restarted (/start).
"Skip" button — saves the answer as "—". Adds an extra option with the actions Next block or Go to command.
Repeat submission — allows or forbids calling the form again. When the option is turned off, you can set a command to go to if the user has already answered the form before.
Delete the answer message — with the Regular keyboard type, deletes the message the user sends by tapping a button.
Delete the Question block after the answer — deletes the question block after the input form is answered.
Random order of options — the form's answer options are shown in random order. The "Confirm" and "Skip" buttons stay in the same places.
Limit answer time — lets you set a time after which the input form can no longer be answered. The special Time is up block is sent instead.
Let's look at the specifics of each input type.
Choice
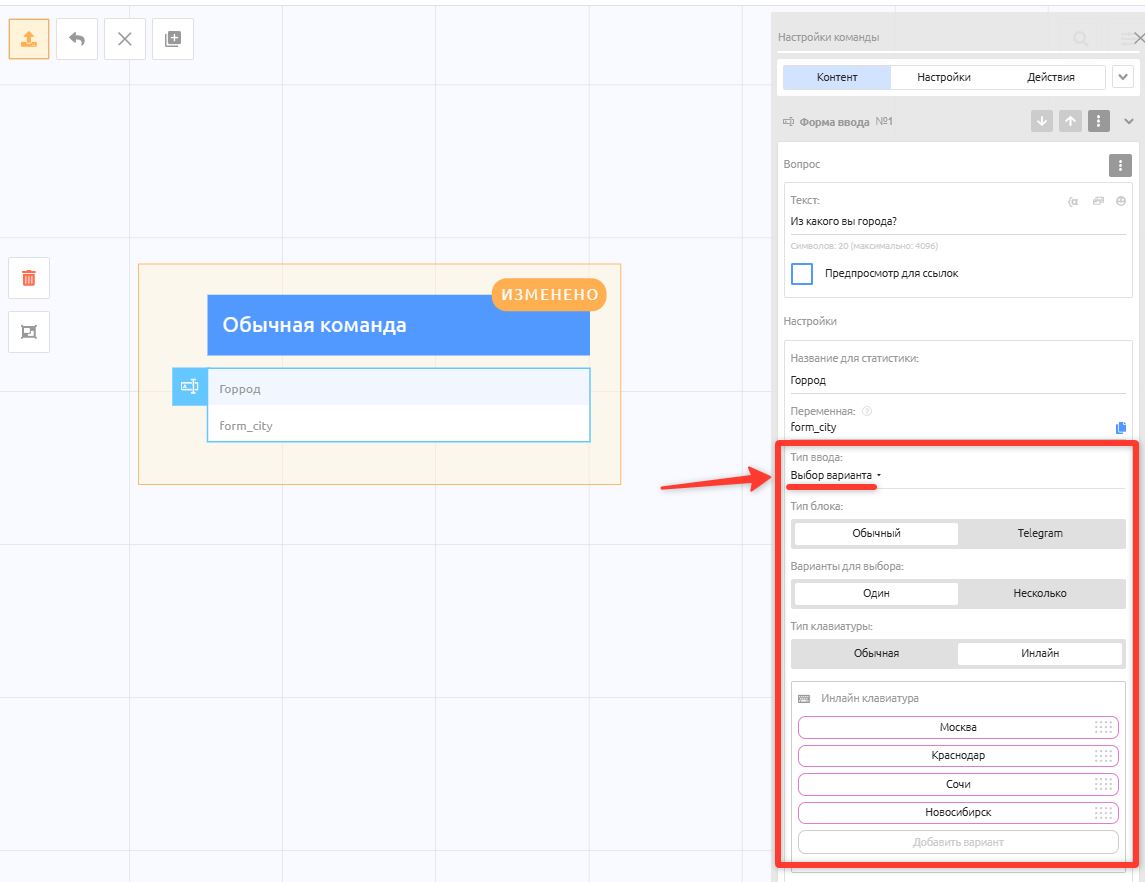
Choice — lets you add a keyboard with answer options. In the option settings you can set an action: go to the Next block or Go to command. You can also turn on the Do not save answer option, which ignores taps on that option so you can use it as a regular button (for example: Back, Go to menu).
Important! With the Go to command action on an option, the user "leaves" the current command and therefore cannot answer the remaining input forms in it. The bot administrator receives a notification containing only the answers the user actually gave. If a form was not sent to the user and/or the user chose not to answer it (with the Allow skipping option turned on), the form name is hidden from the notification.
Important! The additional command settings Add category, Go to command and Run scenario are executed after the command finishes (when all blocks have been sent). If the user went to another command from the form and the command could not finish, these additional settings will not be applied.
Quiz
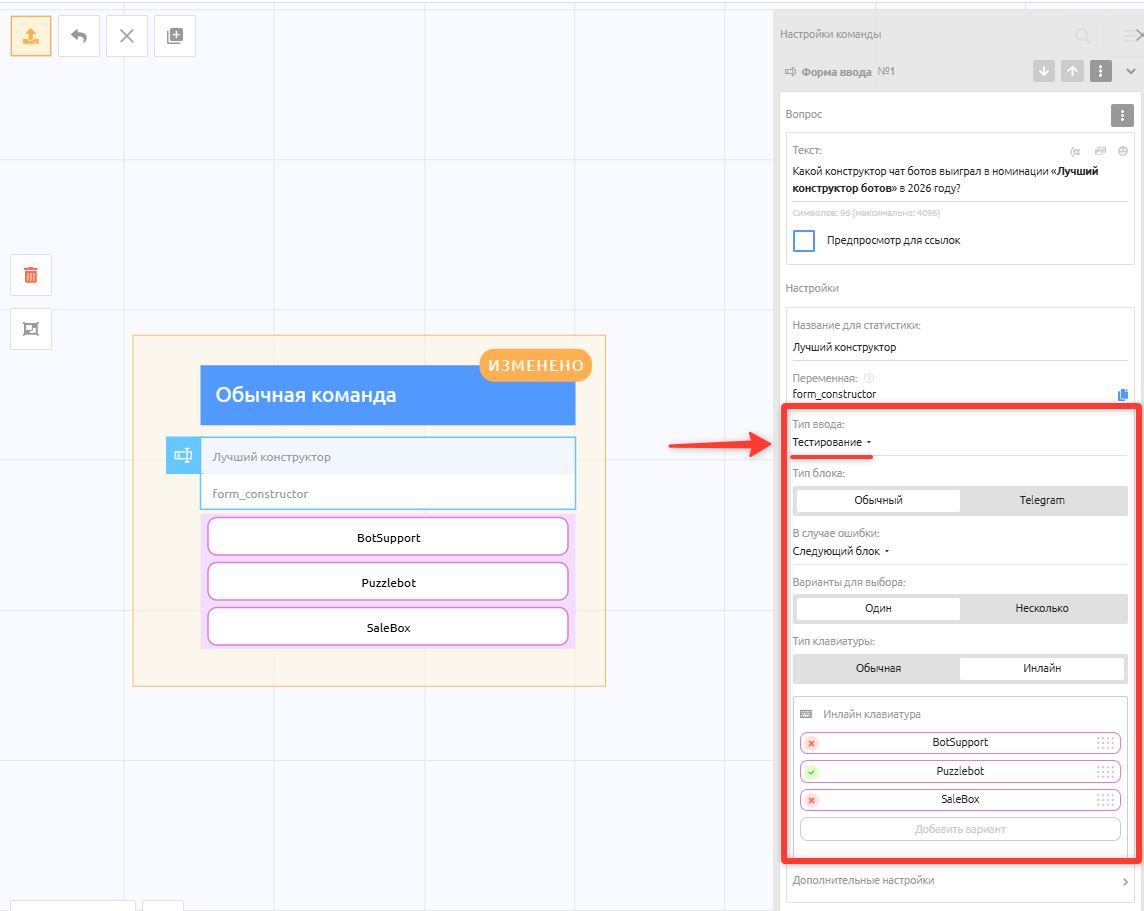
Quiz — lets you add a keyboard with answer options and mark each one as correct or incorrect. When you select the Quiz input type, an additional action field On error appears, where you can set:
Next block — the next block is sent.
Hint — adds a Hint block, which is sent if the user answers incorrectly. The action repeats until the answer is correct.
Repeat — on an error, the Question block is sent again. The action repeats until the answer is correct.
Go to command — on an error, the user is taken to the command.
Sending a message
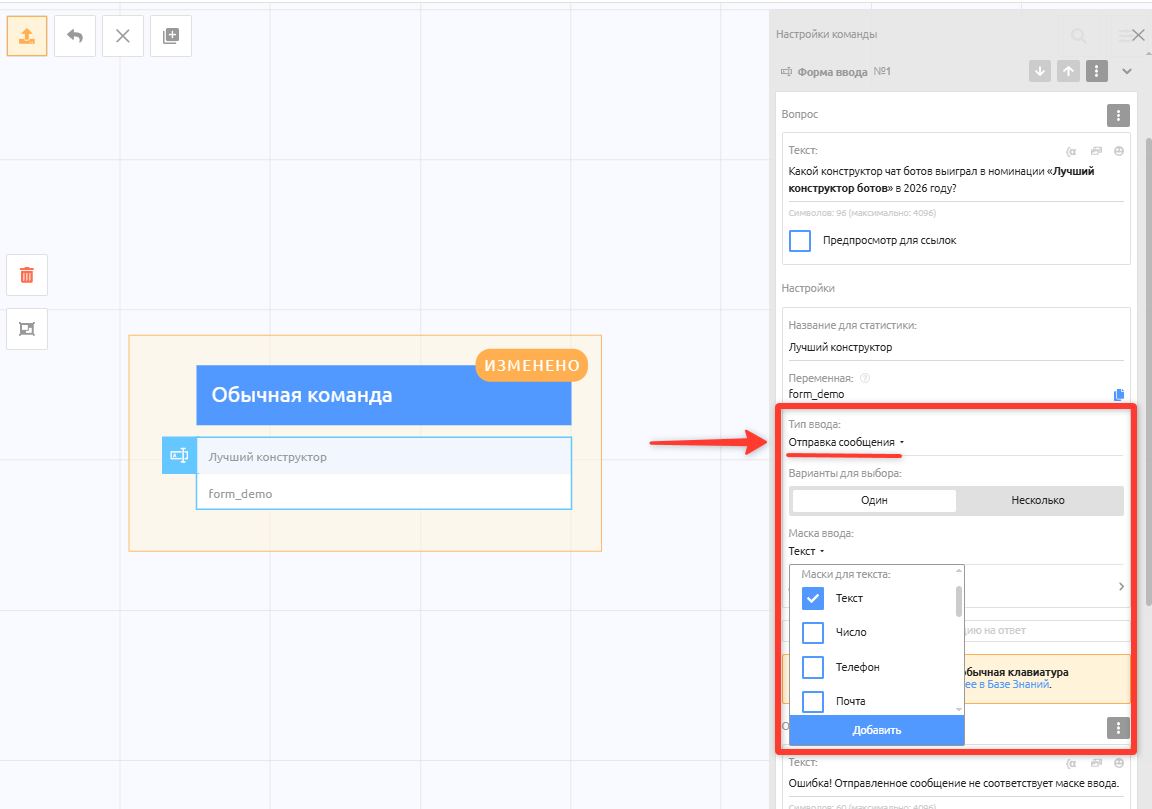
Sending a message — lets you accept any message from the user. If you select Several messages, you can set a phrase that prompts the user to keep sending, and a "Confirm" button is added.
Input mask — a restriction on the data accepted from the user. Mask types:
Text masks:
Number (allowed: 0 1 2 3 4 5 6 7 8 9 , . ).
Phone (designed for numbers from 6 to 16 characters long, allowed: + ( ) -).
Email (the text sent must have the format: text@text).
Text (any text containing digits, letters and symbols is allowed).
Link (the text sent must have the format: text.text).
File masks:
Image (allowed formats: JPG, JPEG, PNG, GIF, BMP, HEIF).
Video (allowed formats: MOV, MP4, WEBP, MPEG).
Audio (allowed formats: MP3, WAV).
Office document (allowed formats: PDF, DOC, DOCX, XLS, XLSX, TXT, XML, PPTX, PPT).
Document (all formats allowed).
Voice message.
Video message.
Other:
Location.
Contact.
Any.
Regular expression (learn how to write expressions: https://habr.com/ru/post/545150/)
Location request, Contact request, Calendar
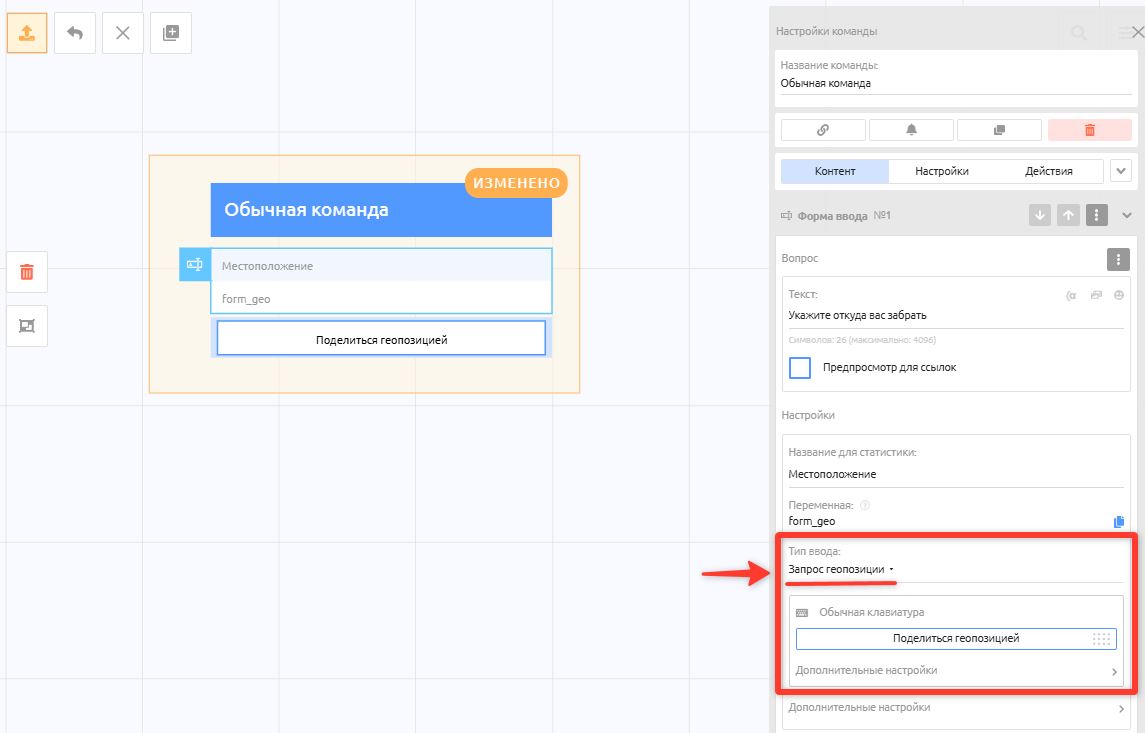
Location request — adds a keyboard with a location request button.
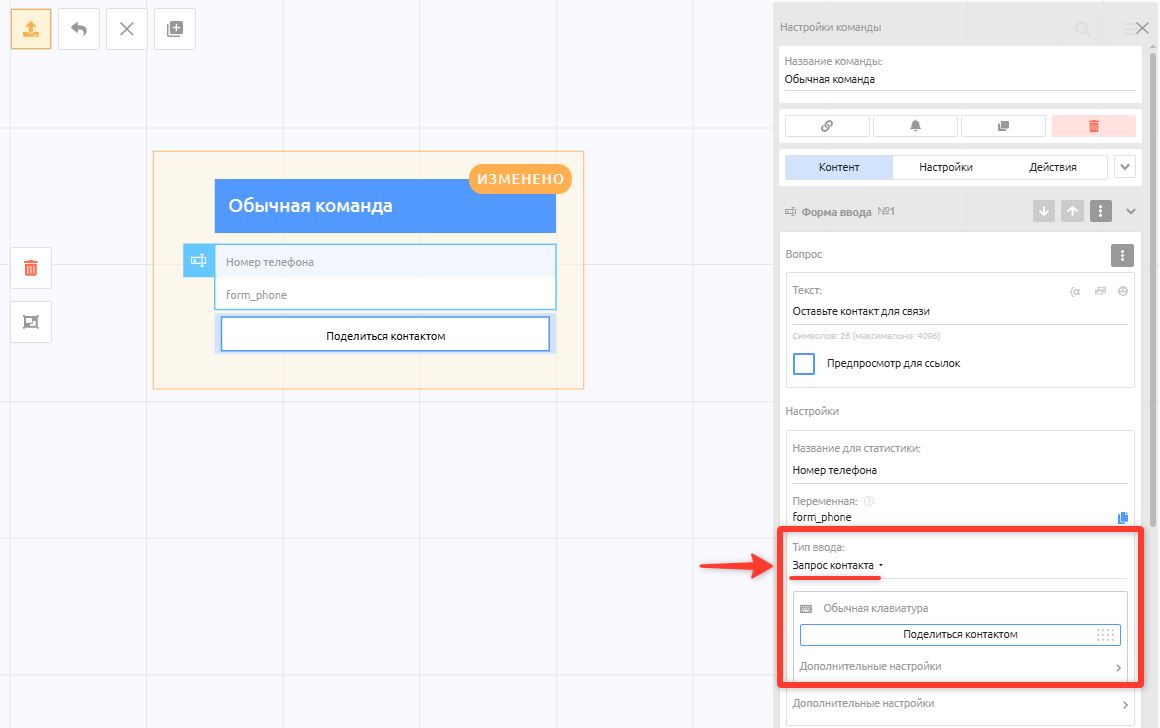
Contact request — adds a keyboard with a contact request button.
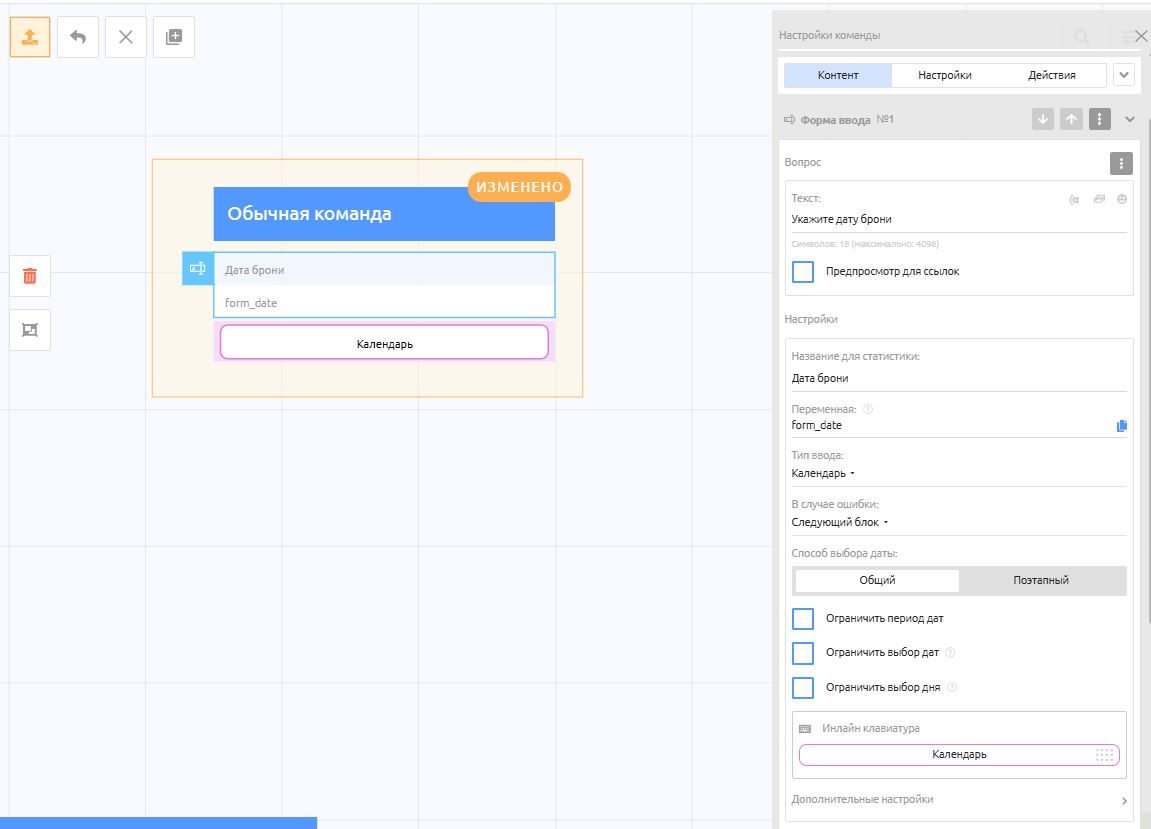
Calendar — adds a calendar made of inline buttons.
Where to view input form answers
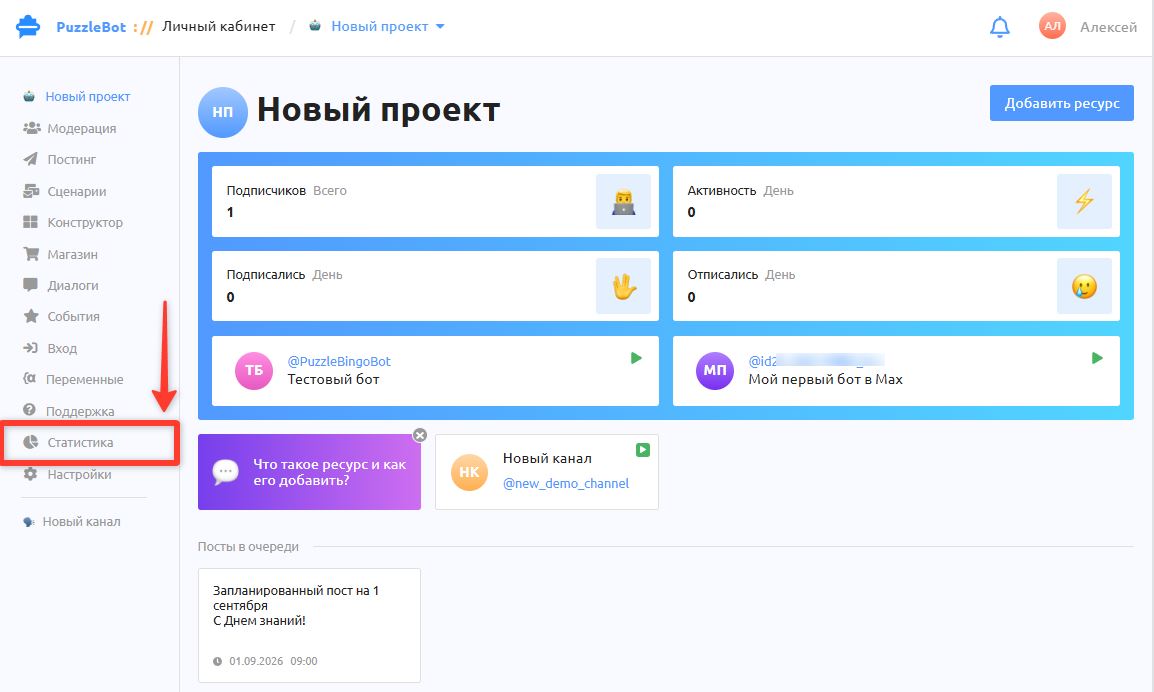
Go to the Statistics section
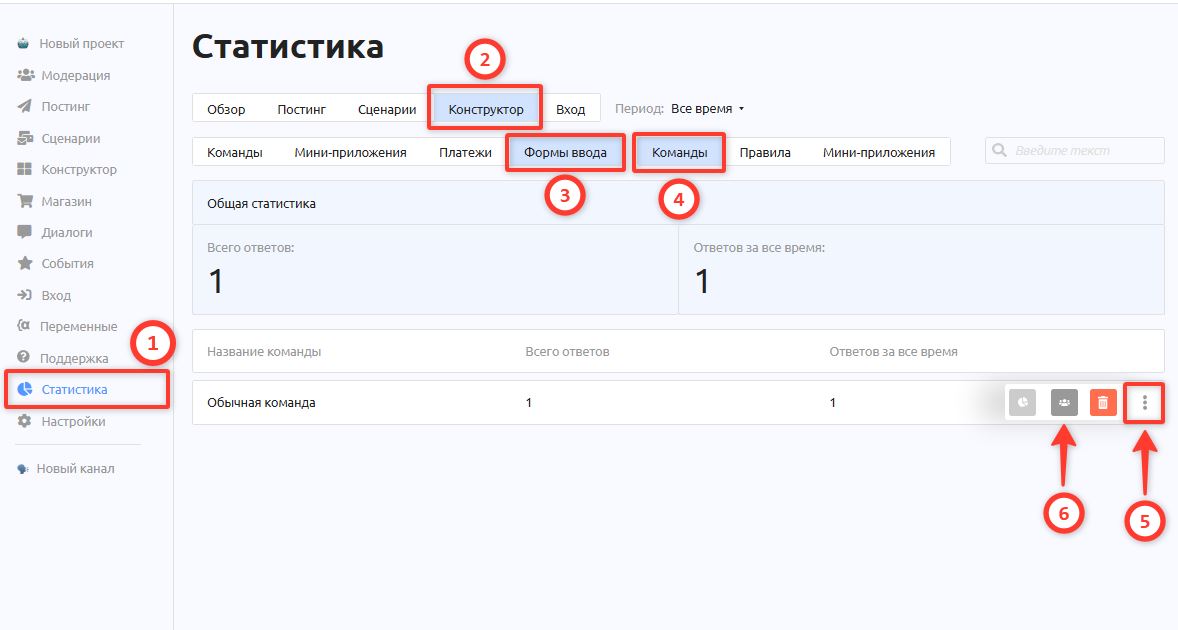
Select the tabs Constructor → Input form → Commands (or Mini app if the answers were given in the app).
This page shows the list of commands that contain input forms.
Find the command whose answers you want to view, click the three dots and then the button that opens all answers.
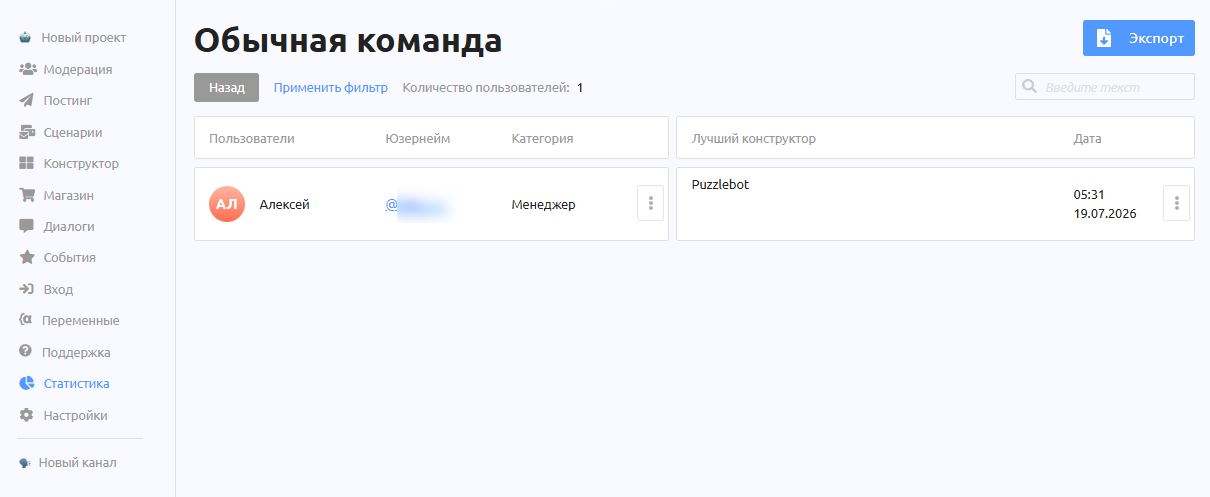
This page shows all answers in the selected command. Click the "Export" button if you want to download all answers as a file.
Tip: If you want to view the information in a single table or receive notifications for several input forms at once, add the forms to one command. For the opposite effect, split the forms across different commands.
For each command and the forms in it, you can view the total number of answers, the answers received today, the number of users who answered (one user can give several answers) and the share of all bot users who answered.
Clicking the three dots in the top right corner of the block opens a context menu where you can reset all data received through the form.
To view the answers to a form, click the corresponding button.
In the bot settings you can set up notification merging. Learn more: Setting up rules for combining input form notifications.