This article covers what you can do by linking Integromat and Google Sheets, and how to connect them.
Google Sheets is a data spreadsheet that also works as a DB (database). It is a very useful tool for collecting, storing and processing data of any type, which you can then keep working with. Google Sheets is a multi-user system, that is, a system where several users can access the database at the same time.
When will you definitely need a DB?
Collecting user information (full name, user_id, answers, statistics, reports).
Interacting with other systems (for example, you cannot build a Registration feature without a DB, because you need to record registered users somewhere and, from time to time, refer to the table of authorized users for further processing: deleting, editing and so on).
Note that besides the basic storage function, spreadsheets can perform various actions within their own platform. For example, it is enough to add a user's answer (from the bot) to a monthly report spreadsheet (a ready-made structure) to automate a work process, or you can use the plugins (extensions) you need. In other words, a DB can exist both as a standalone entity and as part of a complex system.
Our Knowledge base already has an article on how to integrate input forms with a Google Sheets spreadsheet via Integromat. Let's take a more complex example and build a registration/authorization system in a bot.
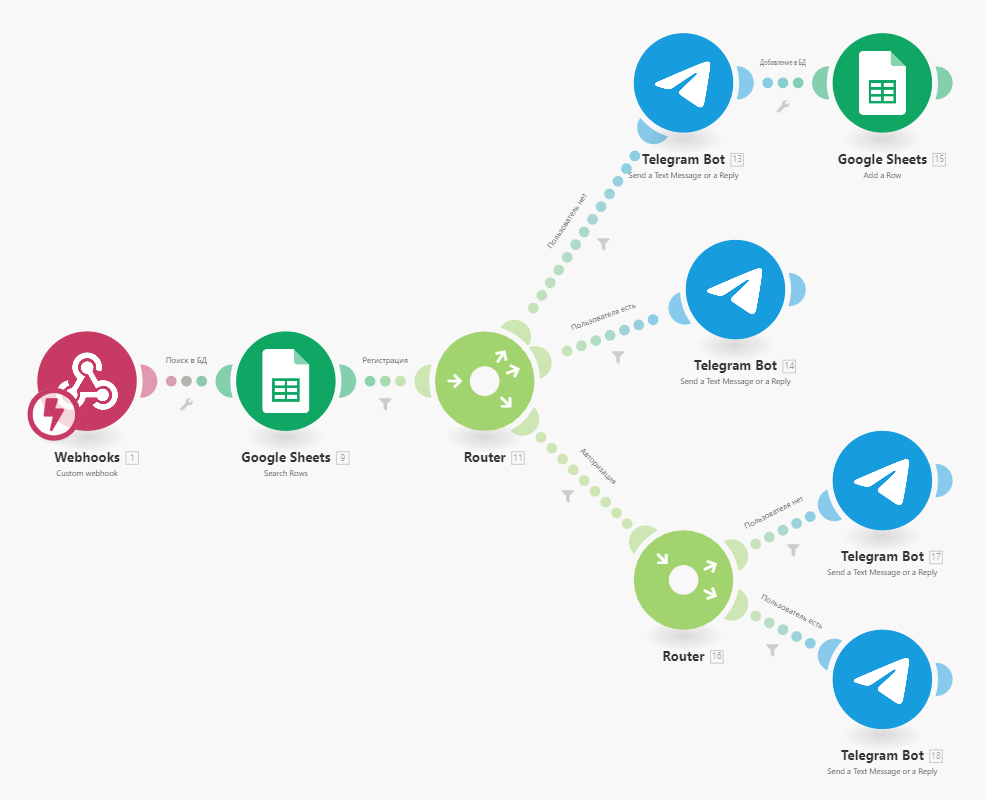
How to do it:
Get your data from the form (the small circle is an indicator with the number 1).
Add the Google Sheets and Telegram Bot modules to the scenario (create a spreadsheet in advance with the headers USER_ID, USERNAME, NAME, CATEGORY, SOURCE and any other fields you need).
In the puzzlebot Constructor:
Create an agreement form to get the initial information to write to the DB (user_id, the user's name and so on). Combined with inline commands, the transitions look much more attractive.
Create two regular commands: Registration and Authorization.
Registration. With this command, we use forms to collect all the data we need from the user: full name, how they heard about us and so on.
Authorization. It is needed only so that a registered user who starts the bot again (/start) does not have to go through registration a second time. That is, the authorization button checks the DB and takes the user to the main content, for example the bot's Menu.
Go to Integromat (your webhook must already be connected):
Add the Google Sheets module with the Search Rows trigger (this trigger is described below).
Connect to the spreadsheet: Spreadsheet and Sheet.
In Column range, set A-Z (the exact range to search in).
In the first drop-down list of the Filter block, select USER_ID (A) — we search by the user's id because this value is unique. Drag the variable received from the bot, user.id (the maroon token), into the second field. Between the fields, set the Equal to parameter. This filter compares the ID in the DB with the ID of the user who contacted the bot.
Add 1 Router module (click once). This is where the condition checks begin. In the filter between Google Sheets and Router, specify: {{1.command_name}} — Equal to — Registration (the command name in the Constructor) + (Add OR rule) + {{1.command_name}} — Equal to — Registration.
Registration:
The user is not in the DB. Add a Telegram Bot module with the content (in Text) "Registration completed successfully ✅". At the bottom of the settings window, check the box next to Show advanced settings, and in Enter/Assemble the Reply Markup Field select the second line. Next, Keyboard — Add item x2 — Menu (in the Text field — this adds a button for the Menu command). Don't forget to select Yes in Flag if to Resize Keyboard Vertically for Optimal Fit. One more module remains (right after Telegram Bot): Google Sheets - Add a Row, where you drag all the user's variables into the DB columns. In the filter (between Router and Telegram Bot), specify: USER_ID (A) (the green token) — Does not exist (the value is missing) + (Add AND rule) + {{1.command_name}} — Equal to — Registration.
The user is in the DB. Add a Telegram Bot module with the content (in Text) "Hey, you have already registered.". At the bottom of the settings window, check the box next to Show advanced settings, and in Enter/Assemble the Reply Markup Field select the second line. Next, Keyboard — Add item x2 — Menu (in the Text field — this adds a button for the Menu command). Don't forget to select Yes in Flag if to Resize Keyboard Vertically for Optimal Fit. In the filter (between Router and Telegram Bot), specify: USER_ID (A) (the green token) — Exists (the value is present) + (Add AND rule) + {{1.command_name}} — Equal to — Registration.
Authorization. Add 1 Router module (click once). In the filter between Router and Router, specify: {{1.forms[].variable}} — Equal to — authForm (the name of the form variable in the Constructor).
The user is not in the DB. Add a Telegram Bot module with the content (in Text) "Register first 👉🏻". At the bottom of the settings window, check the box next to Show advanced settings, and in Enter/Assemble the Reply Markup Field select the second line. Next, Keyboard — Add item x2 — Registration (in the Text field — this adds a button for the Registration command). Don't forget to select Yes in Flag if to Resize Keyboard Vertically for Optimal Fit. In the filter (between Router and Telegram Bot), specify: USER_ID (A) (the green token) — Does not exist (the value is missing).
The user is in the DB. Add a Telegram Bot module with the content (in Text) "Hi, friend, come on in!". At the bottom of the settings window, check the box next to Show advanced settings, and in Enter/Assemble the Reply Markup Field select the second line. Next, Keyboard — Add item x2 — Menu (in the Text field — this adds a button for the Menu command). Don't forget to select Yes in Flag if to Resize Keyboard Vertically for Optimal Fit. In the filter (between Router and Telegram Bot), specify: USER_ID (A) (the green token) — Exists (the value is present).
Description of Google Sheets triggers
Triggers in Integromat are modular pieces of functionality, for example creating a spreadsheet or deleting a sheet.
To avoid repetition, here are the main settings:
Connection: Important! Before going further, connect to your Google account (you need to consent to the integration)
Mode: how the spreadsheet is selected (mapping or manual entry)
Manual entry is useful, for example, when a new spreadsheet is created in the scenario and you want to add data to that spreadsheet from the scenario.
Spreadsheet: selects the spreadsheet
Sheet: selects a specific sheet in the spreadsheet
Actions:
Add a Row — adds a new row at the bottom of the sheet.
Update a Row — updates a row.
Clear a Row — clears the values from a specific row.
Delete a Row — deletes a specific row.
Get a Cell — gets a specific cell.
Update a Cell — updates a specific cell.
Clear a Cell — clears a specific cell.
Add a Sheet — adds a new sheet.
Create a Spreadsheet — creates a new spreadsheet.
Perform a Functional - Responder — returns the processed data produced by the Integromat extension in Google Sheets.
Delete a Sheet — deletes a specific sheet.
Make an API Call — performs an arbitrary authorized API call.
Search:
Search Rows — returns results that match the given criteria.
Search Rows (Advanced) — returns results that match the given criteria (this module does not return the row number).
Get Range Value — returns the contents of a range.
List Sheets — gets a list of all sheets in the spreadsheet.