This article explains how to accept payments (create payments) through your bot. The instructions apply to the Constructor and Posting tabs.
Note: Before adding a payment button, you need to connect a payment system. Learn more: ⚠ Connecting payment systems.
There are two ways to accept payments through a button: fixed and free-amount.
Important! The minimum payment amount depends on the payment system: systems for legal entities accept amounts from $1 (converted at the exchange rate for other currencies), systems for individuals from 2 ₽.
Fixed payment
A fixed payment is an invoice for a specific amount (no more, no less). It works best when the payment amount is known in advance.
To set it up:
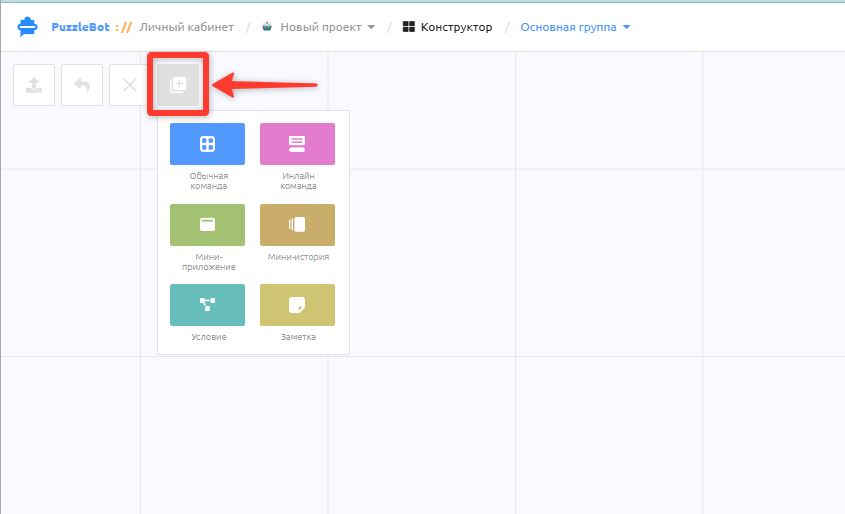
1. Create the command that will contain the payment, or choose an existing one. You can create a payment button in a Regular command, an Inline command or a Mini app.
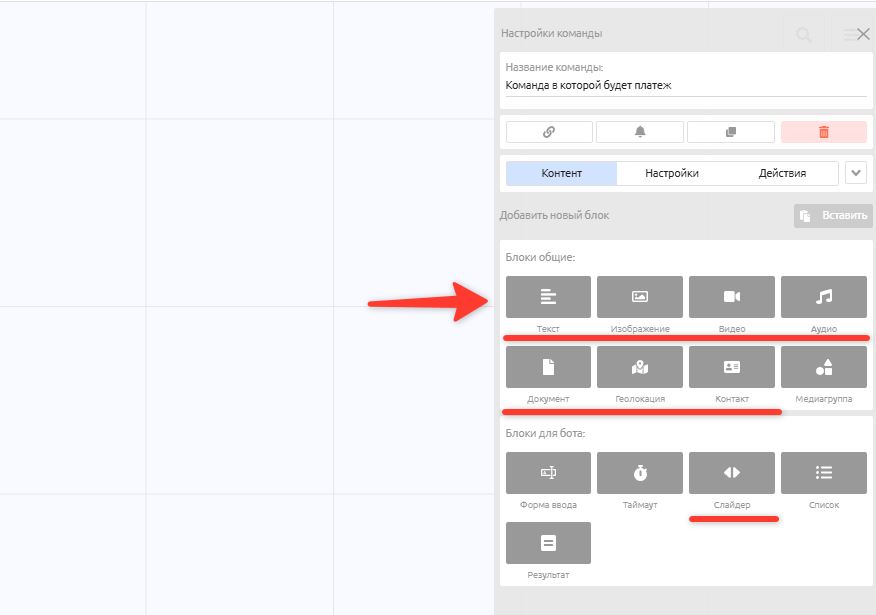
2. In the command, create the block that the payment button will be attached to. The following blocks are suitable: Text, Image, Video, Audio, Document, Location, Contact, Slider.
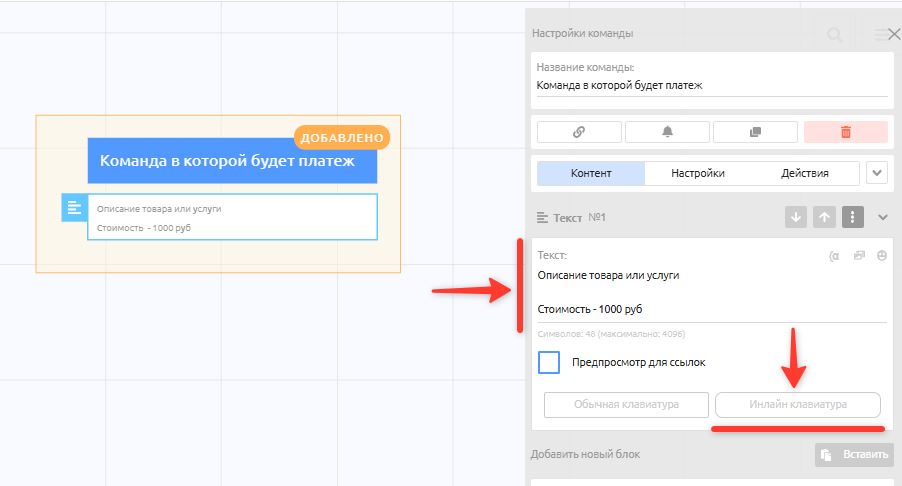
3. Write a description of the product or service and select Inline keyboard (payments are not available in a Regular keyboard), or add a button to an existing inline keyboard.
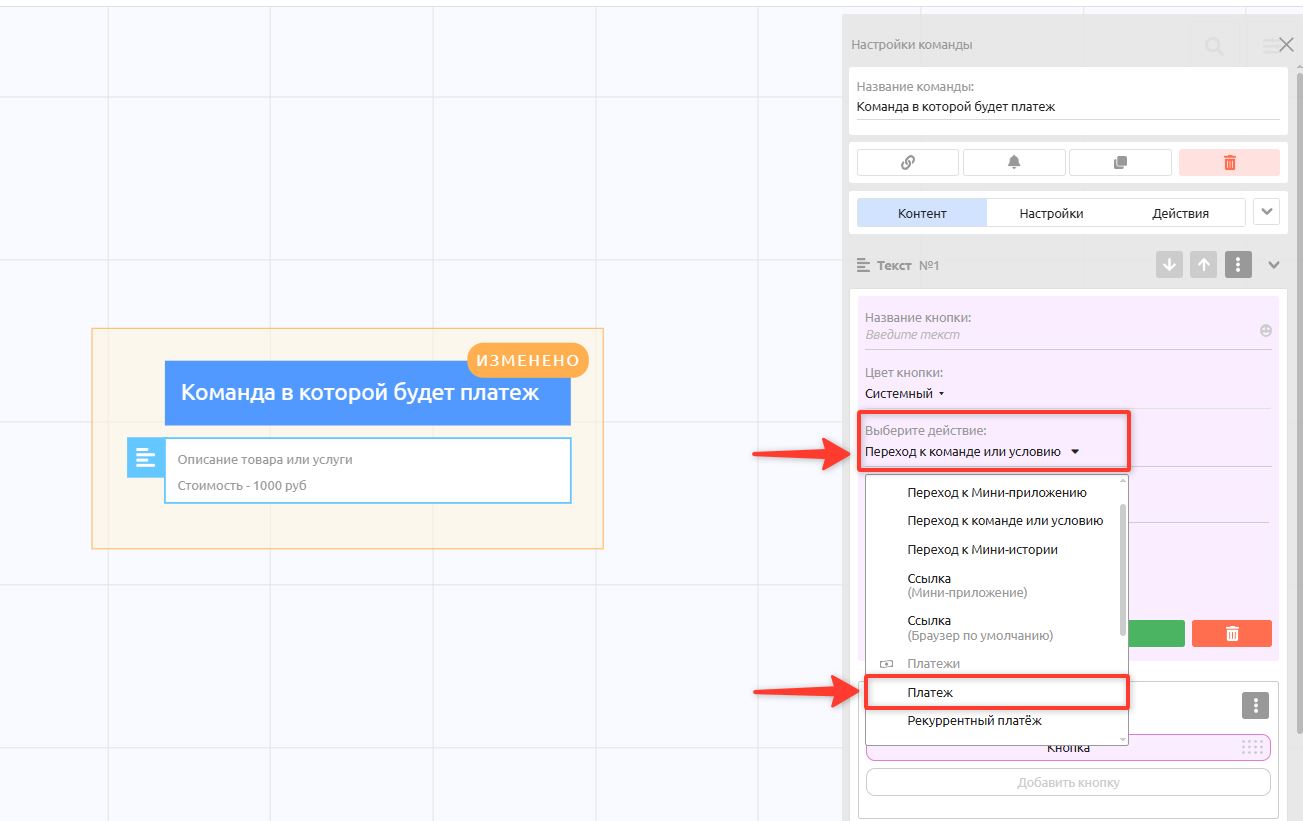
4. In the button settings, select the "Payment" action.
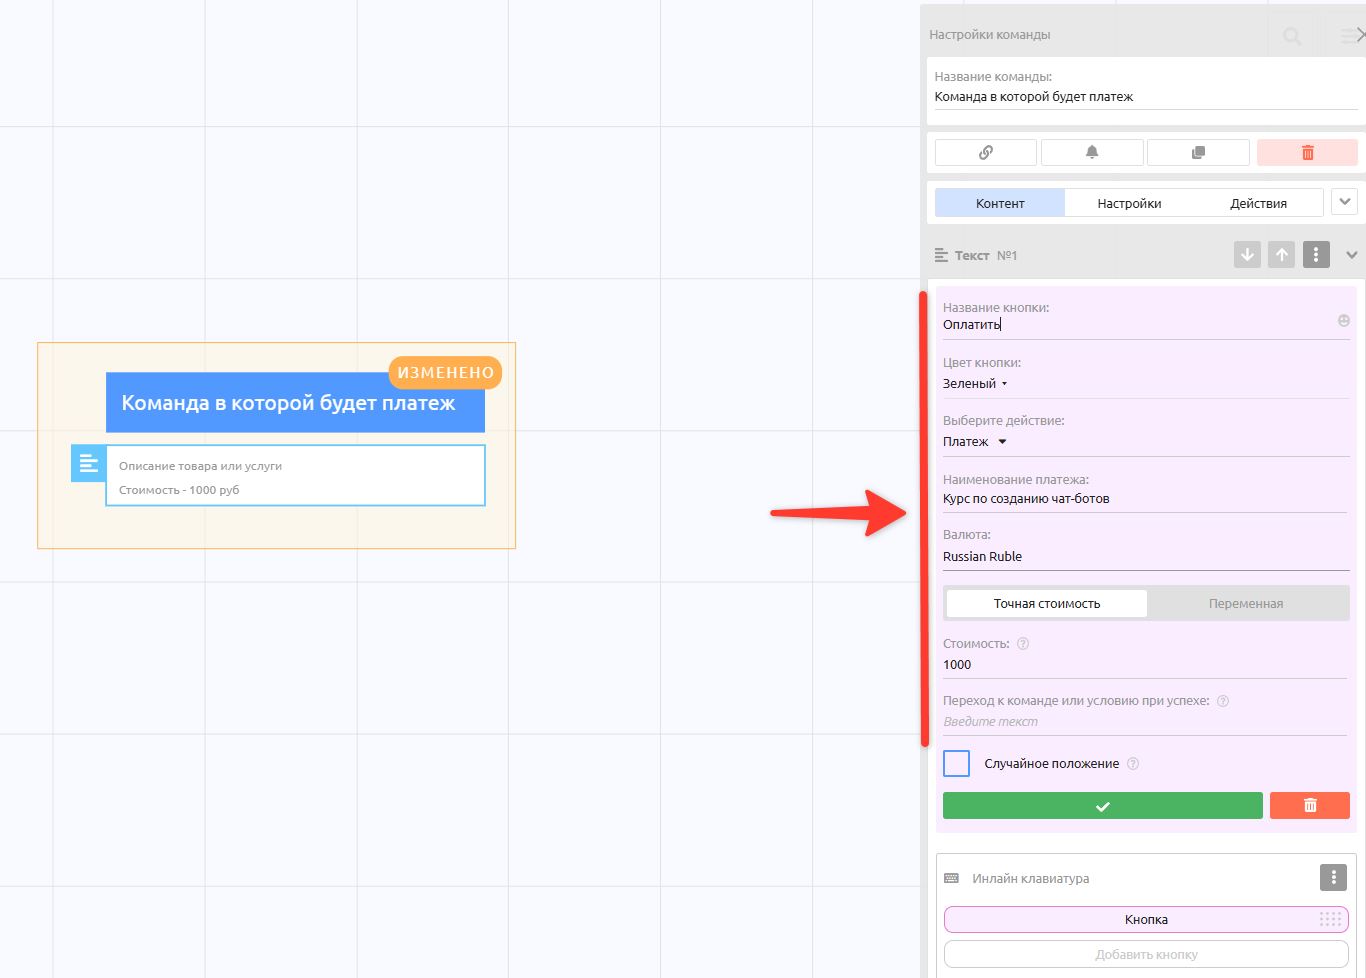
5. Fill in the payment button details:
Button name: for example "Buy" or "Pay".
Button color: optional.
Payment name: the name of your product or service.
Currency: the currencies in which payment is offered. They depend on which payment systems and currencies you have connected. If you have not connected a payment system yet, go to: Connecting payment systems .
Price format: select "Exact price" for a fixed amount that does not change. Or select Variable to create a dynamic price; see the instructions below.
Price: set the payment amount. The minimum amount is from $1 (~90 rubles) depending on the payment system, or from 2 rubles for individuals.
Go to command: specify the command that is sent after a successful payment. If you have not created such a command yet, leave the field empty; we will create the command later. Click the green "✔" button to save.
Creating the command that is sent after the payment is processed successfully
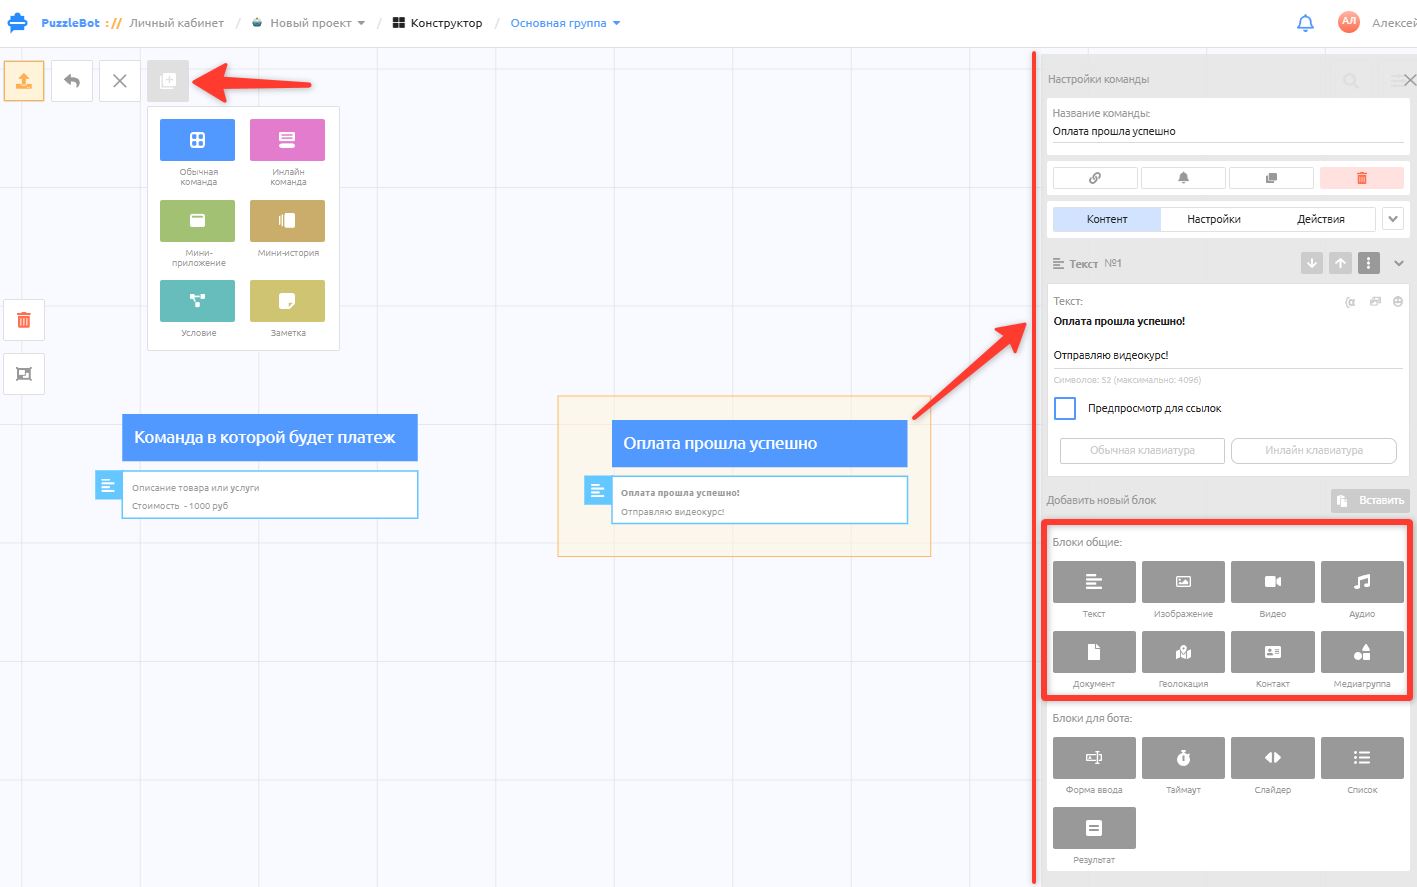
6. Create one more command that is sent after a successful payment. In this command you can place the content you are selling, for example files, a video, or just a text saying that the payment was successful.
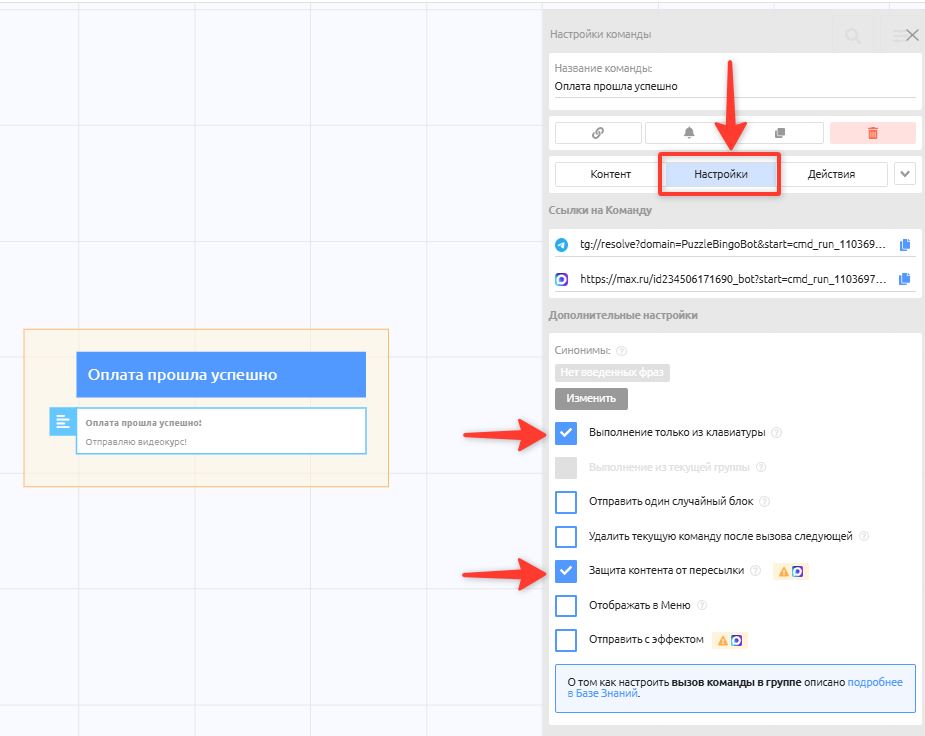
7. Open the command settings to set additional options:
Run from keyboard only — with this option enabled, the command cannot be called just by sending its name to the bot. This guarantees that the command is called only after payment.
Protect content from forwarding — enable it to protect the content from being forwarded or saved. Works only for Telegram bots.
Send with effect — optionally set a reaction on the successful payment message. For example, the "🎉" reaction will be put on the message.
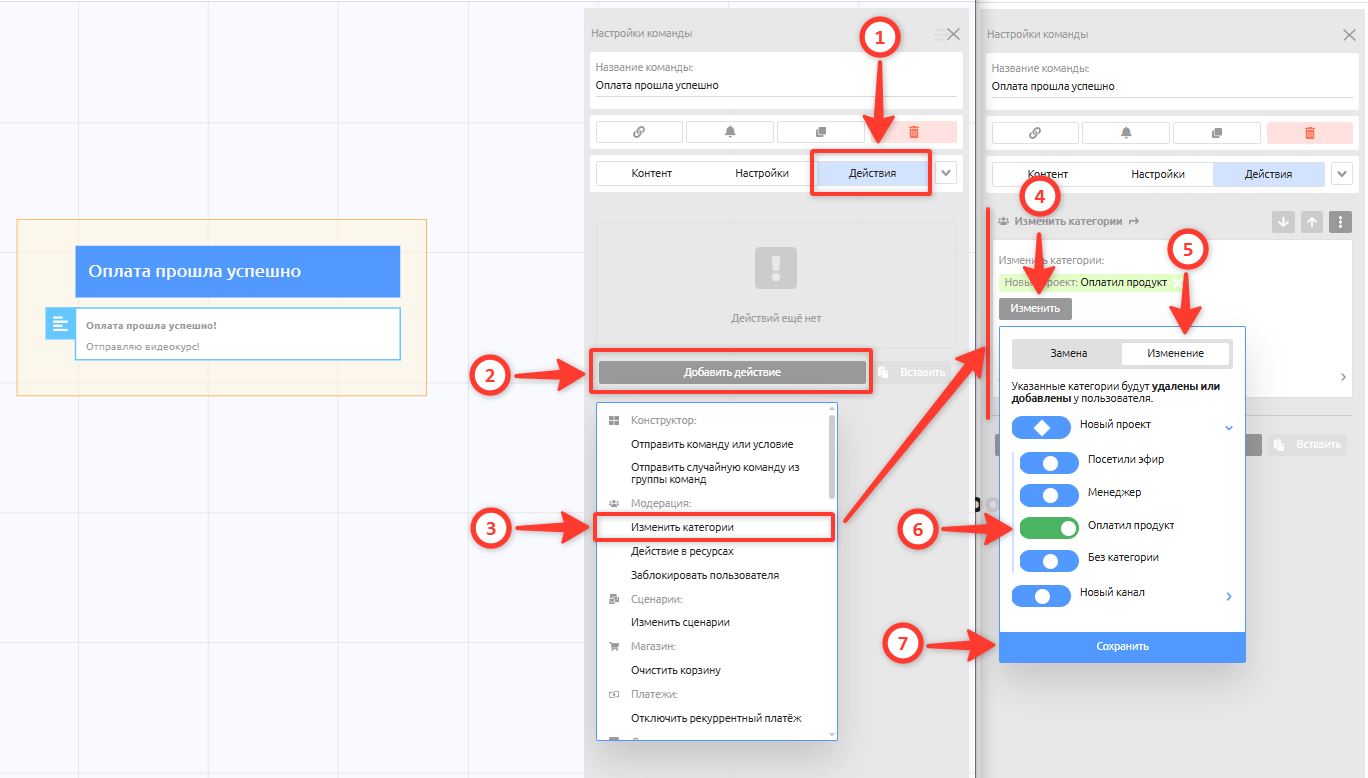
8. If you need to tag all users who bought the product or made a payment, open the "successful payment" command and go to the Action tab → Add action → Change categories, then select a category. The category must be created beforehand in the Moderation section. Learn more: What categories are and how to create them.
Where this is used:
Sending broadcasts through Posting only to users who have the payment category.
Restricting access to other paid sections or commands.
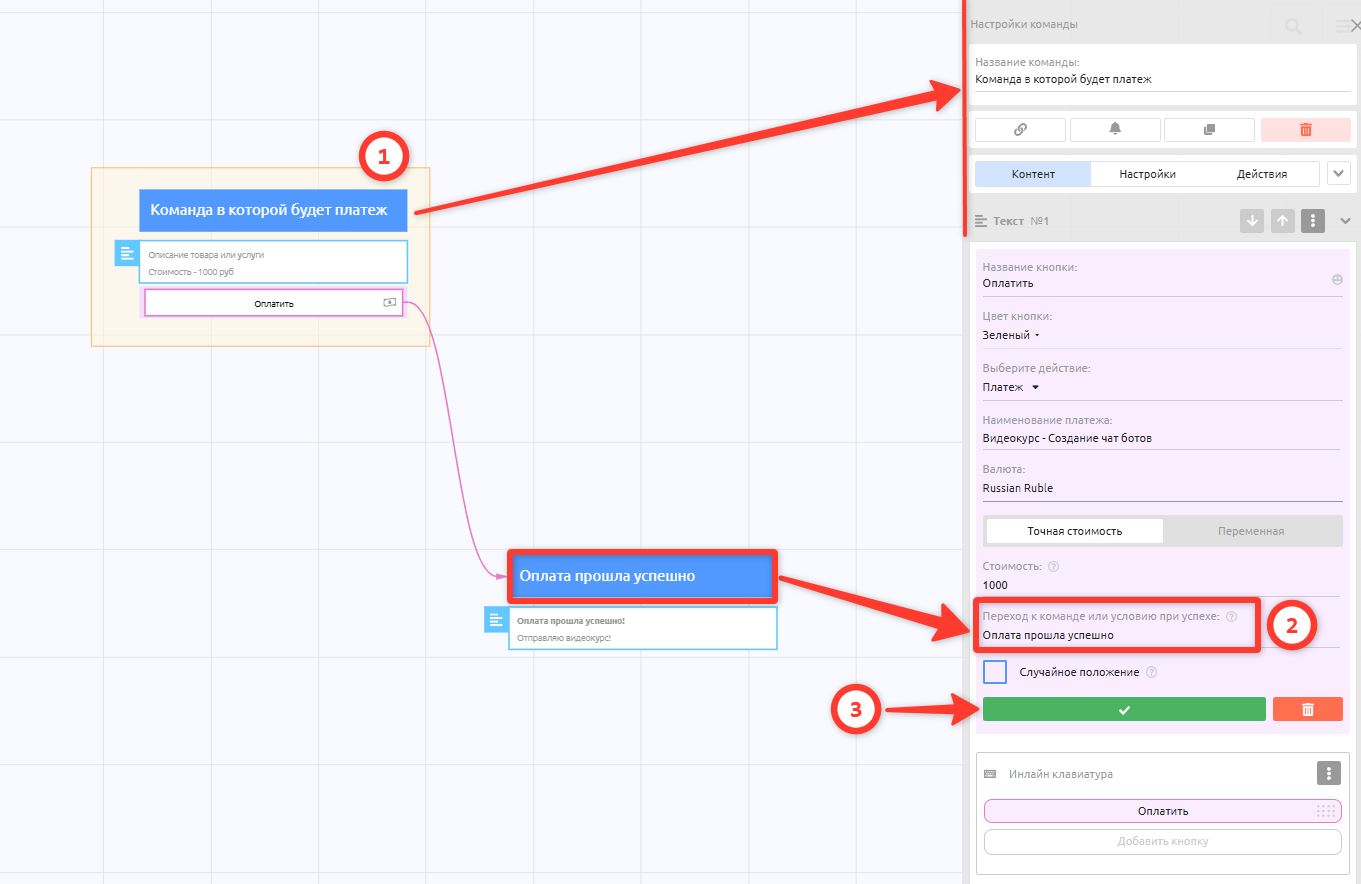
9. Go back to the command where the payment button was created and, in the button settings, enter the name of the command you created in the previous step in the "Go to command or condition on success" field → save the changes with "✔".
Free-amount payment
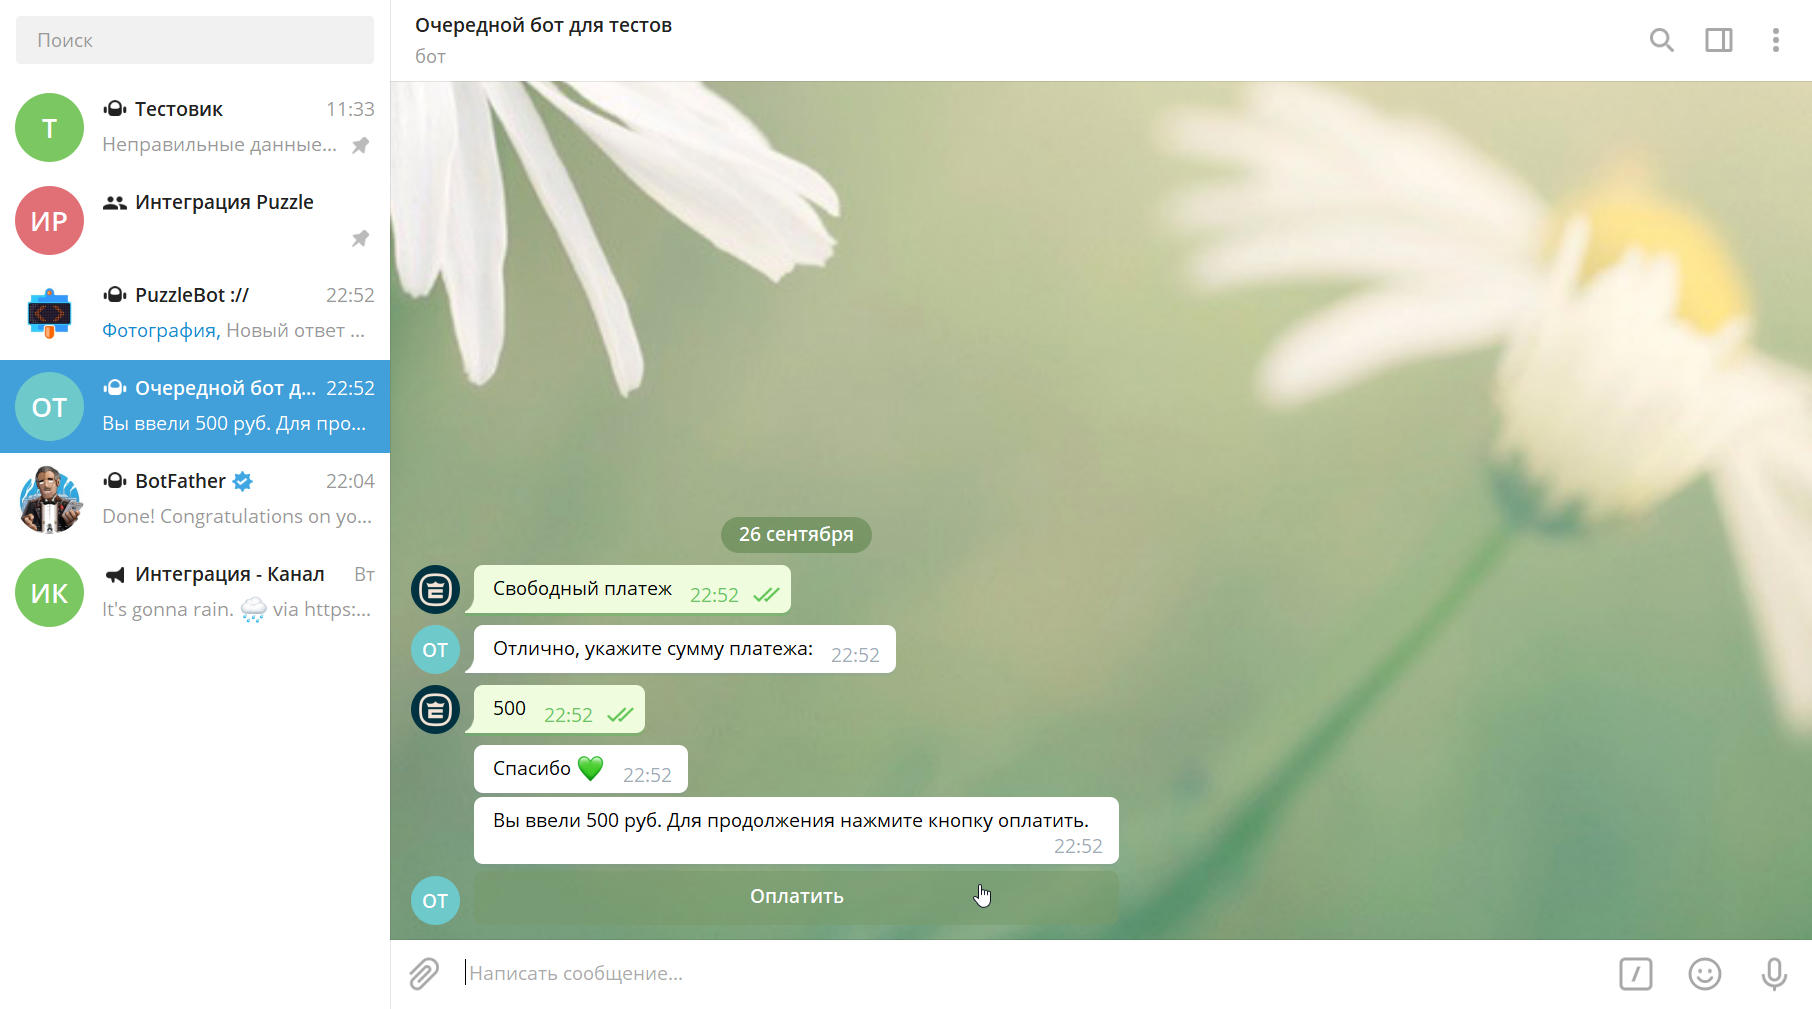
A free-amount payment, in other words a donation payment, is a dynamic/floating amount that the user sets themselves.
To set it up:
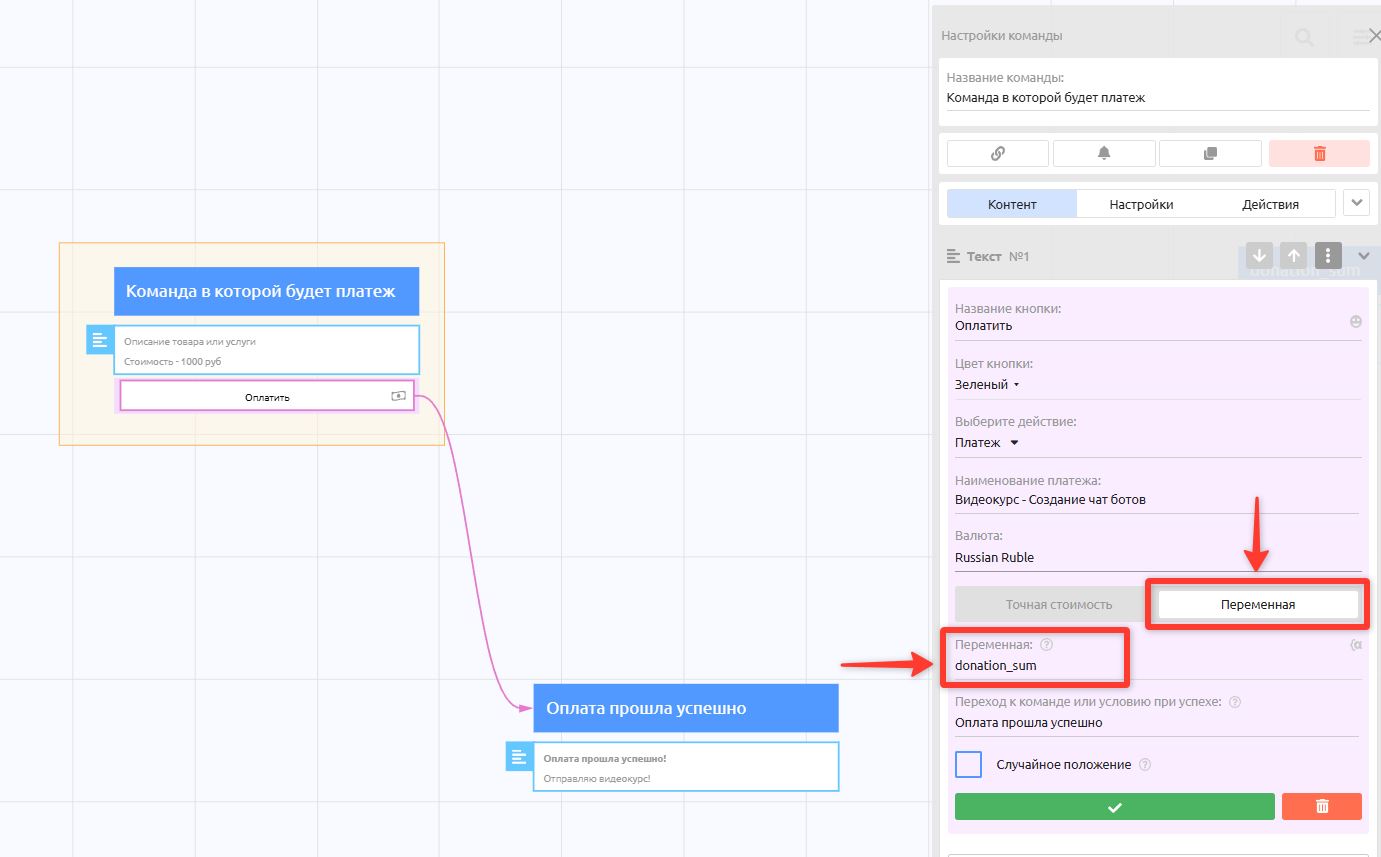
Repeat all the steps above.
However, in the payment button settings, select Variable instead of Exact price . It can be any numeric variable you created, or a variable from an Input form.
Here is how this kind of payment button works:
Since the amount is not fixed, you first need to get it from the user, and you can do that with Input forms. That is, the user first enters the desired amount and then proceeds to the payment (the value is passed automatically). Keep this in mind when ordering commands or blocks.
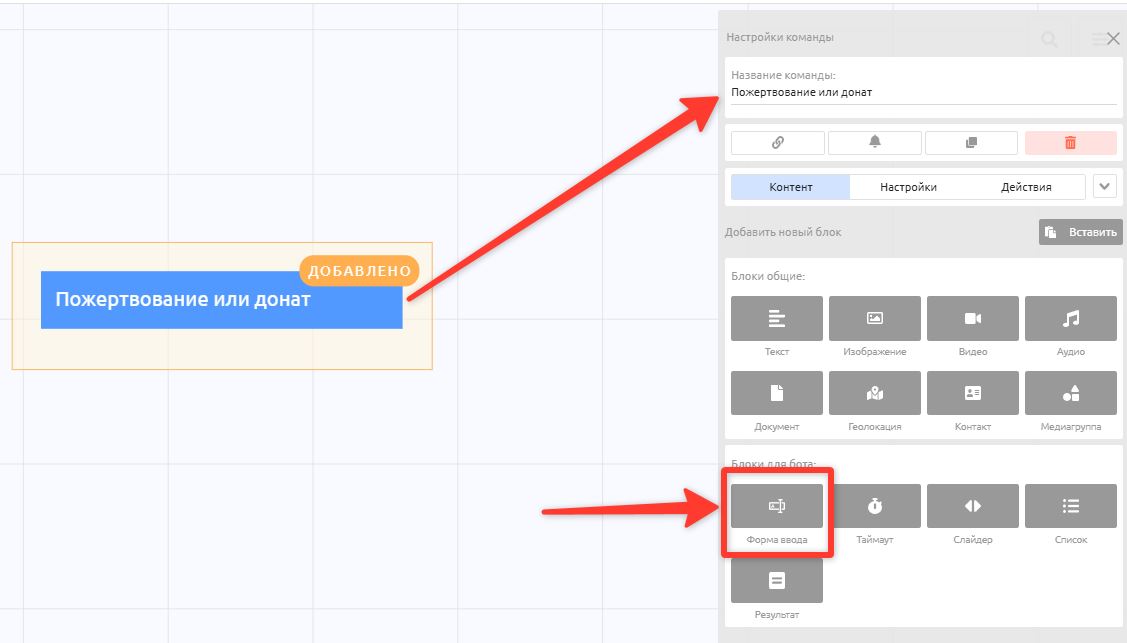
1. So, create an "Input form" block before the block with the payment button.
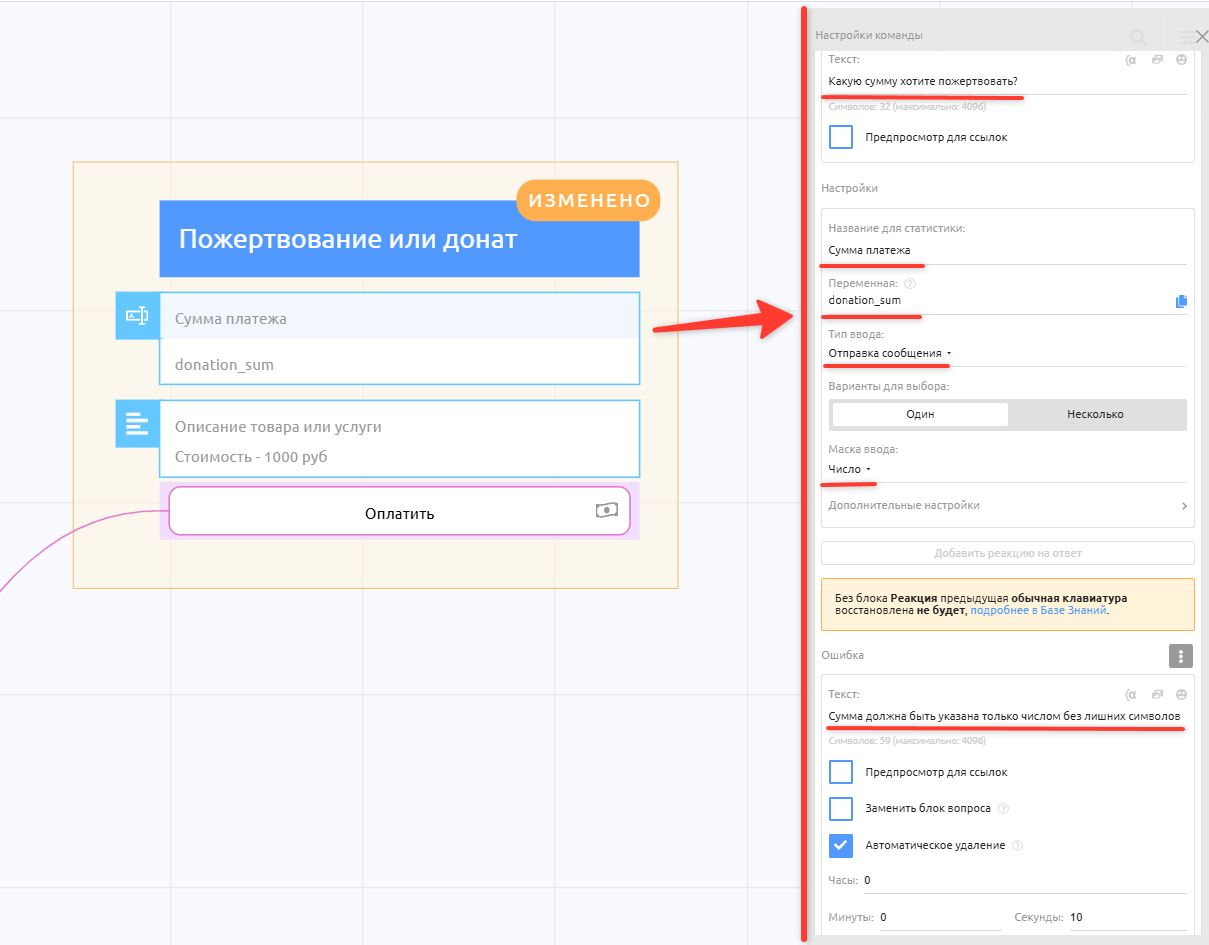
2. Fill in the form details:
Text — the message sent to the user when asking for the amount.
Name for statistics — any name.
Variable — any name, but in Latin letters and without spaces. You will specify this variable in the payment button.
Input type: Sending a message.
Input mask: Number — required, otherwise the bot will not be able to parse the amount.
Error — the error text sent if the user sends something other than a number.
3. Create the payment button as described above, but in the payment button settings select Variable → instead of Exact price and specify the variable from the Input form.
4. Optionally, you can insert the variable from the previous input form to show the entered amount before payment.
You can view payment information on the Statistics tab.
For convenience, all payments on the statistics page are grouped by name.